
Pattern Description:
The Sawtooth Star Band Pillowcase pattern creates a charming 30″ × 20″ standard-size pillowcase featuring a decorative band of eight 5″ Sawtooth Star blocks.
Each block is pieced using Flying Geese units, small squares, and a 3″ center square. The finished star band is joined to the main pillowcase body and secured with neat topstitching for a polished finish.
Materials Needed & Measurements:
| Material Description | Measurement / Quantity | Notes |
| Fabrics | From the Sweet Things and Sweet Things Coordinating Toscana collections by Northcott. | |
| Assorted prints | ¼ yard total | For the star blocks. |
| Black print | ¼ yard | For star block backgrounds. |
| Cupcake print | 1 yard | For pillowcase body and band. |
| Finished Project Size | 30″ × 20″ | Fits a standard pillow. |
| Finished Block Size | 5″ square | — |
| Cutting Instructions | Based on 42″ usable fabric width. All measurements include ¼” seam allowances. | |
| From each assorted print | 1 – 3″ square; 8 – 1¾” squares | — |
| From black print | 32 – 1¾” × 3″ rectangles; 32 – 1¾” squares | — |
| From cupcake print | 1 – 25½” × 40½” rectangle; 1 – 5½” × 40½” rectangle | — |
Instructions for Making the Sawtooth Star Band Pillowcase Pattern:
Preparation and Fabric Cutting
The pattern uses fabrics from the Sweet Things and Sweet Things Coordinating Toscana collections by Northcott.
Choose prints with good contrast to make the stars stand out beautifully against the background.
Cut the following pieces:
- From each assorted print (¼ yard total) – used for the stars:
- Cut 1 piece measuring 3″ square.
- Cut 8 pieces measuring 1¾” square.
- From the black print (¼ yard) – used for star points and backgrounds:
- Cut 32 rectangles measuring 1¾” × 3″.
- Cut 32 squares measuring 1¾”.
- From the cupcake print (1 yard) – used for the pillowcase body and band:
- Cut 1 rectangle 25½” × 40½” for the body.
- Cut 1 rectangle 5½” × 40½” for the band.
Keep all fabric pieces labeled and organized before beginning assembly.
Making the Flying Geese Units
Each Sawtooth Star block requires four Flying Geese units. These are pieced using the black print rectangles and the small assorted print squares.
Flying Geese are constructed by sewing small squares onto opposite corners of each rectangle to create the “wings” of the star.
- Place one assorted print 1¾” square on one end of a black print 1¾” × 3″ rectangle, right sides together.
- Draw a diagonal line on the wrong side of the small square from corner to corner.
- Sew directly along the drawn line, then trim ¼” away from the seam. Press the triangle open.
- Repeat on the opposite end of the rectangle using another marked 1¾” square. Stitch, trim, and press again.
- The finished Flying Geese unit should measure 3″ × 1¾”, including seam allowances.
- Repeat this process to make four Flying Geese units for one star block.
- Continue until you have a total of 32 Flying Geese units (for eight blocks).
Press all seams carefully for a crisp, professional appearance.
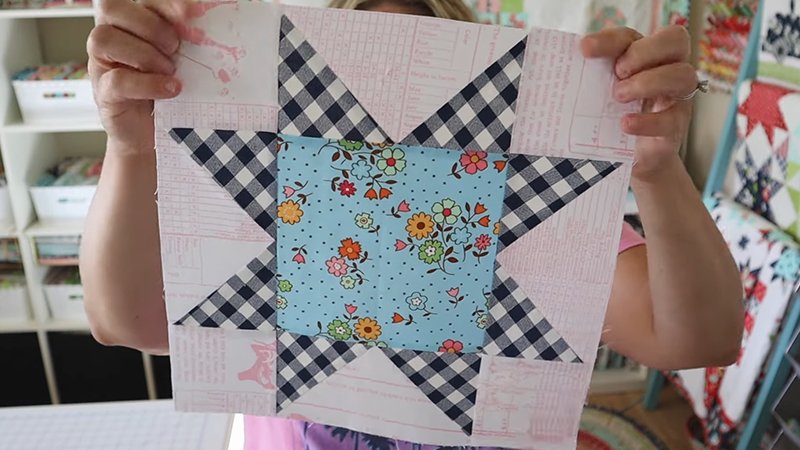
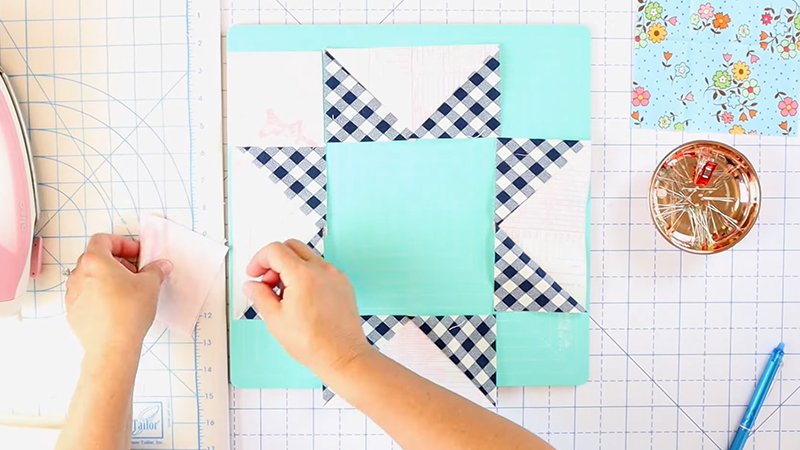
Assembling the Sawtooth Star Blocks
With your Flying Geese units complete, you can now construct the star blocks. Each block is made up of a 3″ center square, four Flying Geese units, and four small black print squares.
- Arrange the block components in three rows:
- Top row: Flying Geese unit, black square, Flying Geese unit.
- Middle row: Flying Geese unit, 3″ assorted print square, Flying Geese unit.
- Bottom row: Repeat the layout from the top row.
- Sew the pieces together in each row, aligning seams carefully.
- Press seams in opposite directions for each row to reduce bulk.
- Join the three rows together to form one complete star block.
- Press the block flat. It should measure 5½” square, including seam allowances.
- Repeat these steps until you have eight identical Sawtooth Star blocks.
Constructing the Decorative Band
The decorative band is created by joining the completed star blocks into a continuous strip. This section adds the standout visual feature to the pillowcase.
- Sew the eight Sawtooth Star blocks together side by side, aligning edges carefully.
- Press seams open to reduce thickness. The joined strip should measure 5½” × 40½”.
- Sew the long edge of this strip to one long edge of the 5½” × 40½” cupcake print strip.
- Press the seam open.
- Join the short ends of the band strip to form a loop. Press this seam open as well.
- Fold the loop in half lengthwise, wrong sides together, so the Sawtooth Stars show on the outside. Press neatly to form the finished pillowcase band.
Assembling the Pillowcase Body
- Take the 25½” × 40½” cupcake print rectangle for the pillowcase body.
- Fold it in half crosswise with right sides together, aligning all edges. The folded piece should now measure 25½” × 20¼”.
- Sew along both long sides and one short side using a ¼” seam allowance. Leave one short end open for inserting the pillow.
- Turn the pillowcase right side out and press it smooth.
Attaching the Band and Finishing
- Slide the folded Sawtooth Star band over the open end of the pillowcase body, matching raw edges and aligning seams.
- Pin securely around the entire edge.
- Sew around the edge using a ¼” seam allowance, catching all layers.
- Press the seam toward the pillowcase body.
- To secure the seam and add a professional touch, topstitch ⅛” from the seam line on the body side of the pillowcase.
This final step reinforces the seam and gives the pillowcase a clean, finished look.
Final Touches
Press the entire pillowcase once more, ensuring the band lies flat and the corners are crisp. Insert a standard pillow to admire your finished Sawtooth Star Band Pillowcase, a perfect blend of classic patchwork design and functional home décor.
Download Free PDF:


