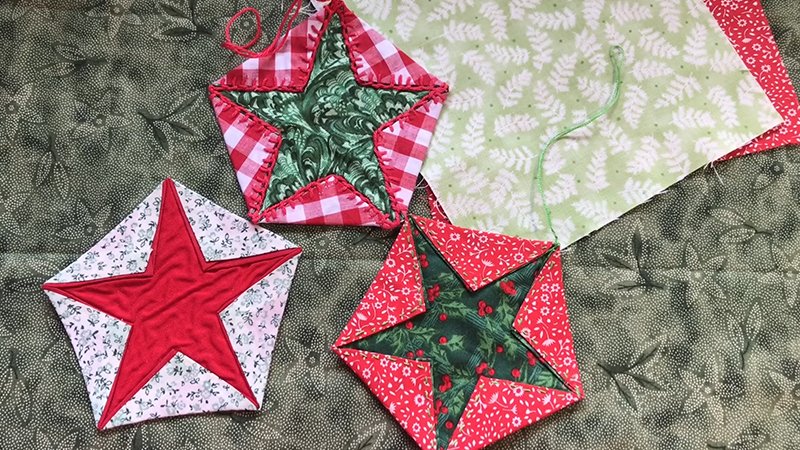
Pattern Description:
Create a festive 4.5″ x 6.5″ Christmas Star Mug Rug featuring two playful star blocks. Using coordinating fabric scraps, you’ll stitch together angled triangles for a whimsical star effect.
Layer with batting and backing, quilt with simple hand or machine stitching, and finish with neat binding. Perfect for holiday décor or as a handmade seasonal gift.
Materials Needed & Measurements:
| Item | Details / Measurements | |
| Finished Dimensions | 4.5″ x 6.5″ | |
| Pattern Basis | Based on a 1″x1″ grid (finished squares) | |
| Coordinating Fabrics | Scraps of coordinating fabrics (the author used prints from the Holiday Cheer line by Jan Shade Beach) | |
| Binding Fabric | Coordinating fabric strip for binding | |
| Background Fabric | White or other solid background | |
| Batting | Small scrap of batting | |
| Backing Fabric | Backing fabric | |
| Floss | Embroidery floss in coordinating colours (used for simple running stitch quilting) | |
| White/Background Squares | 16 squares cut at 1.5″ x 1.5″ | |
| Feature Fabric Squares | 5 squares of both feature fabrics (e.g., red and gray) cut at 1.5″ x 1.5″ (one for the center and four for the star points) | |
| Alternative Star Point Squares | If you want more wonkiness, cut 4 of the squares at 2″ x 2″ | |
| Completed Block Size | Each wonky star block should measure 3.5″ x 3.5″ | |
| White Strips (Mug Rug Top) | Two 1.5″ x 3.5″ strips of white | |
| Binding Strip Measurement | Cut 2″ wide by about 24″ |
Instructions for Making the Christmas Star Mug Rug Pattern:
Preparation and Cutting Requirements
The initial steps involve careful cutting of the fabric squares:
- Cut 16 white or background squares at 1.5″ x 1.5″.
- Cut 5 squares of both feature fabrics (e.g., red and gray) at 1.5″ x 1.5″. These squares are designated as one for the center and four for the star points for each star.
- If a little more room to play with the wonkiness is desired, cut 4 of the squares at 2″ x 2″ instead of 1.5″ x 1.5″.
Next, prepare the star point pieces by cutting all but one of each set of colored squares in half, from corner to corner, to make triangles. The remaining two full squares will be the center of each star.
Constructing the Wonky Star Points
The characteristic “wonky effect” is achieved by using varied angles when attaching the triangles:
- Lay out 8 of the white or background squares.
- Lay 4 triangles of each color over them, right sides together. Ensure that the triangle will cover the square below once flipped open.
- Stitch the long edge of the triangle to the white square to create one point of the star. To ensure the wonky effect, deliberately make sure the angles are different for each piece.
- After stitching, trim the white square below and press the triangle open.
- Attach the second set of star points by placing the remaining triangles on each unit in the same manner, stitching, trimming, and pressing open.
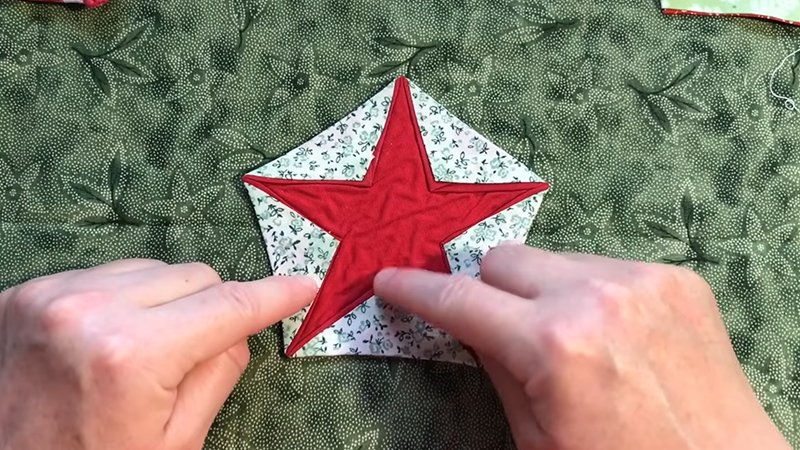
Assembling and Completing the Star Blocks
Once the star points are constructed, they must be squared up before assembly:
- Use a quilting ruler to square up each set of star points; they should measure 1.5″ x 1.5″ inches.
- Ideally, there should be a 1/4″ seam allowance at the base of each unit where the star points join, which helps prevent a gap between the points when stitching them to the center square. To help achieve this allowance, you may need to trim a little more off the white edge than the star edge.
- Arrange the star point blocks around the center square.
- Sew the three rows of squares together. When pressing seams, press the two outside rows with the seams toward the outer edge. Press the center row with the seams toward the middle block. This specific pressing strategy ensures the seams will nest when the rows are joined.
- Sew the three rows together and press the seams. Your wonky star block is complete and should measure 3.5″ x 3.5″.
- Repeat these steps for the second block.
Finishing the Mug Rug Top
The two completed star blocks are now joined to form the mug rug top:
- Cut two 1.5″ x 3.5″ strips of white.
- Sew one star block to one strip of white and press the seam toward the strip.
- Repeat this process for the second block and strip.
- Sew the two halves of the mug rug together and press the seam. The mug rug top is now complete and should measure 4.5″ x 6.5″.
Quilting and Binding
The mug rug is ready for layering, quilting, and binding:
- Layer the mug rug top with the batting and backing and baste or pin the three layers together.
- Quilt the mug rug. The author chose to use a simple running stitch around the stars with embroidery floss, but machine quilting is also an option.
- Once quilting is finished, remove basting stitches and trim the batting and backing.
- To bind the mug rug, cut a strip 2″ wide by about 24″. Fold the strip in half (wrong sides together) and press.
- Fold one end of the binding strip 1/4″ under and press.
- Start stitching the binding strip using a 1/4″ seam allowance, matching the raw edges to the mug rug, and leaving the folded end free.
- For the corners, stop stitching at the 1/4″ mark, pivot, and sew down to the corner. Cut the thread, flip the binding up at right angles away from the mug rug, and then fold it back down with the raw edges matching to create a square corner.
- When restarting the stitch, start 1/4″ in from the end so as not to catch the fold. Repeat this process for all corners.
- At the end, trim the binding strip and slip it inside the beginning of the binding; finish sewing the binding down.
- Finally, fold the binding to the back and slipstitch it down. Fold the corners to mitre at the back the same way they are on the front. The mug rug is now finished.
Download Free Pattern: