Pattern Description
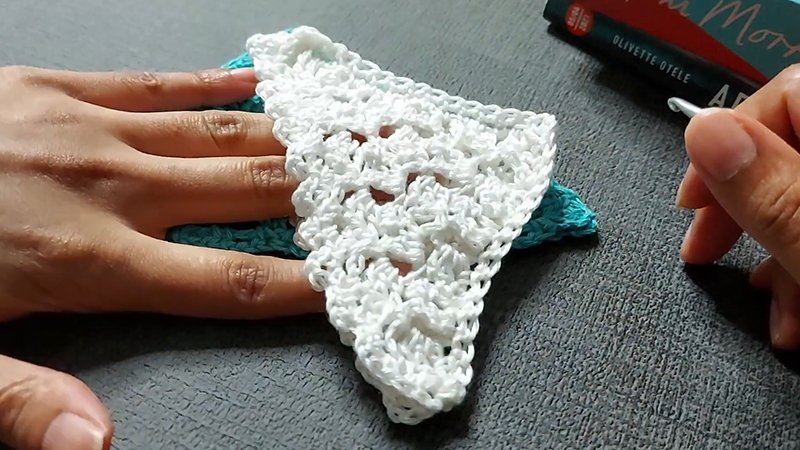
The Lotte Lace Crochet Corner Bookmark is an easy project using a beginner-friendly combination of lacy stitches.
It is worked corner to corner from the point of the right-angle triangle toward the widest edge.
The pattern involves making two lacy triangles and seaming them together, finishing with a picot edge. It uses cotton or any thin scrap yarn.
Materials Needed and Measurements:
Materials Needed
- Yarn: King Cole Giza 4-ply; 100% Giza mercerised cotton. You will need 1 ball or 30-40 m of substitute yarn. This yarn is 158 m per 50 g ball.
- Yarn alternatives: Hobbii Rainbow Lace, Rico Essentials Crochet (10-count 100% mercerised cotton thread), or Curio.
- Hook: 3 mm crochet hook
- Tools: Yarn needle, scissors, blocking mat, pins
Measurements
- Gauge / Tension: 4 rows x 2 shells measure 5 × 5 cm A shell is defined as 1 dc, 1 ch repeated 4 times, 1 dc in the same space.
- Finished Size:
- Width (long edge): approximately 11-13 cm (4.3-5 in)
- Height (short sides): approximately 8-9 cm (3-3.5 in)
Abbreviations Used:
- ch – chain stitch
- sc – single crochet
- dc – double crochet
- ch-sp – chain space
- V st – (1 dc, 1 ch, 1 dc)
- shell – (1 dc, 1 ch) 4 times, 1 dc in the same stitch or space
Instructions for Making the Lotte Bookmark Pattern:
Triangle Pattern (Make 2)
The pattern begins by chaining 5. The increases are made simultaneously at both sides of the triangle.
- Row 1: Miss 4 chains (this counts as 1 dc and 1 ch-sp). Start working into the last chain (first stitch of the chain). Work 1 dc, 1 ch three times, followed by 1 dc in the same stitch. Turn.
- Row 2: Chain 4 (this counts as 1 dc and 1 ch-sp throughout). Work 1 dc in the same stitch. Chain 5, then work 1 V st into the 3rd chain of the beginning chain 4 from the previous row. Turn.
- Row 3: Chain 4. Working into the first V st, work 1 dc, 1 ch three times, followed by 1 dc in the same stitch. Then, work 1 sc into the 3rd dc on the shell 2 rows below, working over the chain 5 from the previous row to fix it in position. Work 1 shell into the last V st. Turn.
- Row 4: Chain 4. Work 1 dc in the same stitch at the bottom of the chain 4 (this counts as the first V st). Chain 5, skip the next shell, then work 1 V st into the next sc. Chain 5, skip the next shell, then work 1 V st into the 3rd chain of the beginning chain 4 from the previous row. Turn.
- Row 5: Chain 4. Working into the first V st, work 1 dc, 1 ch three times, followed by 1 dc in the same stitch. Then, work 1 sc into the 3rd dc on the shell 2 rows below, working over the chain 5 from the previous row to fix it in position. Work 1 shell into the next V st. Then, work 1 sc into the 3rd dc on the shell 2 rows below, working over the chain 5 from the previous row to fix it in position. Work 1 shell into the last V st. Turn.
- Row 6: Chain 4. Work 1 dc in the same stitch at the bottom of the chain 4 (counts as the first V st). Chain 5, skip the next shell, work 1 V st into the next sc twice. Then, chain 5, skip the next shell, and work 1 V st into the 3rd chain of the beginning chain 4 from the previous row. Turn.
- Row 7: Chain 4. Working into the first V st, work 1 dc, 1 ch three times, followed by 1 dc in the same stitch. Work 1 sc into the 3rd dc on the shell 2 rows below, working over the chain 5 from the previous row to fix it in position.
Work 1 shell into the next V st twice. Finally, work 1 sc into the 3rd dc on the shell 2 rows below, working over the chain 5 from the previous row to fix it in position, and 1 shell into the last V st. Turn.
- Row 8: Chain 4. Work 1 dc in the same stitch at the bottom of the chain 4 (counts as the first V st).
Chain 5, skip the next shell, work 1 V st into the next sc three times. Then, chain 5, skip the next shell, and work 1 V st into the 3rd chain of the beginning chain 4 from the previous row. Turn.
- Row 9: Chain 4. Working into the first V st, work 1 dc, 1 ch three times, followed by 1 dc in the same stitch.
Work 1 sc into the 3rd dc on the shell 2 rows below, working over the chain 5 from the previous row to fix it in position.
Work 1 shell into the next V st three times. Finally, work 1 sc into the 3rd dc on the shell 2 rows below, working over the chain 5 from the previous row to fix it in position, and 1 shell into the last V st. Turn.
Crochet Corner Bookmark Edging (Row 10)
- This row adds the picot edge, which opens up the lace on the last row.
- Slip stitch into the first chain space and begin working into the same chain space. Repeat the following sequence across: work 1 sc, chain 3, 1 sc in each of the next four chain spaces, then slip stitch into the next single crochet.
Continue across, ending by working the last slip stitch into the 3rd chain of the beginning chain 4 from the previous row.
- Fasten off the first triangle. You need to make a second triangle, but do not fasten off the second one.
Finishing Instructions
To assemble the Lotte Lace Corner Bookmark:
- Line up both triangles so that the right sides are facing out.
- Crochet the two triangles together using a single crochet stitch. When joining, work around the post of the double crochet stitches on the edge.
- Ensure the seam is neat, as you are working on the right side of the bookmark.
- Fasten off and sew in all ends.
- Blocking is essential: Block firmly, pinning each picot on the long edge of the triangle to fully open up the lace pattern.
- You may use a little spray starch or watered-down PVA glue to further stiffen the bookmark. This helps it sit nicely on the corner of the book and gives excellent stitch definition.
Size Adjustments
- For a smaller bookmark: Work fewer rows and finish with a row of shells. You can also use thinner yarn and a smaller hook.
- For a larger bookmark: Work more rows, ensuring you finish with a row of shells.