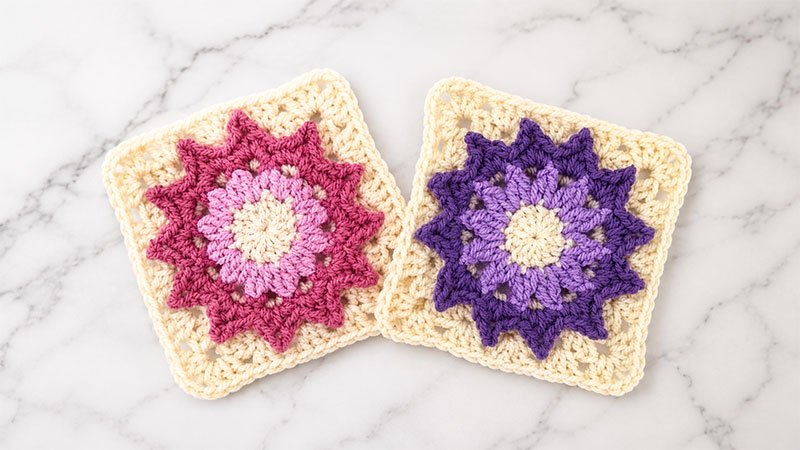
This gorgeous 6-inch afghan block features a striking, dimensional floral motif. Delicate textured petals bloom gracefully from a central ring, layered beautifully over a geometric backdrop.
Seamlessly transition from a round blossom to a crisp, structured square—perfect for building stunning heirloom blankets or floral scrap-busting projects.
Pattern Overview
-
Skill Level: Intermediate
-
Finished Size: 6″ × 6″ (15.2 cm × 15.2 cm)
-
Hook Size: 6.0-mm (J/10 US)
-
Yarn: Aran weight (Medium / Category 4)
Working Abbreviations & Guide
-
MC: Magic Circle (Magic Ring)
-
Ch: Chain
-
Sl st: Slip stitch
-
Sc: Single crochet
-
Hdc: Half double crochet
-
Dc: Double crochet
-
St / Sts: Stitch / Stitches
-
Sp / Sps: Space / Spaces
-
Picot: Chain 3, then insert hook into the front loop and the vertical bar of the previous stitch and work a slip stitch to create a small decorative point.
-
Dc2tog (Double Crochet 2 Together): A joining stitch where you leave the last loop of the first double crochet on your hook, work a second double crochet into the designated stitch, and then yarn over and pull through all remaining loops.
-
Inverted V-Stitch: Similar to a dc2tog, but worked across two separate chain spaces. You begin a double crochet in the first space (leaving the final loop on the hook) and complete it by working the second leg into the next chain space.
Detailed Step-by-Step Instructions
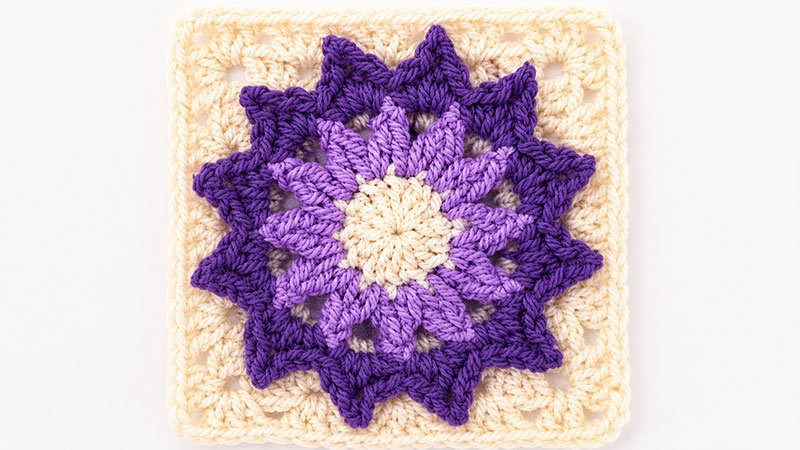
The Floral Center
Round 1: The Foundation Core
Create a Magic Circle to begin.
-
Chain 2. (Note: This chain does not count as a stitch here or anywhere else in the pattern).
-
Work 12 double crochets directly into the center of the ring.
-
Pull the yarn tail firmly to close the magic circle tightly.
-
Insert your hook into the top of the very first double crochet you made and work a slip stitch to close the ring.
Round 1 Total: 12 double crochet stitches.
Round 2: Creating the Flower Base
In this round, you will connect your stitches by sharing legs across the double crochets of Round 1.
-
Chain 2.
-
Double crochet into the very next stitch, leaving the final loop on your hook to complete your first shared dc2tog. Chain 2.
-
Now, start the next dc2tog by inserting your hook into the same stitch where the second leg of your last stitch just ended. Leave the final loop on the hook, and work the second leg into the following stitch. Pull through to complete the stitch, then chain 2.
-
Repeat this shared process 11 more times around the circle.
-
For the final stitch connection, work the first leg into the 12th stitch of Round 1, and the second leg back into the very first stitch of Round 1. Chain 2.
-
Insert your hook into the top of the first dc2tog of this round and secure with a slip stitch.
Round 2 Total: 12 dc2tog stitches and 12 chain-2 spaces.
Round 3: Back-Post Foundation loops
This round prepares a hidden mesh row for the petals to sit on.
-
Chain 1.
-
Bring your hook from back to front, and back to front again around the post of the first dc2tog stitch below to work a back-post slip stitch.
-
Chain 3.
-
Slip stitch around the post of the next dc2tog stitch, then chain 3.
-
Repeat from * to * 11 times until you go all the way around.
-
End by working a slip stitch directly into the first slip stitch of the round.
Round 3 Total: 12 slip stitches and 12 chain-3 spaces.
Round 4: Blooming the Petals
Now you will fill the chain loops from the previous round to create the dimensional petals.
-
Chain 1, then insert your hook into the first chain-3 space of Round 3 and make a slip stitch to position yourself.
-
Inside this same space, work: 1 single crochet, 1 half double crochet, 1 picot stitch, 1 half double crochet, and 1 single crochet. This completes your first petal.
-
Move directly to the next chain-3 space and repeat the sequence: [1 sc, 1 hdc, 1 picot, 1 hdc, 1 sc].
-
Repeat this sequence into every single chain-3 space around the ring.
-
Finish by slip stitching into the very first single crochet of the round.
Round 4 Total: 12 individual flower petals.
Round 5: Preparing for the Square
You will now work behind the petals you just created, attaching your yarn to the open spaces from Round 2.
-
Chain 1. Reach behind the petals of Round 4 and insert your hook into the first open chain-2 space from Round 2, making a slip stitch.
-
Chain 2, then work a double crochet into the next open chain-2 space. This counts as your first Inverted V-Stitch. Chain 2.
-
Begin the next Inverted V-Stitch by working the first leg into the same chain-2 space you just used, and the second leg into the next empty chain-2 space. Complete the stitch, then chain 2.
-
Repeat this shared stitch process 11 times around the back of the flower.
-
Finish by chaining 2 and slip stitching into the top of the first Inverted V-Stitch to close the round.
Round 5 Total: 12 Inverted V-stitches and 12 chain-2 spaces.
Squaring the Flower
Round 6: Shaping the Corners
You will now transform the circular flower into a 4-cornered square by working into the chain spaces from Round 5.
-
Chain 1, then slip stitch into the first chain-2 space from Round 5.
-
In this first space, work 1 single crochet.
-
In the next chain space, build the side slope by working: [2 single crochets, 1 half double crochet].
-
In the following chain space, build your corner by working: [1 half double crochet, 2 double crochets, chain 2, 2 double crochets, 1 half double crochet].
-
In the next chain space, slope back down by working: [1 half double crochet, 2 single crochets].
-
Repeat steps 3 through 5 a total of 3 times to shape three sides of the square.
-
To finish the final side: work [2 single crochets, 1 half double crochet] in the next space, build your last corner [1 hdc, 2 dc, chain 2, 2 dc, 1 hdc] in the following space, and work [1 half double crochet, 1 single crochet] into the very first chain space where you started the round.
-
Join with a slip stitch into the first single crochet.
Round 6 Total: 12 stitches per side and 4 chain-2 corner spaces.
Round 7: Solidifying the Edges
Instead of working into the loops on top, this round is worked into the spaces between the stitch posts.
-
Chain 1, then insert your hook directly between the posts of the first two single crochets from the previous row and slip stitch. Chain 2.
-
In this exact same space between the posts, work 3 double crochets.
-
Skip ahead and insert your hook between the posts of the next two half double crochets, working 3 double crochets.
-
Now reach the corner chain-2 space and work your corner cluster: [3 double crochets, chain 2, 3 double crochets].
-
Insert your hook between the posts of the next two half double crochets and work 3 double crochets.
-
Insert your hook between the posts of the second and third single crochets from the previous round and work 3 double crochets.
-
Repeat steps 2 through 6 a total of 3 times to complete three sides of your square.
-
To finish the final side: work 3 double crochets between the next two half double crochets, work a corner cluster [3 dc, chain 2, 3 dc] in the final corner space, and finish with 3 double crochets between the last two half double crochets.
-
Close the round by slip stitching into the top of the first double crochet.
Round 7 Total: 15 stitches per side and 4 chain-2 corner spaces.
Round 8: The Border Finish
-
Chain 1.
-
Work 1 half double crochet into the top of every stitch across the sides.
-
Whenever you reach a corner chain-2 space, work: [1 half double crochet, chain 2, 1 half double crochet] directly into the space.
-
Continue this simple border all the way around the square.
-
Cut your yarn, pull it through, and securely weave in any loose ends with your tapestry needle.
Round 8 Total: 17 stitches per side and 4 corner chain spaces.