Pattern Description:
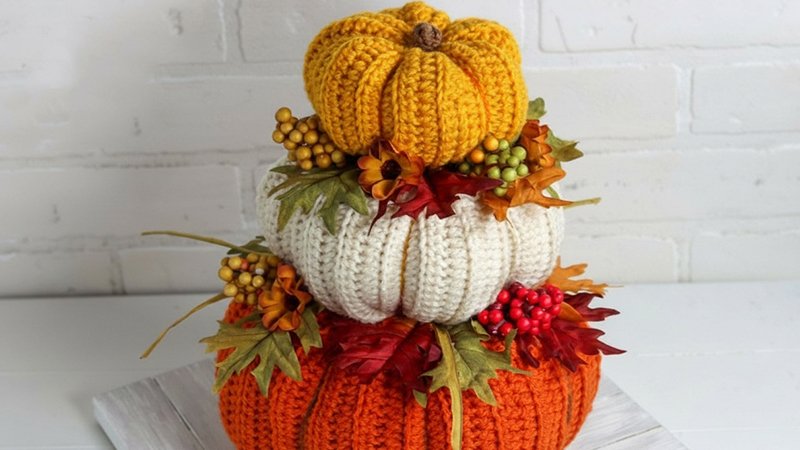
This easy and beautiful design creates a stunning stacked pumpkin table topper that features decorative leaves.
The pumpkins are made by crocheting basic rectangles, which are then gathered and sewn to achieve the pumpkin shape.
The pattern is highly customizable; you can choose different colors, adjust the size by using two pumpkins, or substitute floral picks like sunflowers.
Materials Needed & Measurements:
Materials Needed
Yarn (Red Heart Super Saver):
- Large Pumpkin: 3.7 oz or 193 yds of Carrot.
- Medium Pumpkin: 2.1 oz or 110 yds of Aran.
- Small Pumpkin: 1 oz or 52 yds of Gold.
- Stem: 1 yd of Cafe Latte.
Tools & Notions:
- Size H 5mm Crochet Hook.
- Yarn Needle.
- Scissors.
- Polyfil.
- Hot Glue (Optional).
- Faux Floral Picks of Fall Leaves, Berries, Flowers, etc..
Measurements
Gauge: Gauge: 8 HDC X 5 Rows = 2 inches.
Size Information:
- Large Pumpkin: 9 inches wide and 4.5 inches tall.
- Medium Pumpkin: 7.5 inches wide and 3.5 inches tall.
- Small Pumpkin: 5.5 inches wide and 2.5 inches tall.
- Final Centerpiece: 9 inches wide and 10.5 inches tall.
Stitches and Abbreviations
- CH – Chain
- SC – Single Crochet
- DC – Double Crochet
- BLOHDC – Back Loop Only Half Double Crochet
- SLST – Slip Stitch
- ST(s) – Stitch(es)
- MC – Magic Circle
Instructions for Making the Fall Crochet Centerpiece Pattern:
Crochet Pumpkin Bodies
The pumpkins are constructed from basic rectangles. Gauge is 8 HDC X 5 Rows = 2 inches.
Large Crochet Pumpkin
Use the Carrot color yarn (3.7 oz / 193 yds specified). The final size is 9 inches wide and 4.5 inches tall.
- CH 41.
- Row 1: Work a HDC in 2nd CH from hook. HDC in next 39 CH (40).
- Row 2–54: CH1, turn, BLOHDC in each ST across. (40).
- Fasten off, leaving a 24-inch yarn end to use for sewing and gathering the pumpkin.
Medium Crochet Pumpkin
Use the Aran color yarn (2.1 oz / 110 yds specified). The final size is 7.5 inches wide and 3.5 inches tall.
- CH 31.
- Row 1: Work a HDC in 2nd CH from hook. HDC in next 29 CH (30).
- Row 2–42: CH1, turn, BLOHDC in each ST across. (30).
- Fasten off, leaving a 20-inch yarn end to use for sewing and gathering the pumpkin.
Small Crochet Pumpkin
Use the Gold color yarn (1 oz / 52 yds specified). The final size is 5.5 inches wide and 2.5 inches tall.
- CH 21.
- Row 1: Work a HDC in 2nd CH from hook. HDC in next 19 CH (20).
- Row 2–30: CH1, turn, BLOHDC in each ST across. (20).
- Fasten off, leaving an 18-inch yarn end to use for sewing and gathering the pumpkin.
Small Pumpkin Stem
Use the Cafe Latte yarn (1 yd specified). The stem pattern is worked in continuous rounds.
- Row 1: Work 6 SC into an MC.
- Alternate Row 1: CH2, Work 6 SC into 2nd CH from hook.
- Row 2–5: SC in next 6 STs.
- Fasten off. Do not weave in the ends, as they will be stuffed into the center of the pumpkin.
Gathering Your Crochet Pumpkins
Once the rectangular pieces are complete, they must be gathered and sewn into the pumpkin shape.
- Step 1: Sew a gathering ST along the bottom of the squash and pull tight.
- Step 2: Make 2 STs to secure the gather.
- Step 3: Use a whip ST to sew the two sides of the squash together.
- Step 4: When you reach the top, knot your two yarn ends together to secure.
- Step 5: Sew a gathering ST around the top of the pumpkin.
- Step 6: Stuff the pumpkin with Polyfil and tuck your stem into the top (for the small pumpkin). Pull the gathering ST tight to close the top.
- Step 7: Knot the two yarn ends together to secure the gather. Make a few STs to further secure the stem, and knot the yarn ends together again.
At this point, you have two options for finishing the structure: cinching or segmenting.
Finishing Option 1: Cinched Pumpkin
This method uses the existing yarn ends to pull down the center.
- Step 9: Use a yarn needle to thread your yarn ends from the top to the bottom of the pumpkin.
- Step 10: Pull the yarn ends tight and knot them together.
- Step 11: Clip your yarn ends and hide them inside the pumpkin.
Finishing Option 2: Segmented Pumpkin
This option creates defined ridges, and this method was used for the centerpiece shown in the photos. You will hide your current yarn ends and use a new strand of yarn for segmentation.
- Step 9: Use an 18–24 inch piece of yarn and needle to thread the yarn from the bottom to the top of the center of the pumpkin. Leave about 6 inches hanging out the bottom.
- Step 10: Wrap the yarn around the side of the pumpkin and reinsert the needle from the bottom to the top.
- Step 11: Wrap the yarn around the side of the pumpkin once more, directly across from the other yarn. This action will cut the pumpkin in half.
- Step 12: Pull both yarn ends tight to create a ridge in the sides of the pumpkin, segmenting it into two halves. Knot the two yarn ends together at the bottom.
- Step 13: Using the same piece of yarn, repeat Steps 9–12 to create a total of 6 segmented sections for the small and medium pumpkins, or 8 sections for the large pumpkin.
- Step 14: Repeat Steps 1-14 for each pumpkin, then stack them.
Decorating the Centerpiece
This final part is optional but enhances the centerpiece by using faux floral picks.
- Step 1: Take the floral picks (leaves, flowers, berries, etc.) and cut or pull off the pieces you plan to use. Wire cutters may be necessary if they have a wire center.
- Step 2: Arrange the floral pieces on top of the largest pumpkin. Occasionally place the medium pumpkin on top to ensure the floral pieces are spread out sufficiently.
- Step 3: Glue or sew the floral pieces in place.
- Step 4: Repeat Steps 2 and 3 for the medium size pumpkin.
- Step 5: Stack the pumpkins up, and the centerpiece is complete.
- Step 6 (Optional): If desired, sew or glue the three pumpkins together.