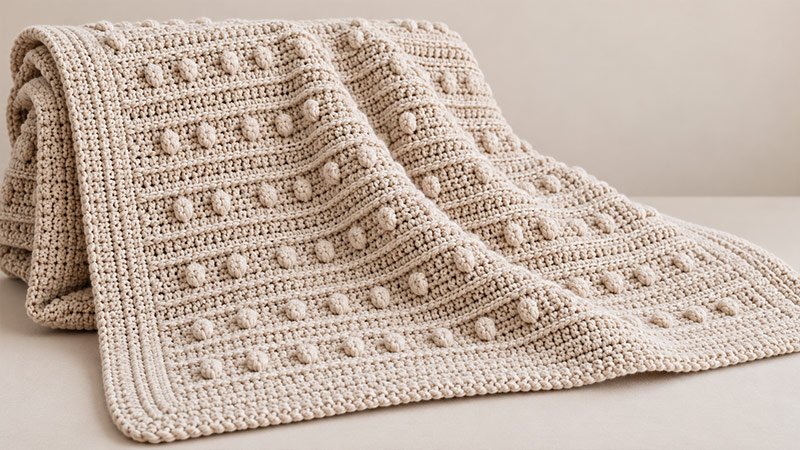
Make a soft throw with neat ridges. Small raised dots look like stars in a calm sky. Use half double crochet, single crochet, and bobble stitches. The stitches form a simple repeat. Work the throw in rows. Then add a smooth border to frame the raised stitches.
Use one shade for a calm look. Or use two shades to make the stitch bands stand out. The steps below show how to work each stitch. They give row counts and border steps, too. Learn how to change the size to suit your home.
Materials
- Yarn: Worsted weight, category #4.
- Estimated yarn amount: About 2,000–2,300 yards, with the border. Make a sample to check how much you need.
- Suggested colors: Use one main shade. Or add a second shade for the bobble bands.
- Crochet hook: Use a 5.5 mm hook. Change the size as needed to meet the gauge.
- Stitch markers: Use at least four. Place one at each border corner.
- Tapestry needle: Use this to weave in yarn ends.
- Scissors.
- Measuring tape.
Pick yarn that feels soft on your skin. Read the care label. It tells you how to wash and dry your throw.
Gauge:
Target gauge: 16 sts and 12 rows = 4 × 4 inches. Check this across the full four-row stitch repeat. Measure it after gentle blocking.
Count each bobble as one st.
To make a gauge swatch:
- Ch 33.
- Work the four pattern rows below. Each row has 32 sts.
- Repeat these four rows to reach 20 rows.
- Wash and dry the swatch. Follow the yarn label’s care steps.
- Measure the center of the swatch. Stay clear of the edges.
If you count more than 16 sts in 4 inches, try a larger hook. If you count fewer, try a smaller hook.
Planned finished size: About 42 × 54 inches. This includes a border about 1 inch wide on each side.
The main panel should be about 40 × 52 inches at the target gauge. These sizes are estimates. They still need to be checked with a test sample.
Pattern Notes:
- This pattern uses US crochet terms.
- Work the main panel in rows, back and forth.
- Turn at the end of each panel row.
- The turning ch does not count as a st.
- Work the first st in the first st of the last row.
- Each panel row has 160 sts.
- Work through both top loops unless BLO is stated.
- Each bobble takes up one st space. It counts as one full st.
- Repeat the stitch pattern every four rows.
- Each bobble row has 10 bobbles.
- The side with raised bobbles is the front.
- Once the panel is done, add the border.
- Your tension may change how much yarn you need. It may also change the size and border placement.
For two colors, use Color A for both hdc rows. Use Color B for the bobble row and the next sc row. Use Color A for the border.
Abbreviations
- BLO: Back loop only
- ch: Chain
- dc: Double crochet
- hdc: Half double crochet
- rep: Repeat
- sc: Single crochet
- sl st: Slip stitch
- st / sts: Stitch / stitches
- yo: Yarn over
- BO: Bobble stitch
Pattern
1. Learn the Stitches
Single crochet — sc
Insert the hook into the stated st. Yo and pull up a loop. Yo and pull through both loops.
Half double crochet — hdc
Yo and insert the hook into the stated st. Yo and pull up a loop. Yo and pull through all three loops.
Back loop only — BLO
Hold the row as you would to work it. Find the two loops at the top of the st. They form a V. Insert the hook under the loop farthest from you.
Bobble — BO
Work all parts of the bobble in the same st:
- Yo and insert the hook into the stated st.
- Yo and pull up a loop.
- Yo and pull through two loops. Keep the rest of the loops on the hook.
- Repeat Steps 1–3 four more times in the same st.
- You now have six loops on the hook.
- Yo and pull through all six loops.
The BO counts as one st. Do not add a chain to close it.
2. Make the Starting Chain
Ch 161.
Keep the chains loose and even. Tight chains may pull the base edge in.
If needed, use a hook one size up. Switch to your main hook before you start Row 1.
3. Work the First Four Rows
Row 1: Plain Hdc Row
Hdc in the second ch from the hook. Hdc in each ch left across. Turn.
Count: 160 hdc.
The skipped ch does not count as a st.
Row 2: Ridge Row
Ch 1. Hdc in the BLO of each st across. Turn.
Count: 160 hdc.
Use the back loop of the first st too. Do the same for all sts left. The front loops stay free and form a ridge.
Row 3: Bobble Row
Ch 1. Sc in the first 7 sts.
Work these steps 10 times:
- BO in the next st.
- Sc in the next 15 sts. Skip this step after the tenth BO.
After the tenth BO, sc in the last 8 sts. Turn.
Count: 150 sc and 10 BO = 160 sts.
Place the bobbles at sts 8, 24, 40, 56, 72, 88, 104, 120, 136, and 152.
Check the spots after the first few bobbles. Each pair should have 15 sc between them.
Row 4: Sc Row
Ch 1. Sc in each st across. Turn.
Count: 160 sc.
Work one sc in the top of each BO. Do not work in a gap next to the bobble.
4. Repeat the Pattern
Rows 5–156: Work Rows 1–4 38 more times. Work into the stitches in each row. Do not work into starting chains.
You will have 39 full four-row repeats. This gives you 156 rows in all.
At the target gauge, the panel should be about 52 inches long.
Fasten off at the end of Row 156. Leave a long tail. It should be long enough to weave in well.
5. Change Colors, If Desired
For the suggested two-color version:
- Work Rows 1–2 in Color A.
- Change to Color B in Row 2. Do this on the last hdc’s final pull-through.
- Work Rows 3–4 in Color B.
- Change back to Color A in Row 4. Do this on the last sc’s final pull-through.
- Repeat these steps.
Cut the old yarn. Leave a tail to weave in. Keep the joins loose so the edges stay relaxed.
6. Check the Panel Before Adding the Border
Lay the panel flat.
Check these points:
- Both long edges are straight.
- Each row has 160 sts.
- Each bobble row has 10 bobbles.
- The starting edge lies flat.
- The bobbles face the side you chose as the front.
Gently push any bobbles that face the back toward the front.
If the lower edge pulls in, fix the tension in the starting chain. Do this before you add the border.
7. Add the Border
Lay the throw with its front facing you. Join the border yarn at a top corner. Use the first st.
Work the border in rounds. Do not turn.
Round 1: Sc Foundation
- Ch 1. Work 3 sc in the corner st. Mark the middle sc.
- Sc in each st across the top. Stop before the last st.
- Work 3 sc in the last st. Mark the middle sc.
- Sc evenly down the first side. Stop before the bottom corner.
- Work 3 sc in the bottom corner chain position. Mark the middle sc.
- Sc across the free starting-chain positions. Stop before the next corner.
- Work 3 sc in that corner position. Mark the middle sc.
- Sc evenly up the last side.
- Join with a sl st to the first sc.
Use each corner position just once.
On each side, start with 5 sc per four-row repeat:
- 1 sc next to the plain hdc row.
- 2 sc next to the BLO hdc row.
- 1 sc next to the bobble row.
- 1 sc next to the plain sc row.
Use this as a guide. Change the count near the corners as needed. Do the same elsewhere to keep the edge flat.
If the border waves, use fewer side sts. If it pulls inward, add a few.
Round 2: Hdc Border
Ch 1. Hdc in each st around. Work 3 hdc in each marked corner st.
Move each marker to the middle hdc of that group.
Join with a sl st to the first hdc.
Round 3: Sc Finish
Ch 1. Sc in each st around. Work 3 sc in each marked corner st.
Join with a sl st to the first sc. Fasten off.
Each round after Round 1 adds eight sts. Add these to the last round’s count.
8. Finish the Throw
Weave all yarn ends through a few stitches on the back. Weave back the other way, then trim the tails.
Wash the throw as the yarn label says. Lay it flat. Gently shape the edges.
Do not stretch the bobbles flat. Let the throw dry fully, then fold it.
9. Adjust the Size
To change the width: Add or remove starting chains in sets of 16.
Keep the first 7 sc on each bobble row. Keep the last 8 sc, too.
For each change of 16 sts, add or remove one bobble. Add or remove its 15-sc section as well.
At the target gauge, 16 sts add about 4 inches to the panel width.
To change the length: Add or remove full four-row repeats.
At the target gauge, each four-row repeat adds about 1⅓ inches.
Change the yarn amount to suit the new width or length.