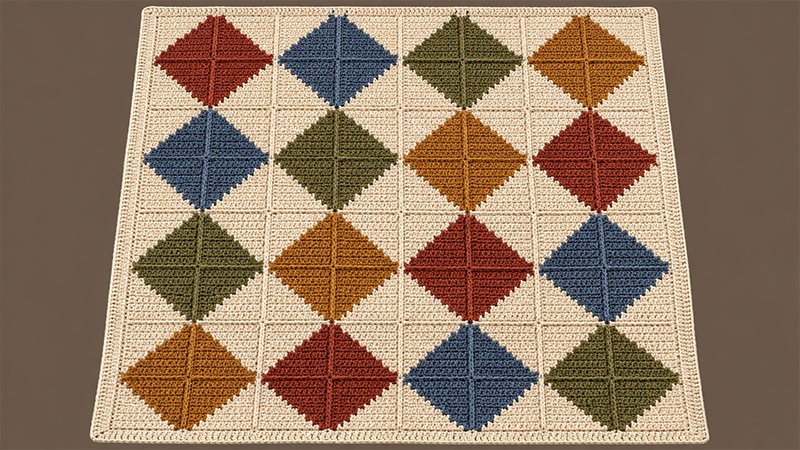
The Barn Quilt Blanket has bold diamond shapes made from squares. Each square is half cream and half a second color. Join four squares to make one quilt block. Then join the blocks to make the throw.
Use single crochet, change colors, and sew the seams. A cream edge frames the shapes.
Skill level: For those with some skill, or new crocheters who can change colors and sew squares.
Finished size: About 42 × 42 inches, with the edge.
This is a new design made for this request. It has not been tested yet. The size and yarn needs are estimates. Make a test square and check its size first.
Materials
- Worsted-weight yarn, Category 4: About 2,400–2,800 yards total.
- Color A — Cream: 1,400–1,600 yards, including seams and border.
- Color B — Rust: 250–300 yards.
- Color C — Slate blue: 250–300 yards.
- Color D — Olive: 250–300 yards.
- Color E — Golden brown: 250–300 yards.
- Crochet hook: US H/8, 5 mm, or the size needed to meet gauge.
- Yarn needle.
- Scissors.
- Measuring tape.
- Stitch markers.
- Small yarn bobbins, if desired.
Use yarns of the same weight and fiber type. Choose a yarn that suits the care needs of a blanket.
Gauge
16 sc × 16 rows = 4 × 4 inches. Check this once you wash and dry the swatch. Follow the care steps on the yarn label.
Each finished square should be about 5 × 5 inches.
Make a Gauge Swatch
- Ch 25.
- Sc in the second ch from the hook. Sc in each ch across. 24 sc.
- Ch 1, turn. Sc in each st across.
- Repeat Step 3 until you have 24 rows.
- Wash and dry the swatch.
- Measure the center 4 inches. Keep clear of the edges.
If you have too many sts in 4 inches, try a larger hook. If you have too few, try a smaller hook.
Check both stitch and row gauge. The blocks must be square. This helps the quilt shapes line up well.
Pattern Notes
- Use US crochet terms.
- Work each square flat in rows.
- Ch 1 at the start of each row. It does not count as a st.
- Each square has 20 sc per row and 20 rows.
- Work all sts through both loops.
- Move the color change by one st each row. This makes a stepped diagonal.
- Use a strand of yarn for each color section.
- Leave the yarn you do not use at the color change. Pick it up on the next row.
- Do not carry that yarn across a full row.
- Change colors on the last pull-through of the st just before the new color.
- Leave an 8-inch tail at each square’s start and end.
- Use 64 squares for the blanket. Place them in an 8 × 8 grid.
- Join four squares to form one diamond block. The blanket has 16 diamond blocks.
- The yarn you need will vary with gauge and how you sew the seams.
Abbreviations
- ch: Chain
- sc: Single crochet
- sl st: Slip stitch
- st / sts: Stitch / stitches
- RS: Right side
- WS: Wrong side
- rep: Repeat
- A: Cream yarn
- X: The colored yarn used for that square
Written Instructions
Step 1: Plan the Squares
Make the following two-color squares:
- 16 squares: A and B.
- 16 squares: A and C.
- 16 squares: A and D.
- 16 squares: A and E.
Each group of 16 squares makes four diamond blocks in that color.
Step 2: Learn the Color Change
Work the last sc before you change colors:
- Put the hook into the st.
- Yarn over with the old color. Draw up a loop.
- Let the old yarn hang on the WS.
- Yarn over with the new color.
- Pull it through both loops.
This stitch is in the old color. Use the new color for the next st.
Keep the strands snug at the join. Do not pull them tight.
Step 3: Crochet a Two-Color Square
Use A and one chosen color, shown below as X.
With A, ch 21.
Row 1: Sc in the second ch from the hook and in the next 18 ch. Change to X on the last pull-through of the 19th sc. With X, sc in the last ch. 20 sc: 19 A, 1 X.
For every row that follows, ch 1 and turn. Work the color counts below in the order shown.
| Row | First color section | Second color section |
|---|---|---|
| 2 | 2 sc in X | 18 sc in A |
| 3 | 17 sc in A | 3 sc in X |
| 4 | 4 sc in X | 16 sc in A |
| 5 | 15 sc in A | 5 sc in X |
| 6 | 6 sc in X | 14 sc in A |
| 7 | 13 sc in A | 7 sc in X |
| 8 | 8 sc in X | 12 sc in A |
| 9 | 11 sc in A | 9 sc in X |
| 10 | 10 sc in X | 10 sc in A |
| 11 | 9 sc in A | 11 sc in X |
| 12 | 12 sc in X | 8 sc in A |
| 13 | 7 sc in A | 13 sc in X |
| 14 | 14 sc in X | 6 sc in A |
| 15 | 5 sc in A | 15 sc in X |
| 16 | 16 sc in X | 4 sc in A |
| 17 | 3 sc in A | 17 sc in X |
| 18 | 18 sc in X | 2 sc in A |
| 19 | 1 sc in A | 19 sc in X |
| 20 | 20 sc in X | None |
Each row has 20 sc.
On Row 20, leave A unused and work the whole row with X.
Fasten off both colors. Leave tails for weaving in.
Step 4: Check and Block the Squares
Lay the first square flat.
- Check for 20 sts across and 20 rows.
- Check that the color change forms a diagonal.
- Check that the size is about 5 × 5 inches.
Once the size is right, make the rest of the squares.
Wash and dry them as the yarn label says. Shape each square to the same size. Let them dry fully before you join them.
Step 5: Arrange One Diamond Block
Use four squares with the same colored yarn.
Place them in a 2 × 2 layout, with the same chosen face up. Rotate each square so its cream half points toward an outer corner.
| Square position | Cream half points toward | Colored half points toward |
|---|---|---|
| Top left | Top-left outer corner | Center |
| Top right | Top-right outer corner | Center |
| Bottom left | Bottom-left outer corner | Center |
| Bottom right | Bottom-right outer corner | Center |
The four colored halves meet to form a diamond. The diagonal edges will have a small stepped texture.
Step 6: Sew the Diamond Block
Use A and a yarn needle.
- Lay the two top squares side by side.
- Line up their edges and corners.
- Join the edges that touch with a flat whipstitch.
- Rep for the two bottom squares.
- Sew the top pair to the bottom pair.
Pass the needle through one edge loop on each square. Use the loop closest to the seam. Keep the yarn loose so the block lies flat.
Match 20 edge positions on each seam. For side seams, use one spot per row end.
Each joined block should be about 10 × 10 inches.
Make:
- 4 rust diamond blocks.
- 4 slate blue diamond blocks.
- 4 olive diamond blocks.
- 4 golden brown diamond blocks.
Step 7: Lay Out the Blanket
Arrange the 16 blocks in four rows.
| Block row | Block 1 | Block 2 | Block 3 | Block 4 |
|---|---|---|---|---|
| 1 | Rust | Slate blue | Olive | Golden brown |
| 2 | Slate blue | Olive | Golden brown | Rust |
| 3 | Olive | Golden brown | Rust | Slate blue |
| 4 | Golden brown | Rust | Slate blue | Olive |
Check that all blocks have the same face up.
Step 8: Join the Blocks
With A, sew the four blocks in each row together.
Then sew the four block rows together.
Match the square corners and seam crossings before sewing. Place markers at these points to help keep the joins even.
The blanket body should measure about 40 × 40 inches.
Step 9: Work the Border
With the RS facing, join A at an outer corner.
Round 1
Ch 1. Work 3 sc in the corner. Mark the middle sc.
Continue around:
- Across the top: Work 1 sc in each st.
- Along each side: Work 1 sc in each row end.
- Across the bottom: Work 1 sc in each foundation ch that holds a stitch.
- At the other corners: Work 3 sc in each corner. Mark the middle sc.
At each corner, the 3-sc group replaces the single edge stitch. Do not work the same corner twice.
At seam crossings, skip the sewing yarn. Work into the crochet edges on either side.
Sl st to the first sc to join. Do not turn.
Lay the blanket flat. If an edge pulls inward, add a few evenly spaced sc. If it waves, remove a few.
Rounds 2–4
Ch 1.
Sc in each st around. Work 3 sc in each marked corner st.
Move each marker to the middle sc of the new corner group.
Sl st to the first sc to join. Do not turn.
After Round 4, fasten off.
Four rounds should add about 1 inch to each edge at the stated gauge.
Step 10: Finish the Blanket
Weave in all tails on the WS. Pass each tail through several stitches, then change direction to help hold it in place.
Wash the blanket as directed on the yarn label. Lay it flat and shape the edges and corners.
Let it dry fully before use.