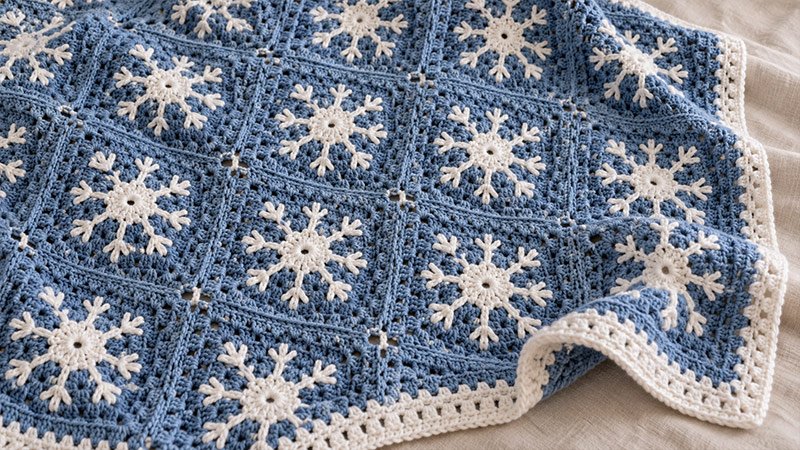
This blanket has white snowflakes in blue granny squares. Start each square with two white rounds. Add three blue rounds to form a square. Stitch white yarn over the blue rounds. This adds six arms to each snowflake.
Make 63 squares. Sew them into seven columns and nine rows. Add a plain border to frame the blanket.
These steps were written for this request. The design has not been tested with a sample. The size and yarn amounts are estimates. Make one full square before you start the blanket.
Skill Level
Confident beginner who can work granny squares, change colors, and sew simple details.
Finished Size
- Each square: About 6 × 6 inches.
- Blanket before border: About 42 × 54 inches.
- Blanket with border: About 44 × 56 inches.
The final size will depend on your gauge and the width of your border.
Materials
- Worsted-weight yarn, Category 4.
- Color A — White: About 850–1,050 yards.
- Color B — Blue: About 1,350–1,650 yards.
- Total yarn: About 2,200–2,700 yards.
- US H/8, 5.0 mm crochet hook. Use the size needed to meet gauge.
- Yarn needle.
- Scissors.
- Measuring tape.
- Four stitch markers.
Use yarns of the same weight. Their fiber content should be much the same.
Use white yarn for the centers. Use it for the snowflake details and border, too. Use blue yarn for the outer rounds and seams.
Gauge
One finished five-round square should measure about 6 × 6 inches after washing and drying as directed on the yarn label.
Make one square, add its snowflake details, and check its size.
- If it is too small, try a larger hook.
- If it is too large, try a smaller hook.
Keep your stitches relaxed. Tight snowflake details can pull the square out of shape.
Abbreviations
- ch: Chain.
- dc: Double crochet.
- sc: Single crochet.
- sl st: Slip stitch.
- st / sts: Stitch / stitches.
- sp / sps: Space / spaces.
- rnd: Round.
- rep: Repeat.
- RS: Right side.
- WS: Wrong side.
- A: White yarn.
- B: Blue yarn.
Special Stitch Groups
Granny Cluster
Work 3 dc in the same sp.
Corner Group
Work (3 dc, ch 2, 3 dc) in the same corner sp.
Snowflake Branch
This is a sewn detail. One long stitch forms each snowflake arm. Two short diagonal stitches form a small V near its tip.
Pattern Notes
- Use US crochet terms.
- Work in joined rnds. Do not turn.
- Beginning ch 3 counts as one dc.
- Join each rnd to the top of the beginning ch 3.
- Use ch 1 between granny clusters along each side.
- Use ch 2 at each corner.
- Work Rnds 1–2 with A.
- Work Rnds 3–5 with B.
- Add the snowflake details before joining the squares.
- Leave an 8-inch tail when fastening off.
- Make 63 squares.
Pattern Instructions
Step 1: Make the White Center
With A, ch 4. Sl st in the first ch to form a ring.
Rnd 1: Ch 3, work 2 dc in the ring, ch 2. Work (3 dc in the ring, ch 2) three times. Sl st to the top of the beginning ch 3.
Count: 12 dc and four ch-2 corner sps.
Step 2: Grow the White Center
Rnd 2: Sl st in the next two dc and into the first corner sp.
Ch 3, work 2 dc in the same sp, ch 2, work 3 dc in the same sp, ch 1.
Work (corner group in the next corner sp, ch 1) three times. Sl st to the top of the beginning ch 3.
Fasten off A.
Count: 24 dc, four ch-1 side sps, and four ch-2 corner sps.
Step 3: Add the First Blue Round
Join B in any ch-2 corner sp.
Rnd 3: Ch 3, work 2 dc in the same sp, ch 2, work 3 dc in the same sp, ch 1.
Work 3 dc in the next ch-1 sp, ch 1.
Repeat the following three times:
- Work a corner group in the next corner sp.
- Ch 1.
- Work 3 dc in the next ch-1 sp.
- Ch 1.
Sl st to the top of the beginning ch 3.
Count: 36 dc, eight ch-1 side sps, and four ch-2 corner sps.
Step 4: Continue the Blue Rounds
Rnd 4: Sl st in the next two dc and into the first corner sp.
Ch 3, work 2 dc in the same sp, ch 2, work 3 dc in the same sp, ch 1.
Work (3 dc in the next ch-1 sp, ch 1) twice.
Repeat the following three times:
- Work a corner group in the next corner sp.
- Ch 1.
- Work (3 dc in the next ch-1 sp, ch 1) twice.
Sl st to the top of the beginning ch 3.
Count: 48 dc, 12 ch-1 side sps, and four ch-2 corner sps.
Rnd 5: Sl st in the next two dc and into the first corner sp.
Ch 3, work 2 dc in the same sp, ch 2, work 3 dc in the same sp, ch 1.
Work (3 dc in the next ch-1 sp, ch 1) three times.
Repeat the following three times:
- Work a corner group in the next corner sp.
- Ch 1.
- Work (3 dc in the next ch-1 sp, ch 1) three times.
Sl st to the top of the beginning ch 3. Fasten off B.
Count: 60 dc, 16 ch-1 side sps, and four ch-2 corner sps.
Each side has 15 dc and four ch-1 sps, measured between its two corner sps.
Step 5: Sew the Snowflake Details
Lay the square flat with the RS face up.
The snowflake has six arms around the white center. Space them evenly. They do not need to line up with the square’s four corners.
- Cut a strand of A about 36 inches long.
- Thread the yarn needle.
- Fix the yarn in place on the WS. Start near the outer edge of the white center.
- Bring the needle to the RS at that edge.
- Sew one straight stitch out across the blue fabric. End near the outer edge of Rnd 4.
- Pass through stitches on the WS. Go to the base of the next arm.
- Repeat to make six arms. Keep the gaps between them even.
Place one arm toward the top. Place one toward the bottom. Place two toward each side.
Add the Branches
Near the tip of each arm:
- Bring the needle up just to one side.
- Sew a short slant stitch toward the arm’s midline.
- Do the same on the other side.
- Let both stitches meet at one point on the arm.
The two stitches form a V. Its open end points toward the arm’s tip.
Keep the yarn loose so the square lies flat. On the WS, weave the yarn through nearby stitches as you move from one detail to the next. This helps keep loose strands short.
Secure the ends. Weave them in.
Step 6: Make the Remaining Squares
Make 63 squares in total.
Check the first few squares against your test square. They should have the same size and stitch count.
Weave in the ends. Wash and dry the squares as directed on the yarn label. Shape each one to about 6 × 6 inches without stretching it.
Step 7: Lay Out the Blanket
Arrange the squares in:
- Seven squares across.
- Nine squares down.
Keep the RS of every square facing up. Turn the squares so the snowflakes sit as you prefer.
Step 8: Sew the Squares into Rows
Use B and a yarn needle.
- Set the first two squares side by side.
- Match their corners and the edges that touch.
- Whipstitch through the back loop of each matched dc.
- At each ch-1 sp, slide the needle under both matched ch-1 chains.
- Use the corner chains to secure both seam ends.
- Add the next square in the same way.
Join seven squares to make each row.
Make nine rows.
Match 15 dc and four ch-1 sps per seam. Join the corner chains at both ends, too.
Keep the yarn loose so the seam lies flat.
Step 9: Join the Rows
- Place the first two rows beside each other.
- Match the square corners and seams.
- Sew the touching edges using the same method.
- Continue until all nine rows are joined.
Where four squares meet, pass the sewing yarn through their corner chains to close any small hole. Avoid pulling the corners into a tight knot.
Step 10: Add the Border
With the RS facing, join A in any outer corner sp.
Border Rnd 1
Ch 1. Work 3 sc in the corner sp. Mark the middle sc.
Continue around the blanket:
- Work 1 sc in each dc.
- Work 1 sc in each ch-1 sp.
- Where two squares meet along a straight edge, work 1 sc in each adjoining corner sp.
- Work 3 sc in each of the blanket’s four outer corners. Mark the middle sc.
Sl st to the first sc. Do not turn.
Lay the blanket flat. If the edge pulls inward, add a few evenly spaced sc. If it waves, reduce a few sc.
Border Rnds 2–4
Ch 1.
- Work 1 sc in each st around.
- Work 3 sc in each marked corner st.
- Move each marker to the middle sc of the new corner group.
Sl st to the first sc after each rnd.
Fasten off after Rnd 4.
Step 11: Finish the Blanket
Weave all loose ends through several stitches on the WS. Change direction once to help hold each end in place.
Wash the blanket as directed on the yarn label. Shape it gently and dry it using the method listed on the label.
Adjust the Size
Keep the same five-round square and change the number of squares.
| Layout | Squares Needed | Approximate Size With Border |
|---|---|---|
| 5 across × 6 down | 30 | 32 × 38 inches |
| 7 across × 9 down | 63 | 44 × 56 inches |
| 8 across × 10 down | 80 | 50 × 62 inches |
These sizes assume 6-inch squares and a border about 1 inch wide on each edge. Larger blankets will need more yarn.