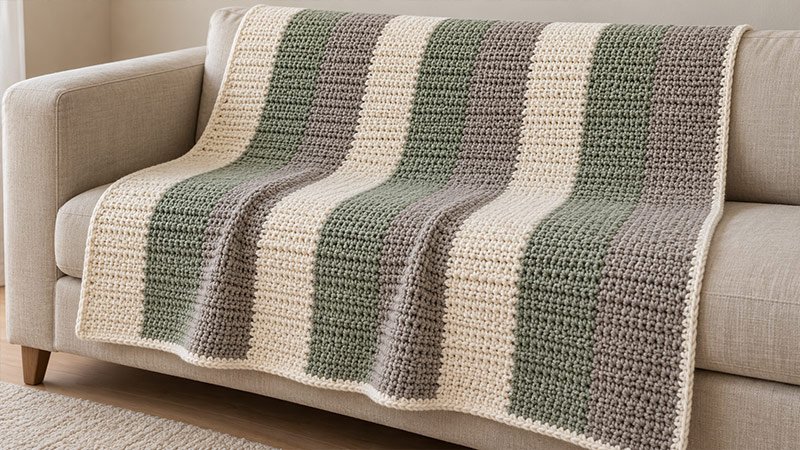
The Aspen Throw is a crochet blanket. It has wide stripes and soft ridges. Most rows use half double crochet in the back loop. Use both loops for each sixth row. This adds a smooth band between the ridges.
Work the throw in one piece. Then add a cream border. This version uses cream, sage, and warm gray.
The yarn amounts and size are estimates. Make a gauge swatch before you start.
SKILL LEVEL
Confident beginner
You should know how to work basic stitches, crochet through the back loop, change colors, and work a border.
YARN REQUIREMENTS
Use worsted-weight yarn, Category 4.
- Color A — Cream: About 800 yards, including the border.
- Color B — Sage: About 550 yards.
- Color C — Warm gray: About 550 yards.
- Total: About 1,900 yards.
Choose yarns with the same weight and similar fiber content. Buy extra yarn if you plan to make a larger throw.
TOOLS
- US J/10, 6.0 mm crochet hook, or the size needed to meet gauge.
- Yarn needle.
- Scissors.
- Measuring tape.
- Four stitch markers.
GAUGE
12 hdc × 9 rows = 4 × 4 inches in the main stitch pattern, after washing and drying.
Make a Gauge Swatch
- Ch 26.
- Hdc in the third ch from the hook. Hdc in each ch to the end. 24 hdc.
- Ch 2, turn. Hdc in the BLO of each st.
- Rep Step 3 through Row 5.
- Row 6: Ch 2, turn. Hdc through both loops of each st.
- Rows 7–11: Ch 2, turn. Hdc in the BLO of each st.
- Row 12: Rep Row 6.
- Keep this six-row repeat. Stop when you have 18 rows.
- Wash and dry the swatch. Follow the care steps on the yarn label.
- Measure 4 inches in the middle of the swatch. Stay clear of the edges.
If you have too many sts in 4 inches, use a larger hook. If you have too few, use a smaller hook. Check the row gauge, too.
FINISHED SIZE
- Before the border: About 40 × 48 inches.
- With the border: About 42 × 50 inches.
The final size may vary with your yarn, gauge, and border tension.
ABBREVIATIONS
- ch: Chain.
- hdc: Half double crochet.
- sc: Single crochet.
- sl st: Slip stitch.
- st / sts: Stitch / stitches.
- BLO: Back loop only.
- RS: Right side.
- WS: Wrong side.
- rep: Repeat.
- rnd: Round.
- A: Cream yarn.
- B: Sage yarn.
- C: Warm gray yarn.
Pattern Notes
- Use US crochet terms.
- Work the main throw in rows.
- Turn at the end of each row.
- Ch 2 does not count as a st.
- Each main row has 120 hdc.
- Work Row 1 into the foundation chains.
- Use both loops for Rows 6, 12, 18, and so on.
- Use BLO for all other rows after Row 1.
- Each stripe has 12 rows.
- Change colors on the last pull-through of the last hdc.
- Use both loops for the border.
- Border ch 1 does not count as a st.
Pattern Instructions
1. Start the Throw
With A, ch 122.
Row 1: Hdc in the third ch from the hook. Hdc in each ch across. 120 hdc.
Place a marker in the first and last hdc if needed. Move these markers up as you work.
2. Work the First Texture Repeat
Row 2: Ch 2, turn. Hdc in BLO of each st across. 120 hdc.
Rows 3–5: Rep Row 2.
Row 6: Ch 2, turn. Hdc through both loops of each st across. 120 hdc.
Rows 7–11: Rep Row 2.
Row 12: Rep Row 6. Change to B on the last pull-through of the final hdc.
The first stripe is complete.
3. Change Colors
For the last hdc of the row:
- Yarn over with the old color.
- Put the hook through the required loops.
- Yarn over and pull up a loop.
- Drop the old yarn on the WS.
- Yarn over with the new color.
- Pull the new yarn through all three loops.
The last hdc counts as the old color. Use the new color for the next row.
Cut the old yarn. Leave an 8-inch tail. Leave an 8-inch tail of the new yarn, too. Weave in both tails.
4. Continue the Stripe Pattern
For each new stripe, work:
- Stripe Rows 1–5: Ch 2, turn. Hdc in BLO of each st across.
- Stripe Row 6: Ch 2, turn. Hdc through both loops of each st across.
- Stripe Rows 7–11: Ch 2, turn. Hdc in BLO of each st across.
- Stripe Row 12: Ch 2, turn. Hdc through both loops of each st across.
Each row has 120 hdc.
Follow this color order:
| Throw rows | Color |
|---|---|
| 1–12 | A — Cream |
| 13–24 | B — Sage |
| 25–36 | C — Warm gray |
| 37–48 | A — Cream |
| 49–60 | B — Sage |
| 61–72 | C — Warm gray |
| 73–84 | A — Cream |
| 85–96 | B — Sage |
| 97–108 | C — Warm gray |
Change colors at the end of each stripe.
After Row 108, fasten off. Leave an 8-inch tail.
5. Check the Main Throw
Lay the throw flat.
- Check that each row has 120 hdc.
- Check that there are nine stripes.
- Check that each stripe has 12 rows.
- The main piece should measure about 40 × 48 inches.
Weave in the stripe ends on the WS. Pass each tail through several nearby stitches, then change direction to help secure it.
6. Border — Rnd 1
Choose one face as the RS. With the RS facing, join A in the first st at a top corner.
Ch 1. Work 3 sc in that corner st. Mark the middle sc.
Continue around the throw:
- Across the top: Sc in each st, with 3 sc in the last corner st.
- Down the side: Work 4 sc for every 3 row ends. Use 1 sc in the first row end, 1 sc in the next, and 2 sc in the third.
- At the lower corner: Work 3 sc in the underside of the foundation ch that holds the corner hdc.
- Across the foundation edge: Sc in the underside of each foundation ch that holds an hdc. Work 3 sc at the far corner.
- Up the final side: Use the same side-edge spacing.
Mark the middle sc of each corner group.
The 3-sc corner group replaces the single sc at that corner. Do not work a corner twice.
Sl st to the first sc to join. Do not turn.
Lay the throw flat. If a side pulls inward, add a few evenly spaced sc. If it waves, remove a few sc.
7. Border — Rnd 2
Ch 1.
Sc in each st around, working 3 sc in each marked corner st. Move each marker to the middle sc of the new corner group.
Sl st to the first sc to join. Do not turn.
8. Border — Rnd 3
Rep Rnd 2.
Check the width of the border. These three rnds should add about 1 inch on each edge.
For a wider border, rep Rnd 2 as needed. Extra rnds will increase the finished size and yarn use.
Fasten off and weave in the ends.
9. Finish the Throw
- Wash and dry the throw as directed on the yarn label.
- While damp, gently shape it into a rectangle if the yarn allows.
- Smooth the edges without stretching the stitches.
- Let it dry fully.
- Check that all yarn ends are secure.
Adjust the Size
To change the width: Add or remove foundation chains. The row stitch count will be two fewer than the chain count. At the stated gauge, 3 sts add about 1 inch.
To change the length: Add or remove complete 12-row stripes. Each stripe adds about 5⅓ inches at the stated gauge.
A larger throw will need more yarn.