
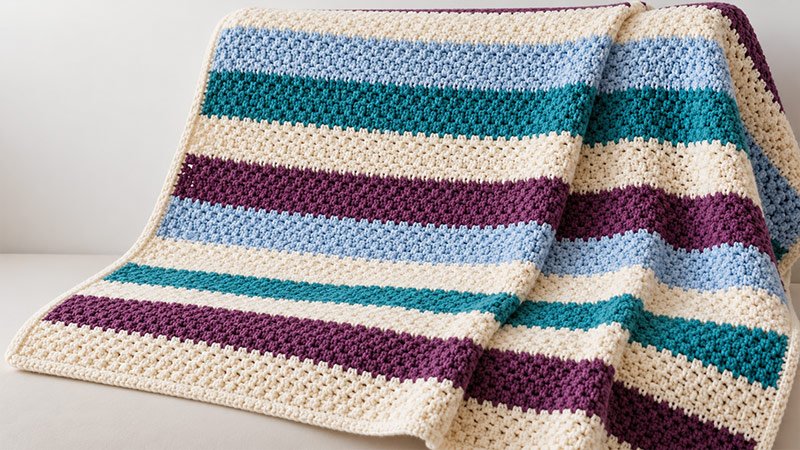
The Arctic Jewel Throw has a soft moss stitch and bands of cream, pale blue, teal, and plum. Small stitches and chain gaps give it a soft feel with no large holes.
Work the throw flat in rows. Then add a plain edge in single crochet. The stitch repeat is easy to learn. This throw suits new crocheters who know the basic stitches.
This is a new design. It does not use the steps from a published pattern with the same name. It has not been tested yet. Yarn needs and the final size are estimates. Make a small gauge swatch first.
Materials
- Worsted-weight yarn, category #4: About 1,800–2,100 yards in all.
- Color A — Cream: About 850–1,000 yards. This includes yarn for the border.
- Color B — Pale blue: About 350–400 yards.
- Color C — Teal: About 350–400 yards.
- Color D — Plum: About 250–300 yards.
- Crochet hook: US H/8, 5 mm. Or use the size that meets gauge.
- Yarn needle to weave in ends.
- Scissors.
- Measuring tape.
- Four stitch markers that you can remove.
Choose yarns with the same weight. Their fiber content should be much the same. Soft acrylic or a washable wool blend works well. Both suit a throw that needs care often.
Gauge
About 7½ moss-stitch repeats and 16 rows = 4 inches. Wash and dry the swatch first. Follow the care steps on the yarn label. Then check the gauge.
One repeat is 1 sc and 1 ch-1 sp.
To make a swatch, ch 34. Follow the steps for the blanket. Work at least 24 rows. Measure across the center. Stay clear of the edges.
- If too many repeats fit in 4 inches, use a larger hook.
- If too few repeats fit in 4 inches, use a smaller hook.
Keep the ch sts loose so the fabric lies flat.
Finished Measurements:
The throw is about 42 inches wide × 54 inches long. This size includes the border.
Before you add the edge, the main piece should be about 40 inches × 52 inches. The size will vary with your yarn, stitch tension, and blocking.
Abbreviations
US crochet terms are used throughout.
- ch: Chain.
- st / sts: Stitch / stitches.
- sc: Single crochet.
- sl st: Slip stitch.
- sp / sps: Space / spaces.
- sk: Skip.
- rep: Repeat.
- RS: Right side.
- WS: Wrong side.
Moss stitch: A repeating sequence of sc and ch-1 sps. After the first row, each sc is worked into a ch sp from the previous row.
Pattern
Pattern Notes
- Work the blanket back and forth. Turn at the end of each row.
- The first ch 2 forms an edge sp. It does not count as an sc.
- Each body row has 75 sc.
- Each full row also has 74 ch-1 sps plus one beginning ch-2 sp.
- After Row 1, work into the chain spaces. Do not work into the sc sts.
- Mark the first ch-2 sp if it is hard to find.
- Change colors on the last sc of the row. Do this on its last pull-through.
- Cut the old color at the end of each stripe. Leave a 6-inch tail to weave in.
Foundation
With Color A, ch 152 loosely.
If your foundation chain tends to be tight, use a hook one size larger for the chain, then return to your usual hook for Row 1.
Row 1
Sc in the 4th ch from the hook.
*Ch 1, sk next ch, sc in next ch; rep from * across to the end.
Turn.
Count: 75 sc, 74 ch-1 sps, and one beginning ch-2 sp.
The three skipped foundation chains create the first edge sp beside the first sc.
Row 2
Ch 2.
Sk the first sc and work 1 sc into the first ch-1 sp.
*Ch 1, sk next sc, sc in next ch-1 sp; rep from * across. On the final rep, work the sc into the beginning ch-2 sp of the previous row.
Turn.
Count: 75 sc, 74 ch-1 sps, and one beginning ch-2 sp.
Rows 3–208
Rep Row 2, following the color sequence below.
The first sc of each row goes into the first ch-1 sp. The last sc goes into the beginning ch-2 sp at the opposite edge.
Check the sc count at the end of each stripe. An extra or missing edge st can gradually change the width.
Color Sequence
Work each stripe for 16 rows.
| Rows | Color |
|---|---|
| 1–16 | A — Cream |
| 17–32 | B — Pale blue |
| 33–48 | C — Teal |
| 49–64 | A — Cream |
| 65–80 | D — Plum |
| 81–96 | B — Pale blue |
| 97–112 | A — Cream |
| 113–128 | C — Teal |
| 129–144 | D — Plum |
| 145–160 | A — Cream |
| 161–176 | B — Pale blue |
| 177–192 | C — Teal |
| 193–208 | A — Cream |
How to Change Colors
- Work the last sc of the stripe. Stop with two loops left on the hook.
- Drop the old color. Yarn over with the new color. Pull it through both loops.
- Turn and ch 2 with the new color. Start the next row.
- Leave both yarn tails long enough to weave in well. Do not pull the tails tight. This can pinch the edge.
- After Row 208, fasten off.
Border — Round 1
With the RS facing, join Color A at any corner.
Ch 1. This does not count as a st.
Work 3 sc in the corner. Mark the middle sc.
Work around the blanket:
- Across the top: Work 1 sc in each sc. Work 1 sc in each ch-1 sp, too. Work 1 sc in the edge ch-2 sp.
- Along each side: Start with about 1 sc in each row end.
- Across the foundation edge: Work about 1 sc opposite each sc. Do the same for each chain space.
- At each remaining corner: Work 3 sc in the corner. Mark the middle sc.
Do not work in the same corner twice.
Sl st to the first sc to join. Do not turn.
Lay the blanket flat. The border should lie smooth and flat. If a side pulls in, add a few sc. Space them evenly along that side. If it ripples, use fewer sc.
Border — Rounds 2–4
Ch 1.
Work 1 sc in each st around, placing 3 sc in each marked corner st.
Move each marker to the middle sc of its new corner group.
Sl st to the first sc to join. Do not turn.
After Round 4, check the width of the edging. Add another round if needed to reach approximately 1 inch.
Fasten off.
Finishing
Weave each yarn tail through a few stitches on the WS. Turn back once to help hold the end in place. Keep the patch from getting thick.
Wash the throw as the yarn label says. Lay it flat and make the stripes straight. Gently shape the corners.
Let it dry fully before you fold or use it.
Adjusting the Size
To change the width: Add or cut chains from the base in sets of 2. Each new pair adds one moss-stitch repeat.
To change the length: Add or cut rows. Keep each stripe at 16 rows for even bands of color. Or use fewer rows for thin bands.
A large throw needs more yarn. Work a few rows, then check the width. Do this before you make the rest of the throw.


