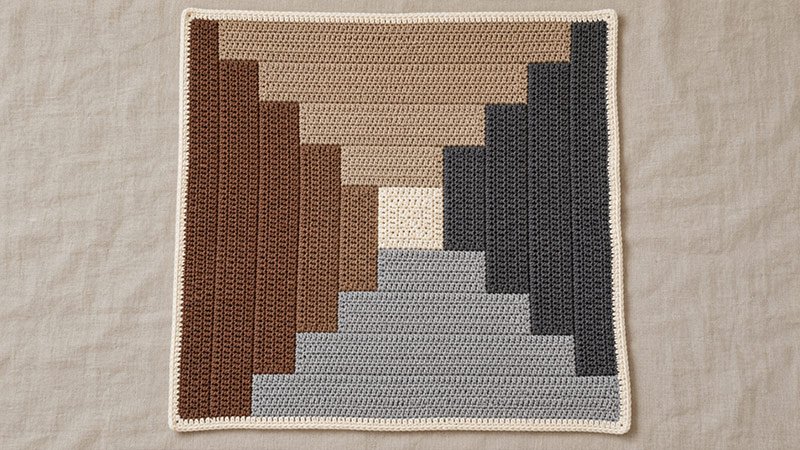
This log cabin throw starts with a small square. Add each new strip to one edge. The throw grows one part at a time.
Single crochet makes a plain, firm fabric. Light and dark yarns show each strip’s shape.
Use five shades or scraps of yarn. Keep the yarn weight and feel the same. The steps below make one square throw. A plain border frames the edge.
Check your gauge first. Keep each edge flat as you work. Start at the center and add each strip. Work out to the last strip.
Skill Level
Confident beginner
You should know how to work sc in rows, join yarn, and work evenly along row ends.
Gauge
16 sc × 16 rows = 4 × 4 inches, after blocking.
Make a swatch at least 6 inches square. Measure the middle 4 inches.
The stitch and row gauge must match to keep the log cabin sections square. Check that your first 16-stitch, 16-row square measures about 4 inches in both directions before you proceed.
Finished Size
About 46 × 46 inches, including a 1-inch border on each side.
The main blanket measures about 44 × 44 inches before the border.
Yarn
Use worsted-weight yarn, category 4, in five shades.
Allow about 2,000–2,300 yards total, divided as follows:
- Color A — cream: 500–600 yards, including the center and border.
- Color B — light gray: 350–400 yards.
- Color C — dark gray: 400–450 yards.
- Color D — tan: 350–400 yards.
- Color E — brown: 400–450 yards.
These amounts are estimates. Fiber, tension, and hook size can change how much yarn you use. Choose yarns with the same weight and care needs.
Hook
5.5 mm crochet hook, or the size needed to meet gauge.
Notions
- Yarn needle.
- Scissors.
- Four removable stitch markers.
- Measuring tape.
- Blocking mat and pins.
Abbreviations
- ch: Chain.
- sc: Single crochet.
- sl st: Slip stitch.
- st / sts: Stitch / stitches.
- rep: Repeat.
- RS: Right side.
- WS: Wrong side.
Pattern Notes
- Use US crochet terms.
- Work each section back and forth in rows.
- Start each row with ch 1. This ch does not count as a st.
- Turn after each row unless told not to.
- Work through both top loops of each st.
- Work 16 rows in each strip.
- Fasten off after the center square and each strip.
- Join each new strip with the RS facing you.
- Mark the RS of the center square.
- Keep the same top, bottom, left, and right labels. Use them for the whole pattern. A marker on the first top edge can help.
- Add strips in this order: bottom, right, top, left.
- Work each strip across the full edge as it is now. Include the ends of all strips added so far.
- On a side edge, work 1 sc into each row end.
- Do not add an extra st where two sections meet.
- Count the sts in the first row of each strip. Do this before you start the next row.
- The st counts below do not include the turning ch.
Free Pattern Instructions
Step 1: Make the Center Square
With Color A, ch 17.
Row 1: Sc in the second ch from the hook and in each ch across. Turn. 16 sc.
Rows 2–16: Ch 1, sc in each st across. Turn. 16 sc.
Fasten off.
Place the square with the RS facing you. Mark the top edge and the RS.
The square should measure about 4 × 4 inches.
Step 2: Learn How to Add a Strip
Use this method for every strip.
- Place the blanket with the RS facing you.
- Find the edge named in the instructions.
- Join the new color at one end of that edge.
- Work Row 1 across the whole edge:
- Work 1 sc in each st along a stitched edge.
- Work 1 sc in each row end along a side edge.
- Where sections meet, keep the count even. Do not add a st in the join itself.
- Turn.
- Rows 2–16: Ch 1, sc in each st across. Turn.
- Fasten off.
Check that the strip measures about 4 inches deep. The stitch count stays the same for all 16 rows of that strip.
Step 3: Work the First Set of Strips
- Strip 1 — Bottom edge
- With Color B, work a 16-row strip across the bottom edge of the center.
- 16 sc per row.
- Strip 2 — Right edge
- With Color C, work a 16-row strip across the full right edge.
- Work across the row ends of the center and Strip 1.
- 32 sc per row.
- Strip 3 — Top edge
- With Color D, work a 16-row strip across the full top edge.
- 32 sc per row.
- Strip 4 — Left edge
- With Color E, work a 16-row strip across the full left edge.
- 48 sc per row.
- The piece should now measure about 12 × 12 inches.
Step 4: Work the Second Set of Strips
Use the same 16-row strip method.
- Bottom — Color B: 48 sc per row.
- Right — Color C: 64 sc per row.
- Top — Color D: 64 sc per row.
- Left — Color E: 80 sc per row.
The piece should now measure about 20 × 20 inches.
Step 5: Work the Third Set of Strips
- Bottom — Color B: 80 sc per row.
- Right — Color C: 96 sc per row.
- Top — Color D: 96 sc per row.
- Left — Color E: 112 sc per row.
Work 16 rows for each strip.
The piece should now measure about 28 × 28 inches.
Step 6: Work the Fourth Set of Strips
- Bottom — Color B: 112 sc per row.
- Right — Color C: 128 sc per row.
- Top — Color D: 128 sc per row.
- Left — Color E: 144 sc per row.
Work 16 rows for each strip.
The piece should now measure about 36 × 36 inches.
Step 7: Work the Fifth Set of Strips
- Bottom — Color B: 144 sc per row.
- Right — Color C: 160 sc per row.
- Top — Color D: 160 sc per row.
- Left — Color E: 176 sc per row.
Work 16 rows for each strip.
Fasten off after the last strip.
The main blanket should measure about 44 × 44 inches.
Step 8: Check the Shape
Lay the blanket flat before adding the border.
- Check that the corners form right angles.
- Smooth each strip without stretching it.
- Check that opposite sides are the same length.
- Weave in most of the yarn tails.
If an edge pulls inward or flares out, check its stitch count and tension. Correct the affected strip before adding the border.
Step 9: Add the Border
With the RS facing you, join Color A in a corner.
Round 1:
- Ch 1.
- Work 3 sc in the corner. Mark the middle sc.
- Sc evenly along the first side:
- Work 1 sc in each st.
- Work 1 sc in each row end.
- Work 3 sc in the next corner. Mark the middle sc.
- Rep around the blanket.
- Sl st in the first sc to join. Do not turn.
At each corner, the 3-sc group replaces the single sc you would otherwise work at that corner point.
Rounds 2–4:
- Ch 1.
- Sc in each st to the marked corner st.
- Work 3 sc in the marked st.
- Move the marker to the middle sc of the new corner group.
- Rep around.
- Sl st in the first sc to join. Do not turn.
Fasten off after Round 4.
The border should measure about 1 inch wide.
Step 10: Finish the Throw
- Weave in all remaining tails on the WS.
- Wash or dampen the blanket as directed on the yarn label.
- Lay it flat and shape it to about 46 × 46 inches.
- Keep the strips straight and the corners square.
- Let it dry fully before use.
Adjust the Size
Each complete set of four strips adds about 8 inches to both the width and length.
- Finish after four sets for a throw about 38 × 38 inches, with the border.
- Work five sets for the stated 46 × 46-inch throw.
- Add a sixth set for a throw about 54 × 54 inches, with the border.
For a sixth set, work 16 rows per strip with these counts:
- Bottom: 176 sc per row.
- Right: 192 sc per row.
- Top: 192 sc per row.
- Left: 208 sc per row.
Allow more yarn for a larger throw.