
Pattern Description:
This is a quick and easy baby blanket pattern adapts the Grandma Cuddles Blanket pattern by using the Berry Stitch instead of Treble Crochet to create a lovely texture. It is designed as a lighter weight stroller size blanket.
Materials Needed & Measurements:
- Yarn: Bernat Softee Baby Cotton (60% cotton, 40% acrylic, 120 g/4.2 oz, 232 m/254 yds).
- Hook: Size H/5.00mm hook.
- Notions: Tapestry needle, scissors.
- Measurements:
- Finished size: 26 in x 28 in.
- Gauge: 4 in = 12 st and 16 rows of pattern.
Stitches & Abbreviations Used:
CH = Chain
SC = Single Crochet
Berry Stitch = Berry Stitch
DC = Double Crochet
SL ST = Slip Stitch
Instructions for Making the Berry Blossom Baby Blanket Pattern:
Main Blanket Pattern Instructions
The core of the blanket is formed by repeating a specific sequence of five rows.
- Foundation Chain: Begin by chaining 100 stitches, or you can chain any even number if you prefer to adjust the blanket’s width.
- Row 1 (SC Row): Starting in the second CH from your hook, work 1 SC in each chain all the way across the row. At the row’s end, CH 1 and turn your work to prepare for the next row.
- Row 2 (Berry Stitch Row): Work 1 SC in the very first stitch of the row. Subsequently, repeat the following sequence across the row: work 1 Berry Stitch in the next stitch, and then 1 SC in the stitch immediately after it. After completing the repeats, CH 1 and turn.
- Row 3 (SC Row): Work 1 SC in each stitch across the entire row. Conclude by chaining CH 1 and turn.
- Row 4 (Offset Berry Stitch Row): Start by working 1 SC in each of the first two stitches. Following this, repeat the sequence from * across the row until only two stitches remain: work 1 Berry Stitch in the next stitch, then 1 SC in the next stitch. Finish the row by working 1 SC in each of the final two stitches. Then, CH 1 and turn.
- Row 5 (SC Row): Work 1 SC in each stitch across the row. As with previous SC rows, CH 1 and turn.
Repeating for Length:
To achieve the desired length for your blanket, you will repeat rows 2 through 5 continuously. Continue these repetitions until your blanket measures between 27 to 28 inches in length, or until it reaches your preferred overall length. If you desire the end of your blanket to visually match the beginning, it is advised to conclude your repetitions by ending with rows 2 and 3 instead of rows 3 and 4.
Border Instructions
Once the main body of the blanket is completed, you can proceed to add the decorative border. You have the flexibility to either tie off your yarn and neatly weave in your ends before starting the border, or you can seamlessly continue by simply chaining 1 and beginning to work the border down the side of the blanket, choosing to weave in all your ends only after the entire border is finished.
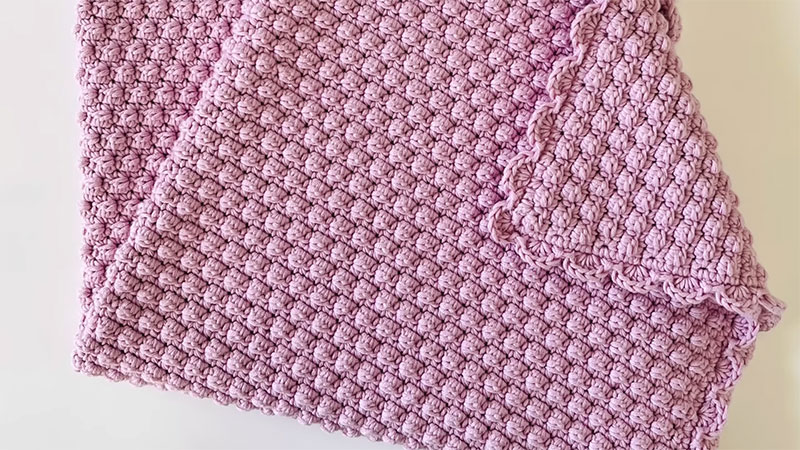
- Round 1 (SC Border): With the textured (berry) side of the blanket facing you, proceed to work 1 full round of SC around the entire perimeter of the blanket. As you crochet along the long sides of the blanket, ensure you place 1 SC per row. For the top and bottom ends of the blanket, work 1 SC per stitch. Crucially, make sure to work 3 SCs into each corner of the blanket to create a smooth turn.
- Round 2 (Shell Border): Starting at one of the corners from Round 1, slip stitch into the starting stitch and continue crocheting in the same direction around the blanket. The pattern for this round is as follows: repeat from * around the entire blanket: work 5 DCs in the next stitch, then follow with 1 SL ST in the next stitch. After that, skip 1 stitch, and then make 1 SL ST again in the subsequent stitch. The pattern notes that no special adjustments are necessary for the corners in this round; simply continue the repeating sequence (5 DCs, 1 SL ST, skip 1 st, 1 SL ST) all the way around the blanket. When you return to your starting corner, slip stitch into the corner stitch and then tie off your yarn.
Finishing Touches
To give your finished Berry Blossom Baby Blanket a professional and neat appearance, blocking is a recommended final step:
- Lay the blanket out flat on a clean towel or, if available, on foam blocking boards.
- Using a spray bottle filled with water, gently dampen the entire blanket evenly.
- Carefully press the blanket into straight lines, gently massaging the stitches with your hands and adjusting the tension as needed to achieve an even and desired shape.
- Pin the blanket securely in place with straight pins to hold its shape while drying.
- Allow the blanket to dry completely before carefully removing the pins.
Important Notes & Tips
- Front and Back Sides: It’s important to note that this blanket has a distinct front side and a back side. A helpful tip to remember is that when you are crocheting a Berry Stitch row, the berries themselves will be facing away from you. Conversely, when you are working a SC row, the textured berry side (the front) will be facing towards you.
Offset Berries: To ensure that the berries are consistently offset and form the intended pattern, it is crucial to check your work before beginning a Berry Stitch row. Verify that you are starting the row with the correct number of SCs as indicated in the pattern to maintain the desired alignment of the berry texture.
Download PDF


