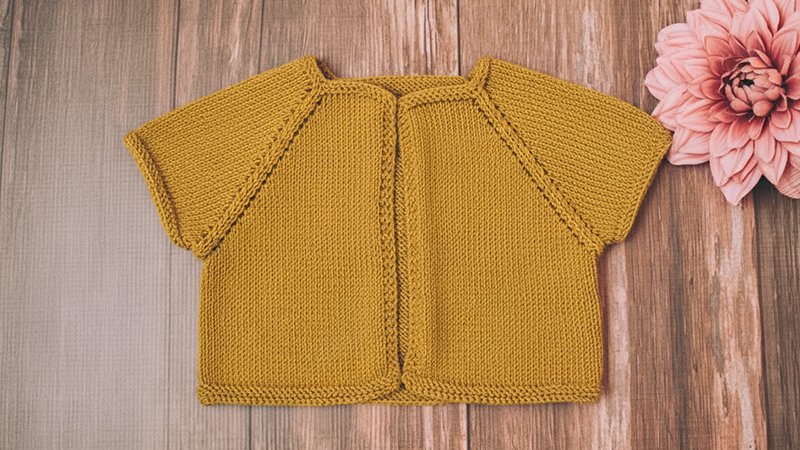
Pattern Description:
The Betsey Baby Cardigan is an easy skill-level knitting pattern designed for babies in multiple sizes from 0-6 months to 18 months.
It is worked in one piece beginning at the neck, utilizing a circular needle and a yoke construction with raglan shaping. The design incorporates Garter stitch borders.
Materials Needed & Measurements:
- Yarn: LION BRAND® A STAR IS BORN: OH BABY (Art. #173), color #174 Olive. The quantity required is 2 (3, 3, 3) balls for sizes 0-6 months (6-9 months, 12 months, 18 months) respectively.
- Knitting Needle: Circular knitting needle size 3 (3.25 mm), 24 in. (61 cm) long.
- Notions:
- LION BRAND® stitch markers
- LION BRAND® stitch holders
- LION BRAND® large-eyed blunt needle
- Measurements:
- Sizes: 0-6 months (6-9 months, 12 months, 18 months).
- Finished Chest: Approximately 20 1/4 (21 1/2, 22 1/4, 23 1/2) in. (51.5 (54.5, 56.5, 59.5) cm).
- Finished Length: Approximately 8 3/4 (9 1/4, 9 1/2, 10) in. (22 (23.5, 24, 25.5) cm).
Stitches & Abbreviations Used:
- Stitch Explanations:
- kfb (knit in front and back): Knit next stitch without removing it from the left needle, then knit through the back of the same stitch, increasing 1 stitch.
- yo (yarn over): An increase that creates a small decorative hole, formed by bringing yarn to the front, then taking it to the back over the right needle.
- Abbreviations:
- beg = begin(ning)(s)
- k = knit
- p = purl
- rep = repeat
- RS = right side
- st(s) = stitch(es)
- St st = stockinette st
- WS = wrong side
Instructions for Making the Betsey Baby Cardigan Pattern:
Here are the etailed instructions for cardigan construction:
The cardigan begins with the yoke, shaping the neckline and shoulders before dividing for the body and sleeves.
Yoke
- Beg at the neck edge, cast on 67 (69, 71, 73) sts.
- Knit 1 row.
- Next Row (Increase Row – RS): K3 (6, 7, 1), kfb, then rep [k4 (3, 3, 3), kfb] 12 (14, 14, 16) times. K to end of row. You should now have 80 (84, 86, 90) sts.
- Knit 1 row.
Shape Raglans
Markers are placed in the next row to indicate the raglan increase locations.
- Set Up Row (RS): K3 for Garter st border. K11 (12, 12, 13) for left front, yo, pm, k2, pm, yo. K10 (10, 11, 11) for left sleeve, yo, pm, k2, pm, yo. K24 (26, 26, 28) for back, yo, pm, k2, pm, yo. K10 (10, 11, 11) for right sleeve, yo, pm, k2, pm, yo. K11 (12, 12, 13) for right front, k3 for Garter st border. At the end of this row, you will have 88 (92, 94, 98) sts.
- Row 1 (WS): K3, p to last 3 sts, sm as you come to them, k3.
- Row 2 (RS): Knit to marker, yo, sm, k2, sm, yo; rep from 3 more times. Knit to end of row. This row will result in 96 (100, 102, 106) sts.
- Rep the last 2 rows (Row 1 and Row 2) 17 (18, 19, 20) more times. After all increases are completed, you will have 232 (244, 254, 266) sts. These sts will be distributed as: 33 (35, 36, 38) sts for each front (including Garter st borders), 48 (50, 53, 55) sts for each sleeve, 62 (66, 68, 72) sts for the back, and 2 sts at each increase location. End with a WS row as your last worked row.
- Continue to sm as you come to them in subsequent rows.
- Next Row (RS): Knit.
- Next Row (WS): K3, p to last 3 sts, k3.
Divide for Body and Sleeves
- Row 1 (RS): Knit to the first marker, remove marker, k1. Place the next st on a holder, remove marker. Place all sleeve sts up to the next marker on the same holder, remove marker. Place the next st on the same holder. K1, remove marker. Knit to the next marker, remove marker, k1. Place the next st on a holder, remove marker. Place all sleeve sts up to the next marker on the same holder, remove marker. Place the next st on the same holder. K1, remove marker, knit to end of row. You should now have 132 (140, 144, 152) sts remaining on the needle for the body.
Body
- Keeping the first and last 3 sts in Garter st, work in St st (k on RS, p on WS) until the piece measures about 3 1/2 (3 3/4, 3 3/4, 4) in. (9 (9.5, 9.5, 10) cm) from the divide. End with a RS row as your last worked row.
- Work in Garter st over all sts for 4 rows.
- Bind off all stitches.
Sleeves
- Place all sts for one sleeve back onto your knitting needle from the holder.
- Knit 3 rows.
- Bind off all stitches.
- Rep these steps with the sts for the opposite sleeve.
Finishing
Once all knitting is complete, follow these final steps:
- Sew sleeve seams.
- Weave in all ends using the large-eyed blunt needle.
Your Betsey Baby Cardigan is now complete!
Download Free PDF: