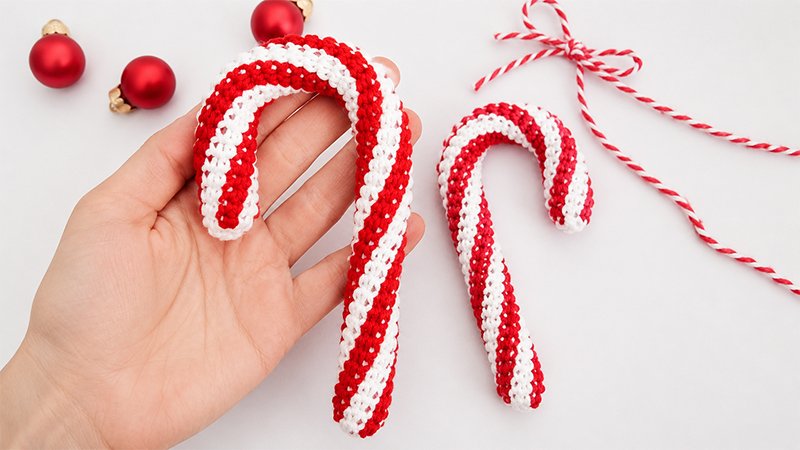
This festive Candy Cane Amigurumi is a classic, twisted holiday ornament perfect for dressing up your Christmas tree or gifting to loved ones.
Worked in seamless, continuous rounds using the tapestry crochet technique, it features neat color changes that create the traditional spiral stripes.
An internal wire core allows you to easily bend and shape the straight tube into a perfect, sturdy hook that holds its form beautifully.
Materials Needed
-
Hook Size: 3.0 mm (US C/2 or UK 11)
-
Yarn: DK weight (Light / Category 3) cotton yarn in two contrasting colors:
-
Color A: White or Cream
-
Color B: Red or Burgundy
-
(Note: You can also use Sport weight yarn with a 2.5 mm hook; just adjust the finished length as noted below).
-
-
Stuffing: Polyester fiberfill (toy stuffing)
-
Structure: 14-gauge aluminum craft wire (approx. 14 inches / 36 cm)
-
Tools: Wire cutters, tapestry needle, stitch marker
Finished Dimensions
Approximately 5 inches (13 cm) tall by 2.5 inches (6 cm) wide once bent into shape.
Crochet Abbreviations (US Terms)
-
Ch: Chain
-
Sc: Single crochet
-
Inc: Single crochet increase (work 2 single crochets into the same stitch)
-
Dec: Single crochet decrease (invisible decrease preferred: insert hook into front loops of the next 2 stitches, yarn over, pull through both loops, yarn over, pull through remaining loops)
-
MC: Magic Circle / Magic Ring
-
St(s): Stitch(es)
Key Technique Notes
-
Continuous Rounds: Do not join the ends of your rounds with a slip stitch or chain at the start of a new row. Use a stitch marker to keep track of the first stitch of each round.
-
Tapestry Crochet (Color Carrying): You will work with both yarn strands simultaneously. Lay the color you are not using along the top of the previous row’s stitches, and crochet right over it with your active color to hide it inside the tube.
-
Smooth Color Transitions: When changing colors, always do so on the final loop of the previous stitch. For example, before switching from White to Red: insert hook into the stitch with White, yarn over, and pull up a loop. Then, drop the White yarn, yarn over with Red, and pull Red through both loops on your hook to complete the stitch.
Step-by-Step Pattern Instructions
Note: Add fiberfill stuffing gradually every few inches as you build the tube.
Round 1: Begin with Color A. Create a magic circle and work 6 sc into the ring. Pull the tail to close the loop tightly. (6 sts)
Round 2: Join Color B. You will now carry the unused yarn inside your stitches.
-
Using Color A: Inc in the next st.
-
Switch to Color B: Inc in the next st.
-
Repeat this alternating sequence (Inc with A, Inc with B) 2 more times around. (12 sts total, alternating sets of 2 white and 2 red stitches)
Round 3:
-
Using Color A: Sc in the next 2 sts.
-
Switch to Color B: Sc in the next 2 sts.
-
Repeat this pattern (2 sc in A, 2 sc in B) 2 more times around the row. (12 sts)
Rounds 4 and Beyond: Keep repeating Round 3 exactly as written. As you build the tube, you will see the colors naturally spiral.
-
If using DK yarn, repeat this row until the tube measures roughly 7 inches (18 cm) long.
-
If using Sport weight yarn, repeat this row until the tube measures roughly 6 inches (15 cm) long.
Finish packing the tube with your fiberfill stuffing, leaving just a tiny bit of room at the very top.
Inserting the Wire Core
-
Take your 14-inch piece of aluminum wire and fold it directly in half.
-
Hold the ends and twist the two halves tightly around each other to create a single, strong, reinforced wire.
-
Carefully slide the twisted wire down the center of your stuffed amigurumi tube until it hits the bottom.
-
Use your wire cutters to trim any excess wire at the top, making sure it sits entirely inside the crocheted tube.
Finishing & Assembly
Final Round: Cut Color B, leaving a short tail to tuck inside the tube. Continue using only Color A.
-
Work 6 sc decreases across the remaining stitches to close the top opening. (6 sts)
Securing the End: Cut Color A, leaving a 6-inch tail. Thread the tail onto your tapestry needle and weave it through the front loops of the final 6 stitches. Pull firmly to cinch the hole completely shut. Knot securely and hide the leftover yarn tail inside the body of the amigurumi.
Shaping: Gently manipulate the tube with your hands, bending the top portion down into a classic hook shape. Your Candy Cane ornament is finished and ready to hang!