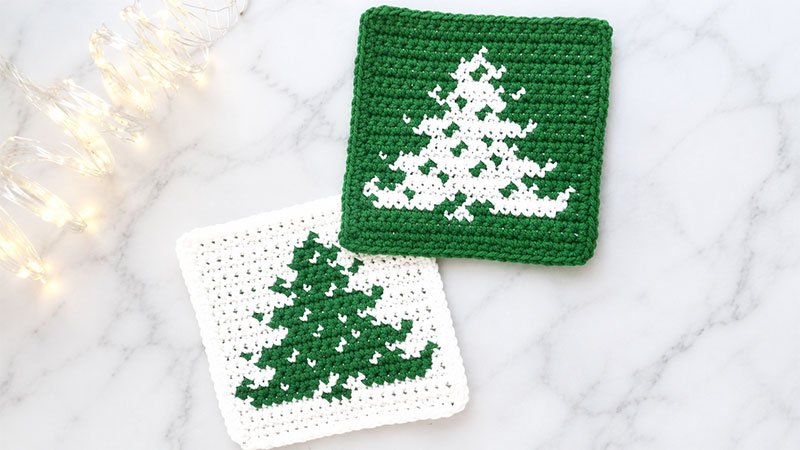
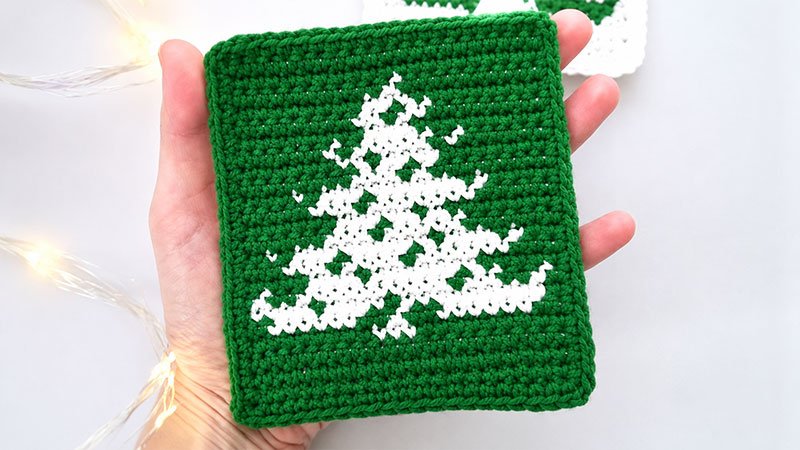
This beginner-friendly tapestry crochet pattern creates a festive Christmas Tree Square using medium cotton yarn.
Worked entirely in single crochet rows with a clean border, it features explicit, fully written instructions instead of confusing charts.
Perfect for holiday cushions, blankets, or coasters, this project ensures seamless color changes and clean, neat edges.
Getting Started & Master Tips
Before diving into the row-by-row instructions, keep these essential tapestry crochet techniques in mind to ensure your square looks neat and professional:
-
Handling the Carried Yarn: You will be working with two colors: Color A (Lipstick Red) and Color B (Cream). When you aren’t using a color, lay it across the top of the previous row and crochet over it, trapping it inside your single crochet stitches until you need it again.
-
Seamless Color Changes: To switch colors smoothly, work the stitch before the change until you have two loops left on your hook. Drop the current color, pick up the new color, and draw it through both loops to complete the stitch.
-
Turning and Edges: Every row consists of exactly 21 stitches. At the end of every single row, you will make a single chain and turn your work. This chain does not count as a stitch; start your next row in the very first stitch available.
Detailed Row-by-Row Square Instructions
The Foundation
Using Color A (Lipstick Red), create a slip knot and make 22 chain stitches.
Section 1: The Bottom Border
-
Row 1 [Right Side]: Insert your hook into the second chain from your hook. Work 1 single crochet in this chain and in every chain across. You will have 21 stitches in total, all in Color A. Chain 1 and turn.
-
Row 2 [Wrong Side]: Work 1 single crochet into each of the 21 stitches across using Color A. Chain 1 and turn.
Section 2: Building the Tree Motif
-
Row 3 [Right Side]: Work 1 single crochet into each of the first 9 stitches with Color A. Switch to Color B and work 1 single crochet into each of the next 3 stitches. Switch back to Color A and work 1 single crochet into the remaining 9 stitches. Chain 1 and turn.
-
Row 4 [Wrong Side]: Work 2 single crochets with Color A. Switch to Color B and work 6 single crochets. Switch to Color A for 2 single crochets. Switch to Color B for 1 single crochet. Switch to Color A for 2 single crochets. Switch to Color B for 6 single crochets. Finish the row with 2 single crochets in Color A. Chain 1 and turn.
-
Row 5 [Right Side]: Work 1 single crochet in Color A. Switch to Color B and work 9 single crochets. Switch to Color A for 1 single crochet. Switch to Color B for 4 single crochets. Switch to Color A for 1 single crochet. Switch to Color B for 4 single crochets. Finish with 1 single crochet in Color A. Chain 1 and turn.
-
Row 6 [Wrong Side]: Work 1 single crochet in Color A, then 1 in Color B, and 2 in Color A. Next, work 10 single crochets in Color B, followed by 1 in Color A, 2 in Color B, 2 in Color A, and 1 in Color B. End the row with 1 single crochet in Color A. Chain 1 and turn.
-
Row 7 [Right Side]: Work 5 single crochets in Color A. Switch to Color B for 7 single crochets. Switch to Color A for 1 single crochet. Switch to Color B for 3 single crochets. Finish the row with 5 single crochets in Color A. Chain 1 and turn.
-
Row 8 [Wrong Side]: Work 3 single crochets in Color A. Switch to Color B for 3 single crochets. Switch to Color A for 1 single crochet. Switch to Color B for 4 single crochets. Switch to Color A for 1 single crochet. Switch to Color B for 6 single crochets. Finish with 3 single crochets in Color A. Chain 1 and turn.
-
Row 9 [Right Side]: Work 2 single crochets in Color A, 1 in Color B, and 1 in Color A. Next, work 3 single crochets in Color B, 1 in Color A, 9 in Color B, and 1 in Color A. Work 1 single crochet in Color B, then finish the row with 2 single crochets in Color A. Chain 1 and turn.
-
Row 10 [Wrong Side]: Work 6 single crochets in Color A. Switch to Color B for 3 single crochets. Switch to Color A for 1 single crochet. Switch to Color B for 5 single crochets. Finish the row with 6 single crochets in Color A. Chain 1 and turn.
-
Row 11 [Right Side]: Work 7 single crochets in Color A, 1 in Color B, and 1 in Color A. Switch to Color B for 5 single crochets. Finish the row with 7 single crochets in Color A. Chain 1 and turn.
-
Row 12 [Wrong Side]: Work 5 single crochets in Color A. Switch to Color B for 3 single crochets. Switch to Color A for 1 single crochet. Switch to Color B for 7 single crochets. Finish the row with 5 single crochets in Color A. Chain 1 and turn.
-
Row 13 [Right Side]: Work 4 single crochets in Color A, 1 in Color B, and 1 in Color A. Switch to Color B for 9 single crochets, then work 1 in Color A, and 1 in Color B. Finish the row with 4 single crochets in Color A. Chain 1 and turn.
-
Row 14 [Wrong Side]: Work 8 single crochets in Color A. Switch to Color B for 3 single crochets. Switch to Color A for 1 single crochet, then work 1 in Color B. Finish the row with 8 single crochets in Color A. Chain 1 and turn.
-
Row 15 [Right Side]: Work 7 single crochets in Color A. Switch to Color B for 4 single crochets. Switch to Color A for 1 single crochet. Switch to Color B for 2 single crochets. Finish the row with 7 single crochets in Color A. Chain 1 and turn.
-
Row 16 [Wrong Side]: Work 6 single crochets in Color A, 1 in Color B, and 1 in Color A. Switch to Color B for 5 single crochets, then work 1 in Color A, and 1 in Color B. Finish the row with 6 single crochets in Color A. Chain 1 and turn.
-
Row 17 [Right Side]: Work 9 single crochets with Color A. Switch to Color B and work 3 single crochets. Switch back to Color A and work 9 single crochets. Chain 1 and turn.
-
Row 18 [Wrong Side]: Work 8 single crochets in Color A. Switch to Color B for 2 single crochets. Switch to Color A for 1 single crochet. Switch to Color B for 2 single crochets. Finish the row with 8 single crochets in Color A. Chain 1 and turn.
-
Row 19 [Right Side]: Work 9 single crochets with Color A. Switch to Color B and work 3 single crochets. Switch back to Color A and work 9 single crochets. Chain 1 and turn.
-
Row 20 [Wrong Side]: Work 10 single crochets in Color A. Switch to Color B for just 1 single crochet. Finish the row with 10 single crochets in Color A. Chain 1 and turn.
Section 3: The Top Border
-
Row 21 [Right Side]: Work 1 single crochet into each of the 21 stitches across using Color A. Chain 1 and turn.
-
Row 22 [Wrong Side]: Work 1 single crochet into each of the 21 stitches across using Color A. Chain 1 and turn.
-
Row 23 [Right Side]: Work 1 single crochet into each of the 21 stitches across using Color A.
Once you complete Row 23, cut your Color B yarn, securing the end. Do not cut Color A, as you will use it immediately to create the border.
Adding the Border
The border neatly frames your tapestry design and prepares the square to be joined into a cushion. You will be working in a continuous frame around all four sides.
-
Setup: With Color A still on your hook, make 1 chain stitch.
-
Top & Bottom Edges: You will place exactly 21 single crochet stitches evenly across the top edge and the bottom edge.
-
Left & Right Edges: You will place exactly 23 single crochet stitches evenly along the raw row-ends of the left and right sides (roughly 1 stitch per row).
-
Creating the Corners: To transition cleanly from one side of the square to the next, make 1 chain stitch at each corner before beginning the stitches for the adjacent side.
-
Finishing Up: Once you have crocheted all the way around the square, join the last stitch to the first stitch with a slip stitch. Cut your yarn, pull it through to secure, and use your tapestry needle to neatly weave in all loose yarn tails on the wrong side of your project.