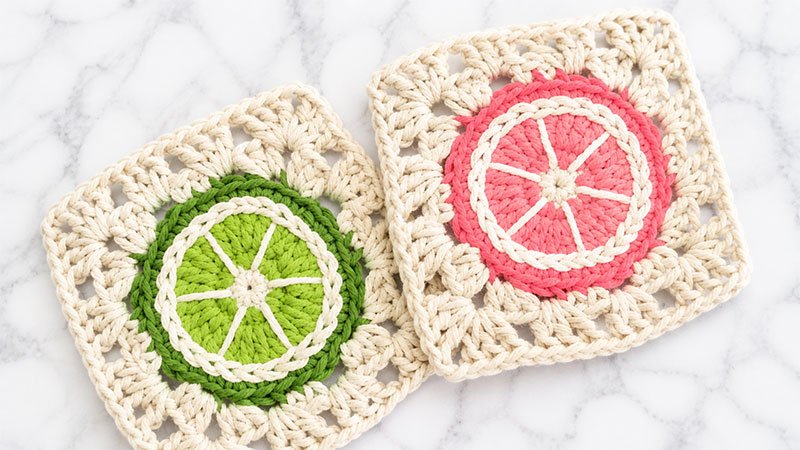
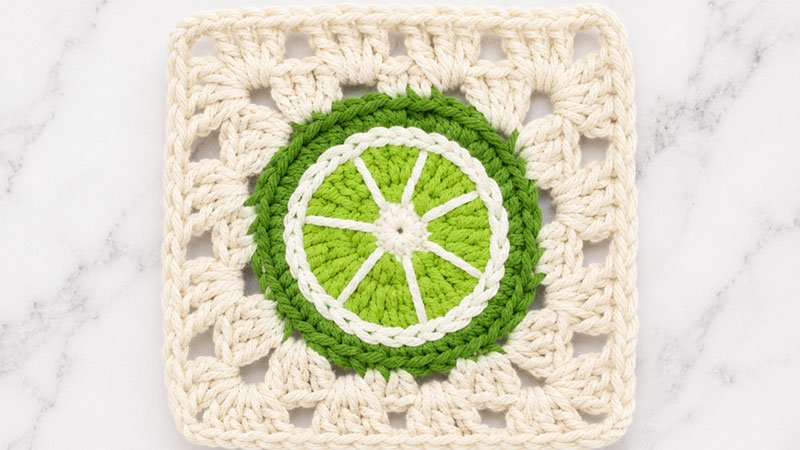
This delightful pattern creates a 4-inch (10 cm) square featuring a vibrant citrus slice (like a lemon, lime, or orange) framed by a clean, classic border.
Materials Needed
-
Yarn: Aran weight (Medium, Category 4) cotton yarn. You will need three colors:
-
Color A (Main Fruit Color): Yellow, Orange, or Lime Green
-
Color B (Pith/Detail Color): White or Off-White
-
Color C (Border Color): Cream, Beige, or any contrasting framing shade
-
-
Hook: 4.5 mm (US 7) crochet hook
-
Tools: Tapestry needle for weaving in ends and embroidery, scissors.
Stitch Abbreviations (US Terms)
-
Ch: Chain
-
St(s): Stitch(es)
-
Sl St: Slip stitch
-
Sc: Single crochet
-
Hdc: Half double crochet
-
Dc: Double crochet
-
Inc: Increase (work 2 stitches into the same single stitch)
-
BLO: Back loop only
-
MC: Magic Circle / Magic Ring
-
Sp: Space
Step-by-Step Pattern Instructions
Note on Chains: Throughout this pattern, your starting chains (Ch 1 or Ch 2) at the beginning of rounds are used purely to bring the yarn up to the correct height. They do not count as an actual stitch. Always place your first true stitch of the round directly into the very first stitch available.
Step 1: The Core of the Fruit
Round 1: Start by forming a Magic Circle using Color B. Secure it with a Ch 1. Work 6 Sc directly into the ring. Pull the yarn tail firmly to close the center hole. Complete the round by making a Sl St into the top of your very first Sc. (6 sts) Cut Color B and fasten off.
Step 2: Building the Fruit Flesh
Round 2: Turn the piece so the right side is facing you. Insert your hook into any stitch from the previous round and draw up a loop of Color A. Ch 1 to secure. Work 2 Sc into that same stitch, and then work 2 Sc into every remaining stitch around. Join the round with a Sl St into the first Sc. (12 sts)
Round 3: Ch 2. You will now double the stitch count using double crochets. Work 2 Dc into the first stitch, and continue placing 2 Dc into every single stitch around the circle. Join with a Sl St into the first Dc of the round. (24 sts)
Round 4: Ch 1. In this round, you will expand the circle evenly. Work an increase (2 Sc) into the first stitch, then work 1 Sc into each of the next 2 stitches. Repeat this pattern—[2 Sc in one st, then 1 Sc in each of the next 2 sts]—all the way around the circle. You will repeat this sequence 8 times total. Join with a Sl St to the first Sc. (32 sts) Cut Color A and fasten off.
Step 3: Squaring Off the Circle
Round 5: Turn the right side to face you. Grab Color C and join it to the back loop only (BLO) of any stitch from Round 4. Ch 1.
-
Step 1: Work 1 BLO Sc into the same stitch where you joined your yarn.
-
Step 2 (The Corner Sequence): Ch 1, skip the next 2 stitches. In the next stitch, work 3 BLO Hdc. Ch 2 (this creates your corner space). In the very next stitch, work another 3 BLO Hdc. Ch 1, skip the next 2 stitches.
-
Step 3 (The Side): Work 1 BLO Sc into each of the next 2 stitches.
-
Step 4 (Repeat): Repeat Steps 2 and 3 three more times around. On your very last repeat, you will only need to work 1 BLO Sc at the end, then join with a Sl St into your very first Sc of the round.
Round 6: Sl St forward into the first Ch-1 space. Ch 2 (this serves as the physical height/post of your first stitch). Work 2 more Dc into this same Ch-1 space, then Ch 1.
-
The Corner: In the Ch-2 corner space, work [3 Dc, Ch 2, 3 Dc], followed by a Ch 1.
-
The Sides: Work 3 Dc into the next Ch-1 space, Ch 1, and 3 Dc into the following Ch-1 space, Ch 1.
-
Repeat: Follow this pattern around the entire square: work the corner clusters in the corners and the 3-Dc clusters in the side spaces, separating every cluster with a Ch 1.
-
To finish, join with a Sl St directly into the top of the first actual Dc stitch (ignore the starting Ch-2).
-
Fasten off and weave in these ends safely using your tapestry needle.
Section Details & Finishing Touches
To make the square look like a true citrus slice, you will now add the white pith lines using surface crochet and embroidery.
      \   |   /
       \  |  /      <- Embroider 6 lines radiating from
   ----(Center)----    the center to Round 3 to create
       /  |  \         the fruit segments.
      /   |   /
1. The Circular Pith Ring
Take a length of Color B and your crochet hook. You will work a surface slip stitch ring into the natural gaps found between Round 3 and Round 4.
-
Hold your yarn behind the square.
-
Insert your hook from the front to the back through a gap, catch the yarn, and pull a loop to the front.
-
Insert your hook into the next adjacent gap between Rounds 3 and 4, catch the yarn behind the work, and pull it through both the fabric and the loop on your hook.
-
Repeat this all the way around the circle to create a clean, chained border line.
-
Do not cut the yarn yet; leave a long tail (about 12–18 inches) for embroidery.
2. Embroidering the Segment Lines
Thread the long tail of Color B onto your tapestry needle to create the 6 segment dividers:
-
Pass the needle from the surface ring down to the center Magic Circle (Round 1), following the natural alignment of the stitches.
-
Bring the needle back up through the outer edge and sew a straight line from Round 1 directly to Round 3.
-
Space these lines evenly. Each of the 6 segments should span exactly 4 double crochet stitches wide along Round 3.
-
Once all 6 lines are stitched, pull the yarn safely to the back of the square, tie a secure knot, and weave in the remaining tail.
Your beautiful citrus granny square is complete and ready to be blocked or joined into your next project!