Pattern Description:
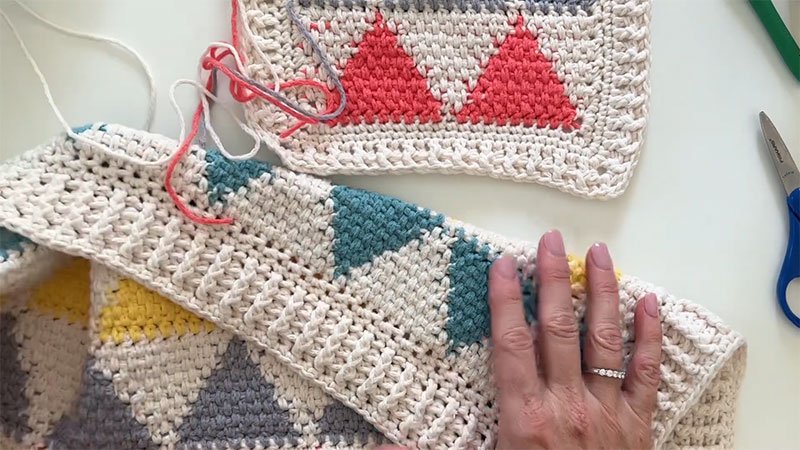
This new colorful triangles blanket features triangles alternating in between instead of stacked on top of each other.
It is part of a collection of triangle designs, with possibilities for varying triangle sizes and spacing. The designers particularly enjoy working with shapes in crochet.
Materials Needed & Measurements:
- Yarn: Bernat Bundle Up. You will need 4 skeins of Marshmallow and 1 skein each of Brook, Red Wagon, Duckling, and Violet Gray.
- Hook: 5.5 mm I hook.
- Notions: Tapestry needle, scissors, and a stitch marker.
- Measurements: The baby blanket size is 34 x 34 inches.
Stitches & Abbreviations Used:
- BPDC = Back Post Double Crochet
- DC = Double Crochet
- FPDC = Front Post Double Crochet
- HDC = Half Double Crochet
- SC = Single Crochet
- WHDC = Wide Half Double Crochet
Instructions for Making the Colorful Triangles Baby Blanket Pattern:
Here are the detailed instructions for making the Crochet Colorful Triangles Baby Blanket Pattern:
Main Blanket Pattern
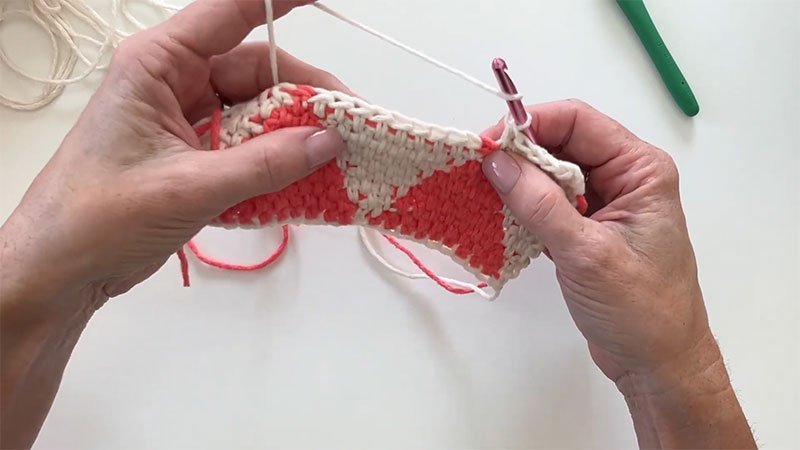
To begin the blanket, chain 113. The pattern repeat for making the blanket a larger size is any number times 10 plus 3. The main body of the blanket is worked in a series of 20-row repeats, with color changes to create the triangle design. Throughout the pattern, it is assumed the crocheter knows how to change color and carry yarn; a YouTube tutorial is available for those needing assistance with yarn carrying or the wHDC stitch.
- Row 1: With Marshmallow yarn, begin in the third chain from the hook with 1 HDC, pulling through with Red Wagon on the last step of the HDC stitch. Then, work HDC in Red Wagon in each of the next 9 stitches (sts) while bringing Marshmallow yarn along the row and working the HDC’s over the carried yarn. On the last step of the 9th HDC, pull through with Marshmallow. Work 1 HDC in Marshmallow, crocheting over the Red Wagon and changing back to Red Wagon on the last step. Repeat this sequence from the asterisk (*) across the row. CH 2 and turn with Marshmallow.
- Rows 2-9 (Red Wagon Triangle): From Row 2 onward, the wide Half Double Crochet (wHDC) stitch is used. Each row gradually shifts the Red Wagon color to form the triangle shape against the Marshmallow background. The last HDC of each row is worked between the last post and the turning chain.
- ROW 2: 1 HDC in Marshmallow, 8 HDC in Red Wagon. 2 HDC in Marshmallow. Repeat from across the row.
- ROW 3: 2 HDC in Marshmallow, 7 HDC in Red Wagon, 3 HDC in Marshmallow. Repeat from across the row ending with 1 HDC in each of the last 2 spaces (sps) in Marshmallow.
- ROW 4: 2 HDC in Marshmallow, 6 HDC in Red Wagon, 4 HDC in Marshmallow. Repeat from across the row ending with 1 HDC in each of the last 3 sps in Marshmallow.
- ROW 5: 3 HDC in Marshmallow, 5 HDC in Red Wagon, 5 HDC in Marshmallow. Repeat from across the row ending with 1 HDC in each of the last 3 sps in Marshmallow.
- ROW 6: 3 HDC in Marshmallow, 4 HDC in Red Wagon, 6 HDC in Marshmallow. Repeat from across the row ending with 1 HDC in each of the last 4 sps in Marshmallow.
- ROW 7: 4 HDC in Marshmallow, 3 HDC in Red Wagon, 7 HDC in Marshmallow. Repeat from across the row ending with 1 HDC in each of the last 4 sps in Marshmallow.
- ROW 8: 4 HDC in Marshmallow, 2 HDC in Red Wagon, 8 HDC in Marshmallow. Repeat from across the row ending with 1 HDC in each of the last 5 sps in Marshmallow.
- ROW 9: 5 HDC in Marshmallow, 1 HDC in Red Wagon, 9 HDC in Marshmallow. Repeat from across the row ending with 1 HDC in each of the last 5 sps in Marshmallow. Cut Red Wagon yarn after this row, leaving a long tail for weaving in.
- Row 10 (Transition): With Marshmallow, work 1 HDC into each sp across the row. Pull through with Violet Gray on the last step of the last stitch of the row. CH 2 and turn.
Violet Gray Triangle(Rows 11-19):
These rows follow a similar increasing and decreasing pattern of stitches to form the Violet Gray triangle, mirroring the Red Wagon section.
- ROW 11: 5 HDC in Violet Gray, 1 HDC in Marshmallow, 9 HDC in Violet Gray. Repeat from across the row ending with 1 HDC in each of the last 5 sps in Violet Gray.
- ROW 12: 4 HDC in Violet Gray, 2 HDC in Marshmallow, 8 HDC in Violet Gray. Repeat from across the row ending with 1 HDC in each of the last 5 sps in Violet Gray.
- ROW 13: 4 HDC in Violet Gray, 3 HDC in Marshmallow, 7 HDC in Violet Gray. Repeat from across the row ending with 1 HDC in each of the last 4 sps in Violet Gray.
- ROW 14: 3 HDC in Violet Gray, 4 HDC in Marshmallow, 6 HDC in Violet Gray. Repeat from across the row ending with 1 HDC in each of the last 3 sps in Violet Gray.
- ROW 15: 3 HDC in Violet Gray, 5 HDC in Marshmallow, 5 HDC in Violet Gray. Repeat from across the row ending with 1 HDC in each of the last 3 sps in Violet Gray.
- ROW 16: 2 HDC in Violet Gray, 6 HDC in Marshmallow, 4 HDC in Violet Gray. Repeat from across the row ending with 1 HDC in each of the last 2 sps in Violet Gray.
- ROW 17: 2 HDC in Violet Gray, 7 HDC in Marshmallow, 3 HDC in Violet Gray. Repeat from across the row ending with 1 HDC in each of the last 2 sps in Violet Gray.
- ROW 18: HDC in Violet Gray, 8 HDC in Marshmallow, 2 HDC in Violet Gray. Repeat from across the row ending with 1 HDC in last sp in Violet Gray.
- ROW 19: HDC in Violet Gray, 9 HDC in Marshmallow, HDC in Violet Gray. Repeat from across the row ending with 1 HDC in last sp in Violet Gray, pull through with Marshmallow. CH 2 and turn.
- Row 20 (Transition): HDC into each sp across the row, CH 2 and turn.
To complete the blanket, repeat rows 1 through 20 with the color changes of Duckling and Brook, then repeat all color changes twice more ending with 120 rows of pattern.
Border Instructions
Once the main blanket body is complete, secure the last stitch with a marker and weave in all ends. The border consists of 8 rounds. For Rounds 1-7, you should not join or turn at the end of the round.
- ROUND 1: Do not turn after the last stitch. CH 2 and place a SC in the corner. Work 2 SC at the end of every other row. Place [SC, CH 2, SC] in each corner. Work SC into each stitch on the top and bottom of the blanket.
- ROUND 2: Work [SC, CH 2, SC] around the chain 2 space of each corner. Work 1 SC into each SC.
- ROUND 3: Work [DC, CH 2, DC] around the chain 2 space of each corner. Work 1 DC into each SC.
- ROUND 4: Work [DC, CH 2, DC] around the chain 2 space of each corner. Work alternating FPDC and BPDC around each DC.
- ROUND 5-7: Repeat Round 4. A tip for these rounds is to ensure you are working either FPDC or BPDC around the DC’s that form the corner stitches to maintain the alternating pattern. Also, work a FPDC around FPDC of the previous row, and BPDC around BPDC to form the ribbed look.
ROUND 8: Work SC into each DC and [SC, CH 1, SC] in corners. SL ST to the first SC and tie off, then weave in the end.
Download PDF