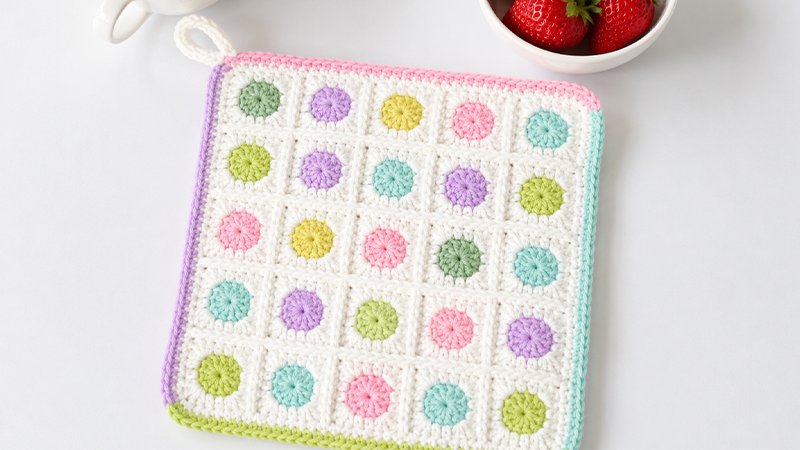
Brighten up your kitchen with this vibrant, retro-inspired potholder. Built from 25 individual “dot” mini-squares, this project combines solid colorful circles with clean white borders. It is an excellent way to use up leftover scrap yarn while creating a thick, functional, and eye-catching accessory for your home.
Supplies Needed
-
Hook Size: 3.0 mm (US C/2 or UK 11)
-
Yarn: DK weight (Light, Category 3) 100% cotton yarn. You will need a main neutral color (like cream or white) for the background and borders, plus an assortment of contrast colors for the colorful centers.
-
Tools: Tapestry needle for weaving in ends, scissors.
Pattern Metrics
-
Finished Size: Approximately 6.2 inches (16 cm) square.
-
Gauge: Each finished mini-square measures roughly 1.2 inches (3 cm) across.
Core Terminology (US Stitch Guides)
-
Ch: Chain
-
Sc: Single Crochet
-
Hdc: Half Double Crochet
-
Dc: Double Crochet
-
Sl St: Slip Stitch
-
MC: Magic Circle / Adjustable Ring
-
St(s): Stitch(es)
-
Inc: Increase (work 2 stitches into the exact same stitch)
-
[ ] / ( ): Work all instructions inside these brackets into the same single stitch, or repeat the sequence as directed.
Step-by-Step Directions
1. The Scrappy Dot Squares (Create 25)
Round 1 (The Colorful Center): Using any accent color, form a magic circle.
-
Chain 2 (this does not count as a stitch).
-
Work 12 double crochets directly into the ring.
-
Pull the yarn tail to close the center hole tightly.
-
Join with a slip stitch to the top of your very first double crochet. (12 stitches total)
-
Cut yarn and fasten off.
Round 2 (Squaring the Circle): Pull up a loop of your main background white/cream yarn in any stitch from Round 1.
-
Chain 1 (does not count as a stitch), then work 1 half double crochet into that same starting stitch.
-
*In the next stitch, create a corner by working: [1 half double crochet, 2 double crochets, 1 half double crochet] all together.
-
Work 1 half double crochet into each of the next 2 stitches.*
-
Repeat from * to * a total of 3 times.
-
In the next stitch, work your final corner: [1 half double crochet, 2 double crochets, 1 half double crochet].
-
Work 1 half double crochet into the remaining stitch.
-
Join with a slip stitch to the first half double crochet of the round. (24 stitches total)
-
Fasten off and secure your yarn ends.
2. Joining the Grid
Lay out your 25 mini-squares in a 5×5 grid, arranging the colors to your liking.
To join them, you will connect them row by row horizontally, and then repeat the process vertically. Use your main background yarn:
-
Align two squares face-up.
-
Attach your yarn to the outer corner double crochet of the bottom square.
-
Slip stitch or whipstitch across through the inner loops only of both squares, matching stitch for stitch.
-
When you reach the next corner, grab the next pair of squares from your layout and continue joining without cutting the yarn.
-
Once all rows are joined in one direction, turn the project 90 degrees and repeat the process across the perpendicular seams to finalize the 5×5 grid.
3. Border Expansion
Round 1: Attach the background white yarn to any stitch on the perimeter.
-
Single crochet evenly around the entire edge. Work 7 single crochets along the side of each mini-square.
-
When you reach the four outer corners of the potholder, work a single crochet increase (2 sc) into each corner double crochet stitch. (This yields 37 stitches along each side).
-
Slip stitch to join and fasten off.
Round 2 (Color Accent Frame): Join a contrast color of your choice in the second stitch of any corner increase.
-
*Work a single crochet increase in the corner, single crochet into the next 35 stitches, then work a single crochet increase in the next corner stitch.*
-
Switch to a new contrast color for each side if you prefer a multi-colored frame, repeating from * around.
-
Join and fasten off.
4. Adding the Hanging Loop
Turn the potholder so the wrong side is facing you.
-
Attach your main background yarn to the edge where two border colors meet at a corner.
-
Chain 20, then secure the loop by working a slip stitch into the adjacent corner stitch.
-
Chain 1 and turn so the right side is facing you.
-
Work single crochets densely around the chain loop itself (do not pierce individual chain links; simply wrap the stitches over the chain) until the loop is completely covered and sturdy.
-
Slip stitch to the base to secure, fasten off, and weave in all remaining yarn tails.