Pattern Description:
This classic, winter-approved crochet knit stitch hat features “knit-look stitches” that are easier to create than they appear.
It’s a quintessential part of a winter wardrobe, with stitches that pop when worked with bulkier yarn.
The pattern is free and includes a video tutorial for visual learners and guidance on working the special “Snowfall Stitch”.
Materials Needed & Measurements:
- Yarn:
- Mighty Stitch in 2-3 colors (medium weight yarn).
- #5 Hue and Me (bulkier yarn) is mentioned for stitches to pop.
- It is noted that using a thicker yarn is doable, requiring a shorter band and fewer body stitches.
- Yarn Weight: Medium weight yarn is specified for Mighty Stitch. A bulkier #5 weight yarn is also suggested.
- Hook: G-J hook (a gauge swatch is recommended to determine the correct hook).
- Notions:
- Darning Needle
- Fur or Yarn pom-pom
- Tape measure
- Measurements:
- Gauge: 14 dc = 4″.
- Teen/Adult Crochet Hat Height: Approximately 9″ tall.
- Band Length: Repeat row 2 until the row reaches 19″ – 20″ long. The band should be measured by gently stretching it outwards to ensure it’s snug but not too tight.
- Hat Body Stitches: 72 stitches around the top of the band for the first row.
Stitches & Abbreviations Used:
- Abbreviations (US Terms):
- Ch – chain
- Sc – single crochet
- Dc – Double Crochet
- Hdc – Half Double Crochet
- Sl st – Slip Stitch
- St – stitch
- Special Stitch:
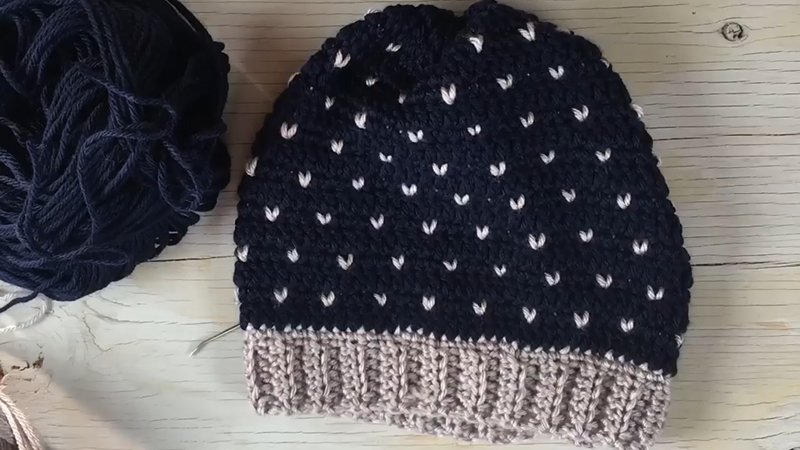
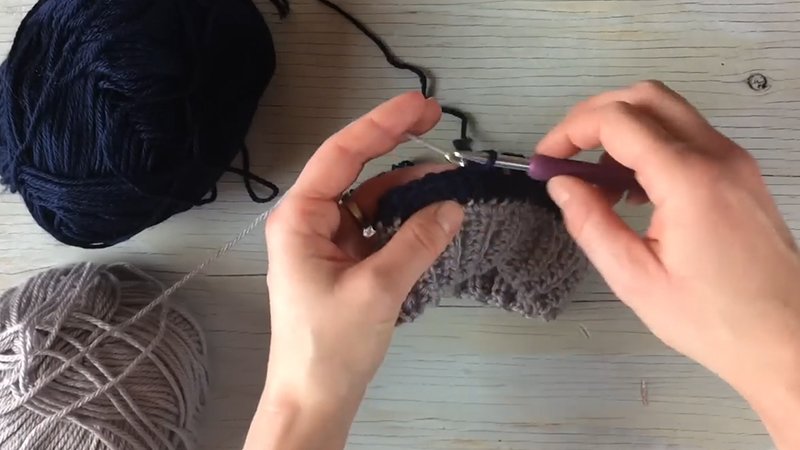
- Snowfall Stitch: Work this “half” sc by inserting hook, yarning over with the second color, pulling it through. Drop the second color, and finish the stitch with the first color. This stitch is demonstrated in a video tutorial.
Instructions for Making the Crochet Snowfall Hat Pattern:
Band Construction (Teen/Adult Size)
The band is worked first, forming the ribbed brim of the hat:
- Ch 9.
- Row 1: Work Hdc in the 2nd ch from the hook. Then, Hdc 7. Turn. (You should have 8 sts).
- Row 2: Ch 1. Work Hdc in the same st as the chain. Work Hdc 6 in the back loops only. Finish by working Hdc in the last st, through both loops. Turn.
- Repeat Row 2 until the band measures 19″ – 20″ long.
- Important Measurement Note: When measuring the band, gently stretch it outwards. The goal is for it to be snug but not so tight that you have to “yank it” to reach the desired length. If your yarn isn’t stretchy at all, it might not be suitable for this project.
- Starting Stitch Clarification: When you chain 1 (or 2) at the beginning of a row, always make the beginning stitch of that row in the same stitch as the chain.
- Once the desired length is reached, slip stitch the short ends of the band together.
- Turn the band so that the seam is on the inside and the loop is at the top. You are now ready to proceed to the hat body.
Hat Body Construction
The hat body is worked in the round, building upon the band:
- Row 1: Ch 1. Work Sc 72 evenly around the top of the band. Join with a sl st. (72 sts).
- Join the 2nd color.
- Row 2: Ch 2. Work Dc in each st around. Join with a sl st. (72 sts).
- Row 3: Ch 1. Repeat the sequence: Sc 3. work Snowfall Stitch in next st all around the hat. Join with a sl st. (72 sts).
- Row 4: Ch 2. Work Dc in each st around. Join with a sl st. (72 sts).
- Row 5: Ch 1. Work Sc. Then, repeat the sequence: Work Snowfall stitch in next st. Sc 3. all around, making sure to leave the last st unworked. In the last st, work a Snowfall Stitch. Join with a sl st. (72 sts).
- Rows 6 – 17: Repeat Rows 2 – 5, respectively, until you have completed Row 17 and are ready to begin Row 18.
- Row 18: Ch 2. (Work with the 1st color only for this row). Work Dc in the same st. Then, repeat the sequence: Dc2tog. Dc all around the hat. Join with a sl st. (You should have 48 sts).
- Row 19: Ch 2. Work Dc2tog 24 times around the hat. Join with a sl st. (You should have 24 sts).
- Tie off the yarn.
Finishing
The final steps involve closing the hat and adding a decorative pom-pom:
- Tie off all the loose ends securely.
- Thread a length of yarn onto your darning needle.
- Turn your hat inside out.
- Sew a running stitch going in and out around the very top edge of the hat.
- Pull the ends of the yarn to cinch the top of the hat shut tightly.
- Tie the ends in a firm knot to secure the closure.
- Turn the hat right-side out.
- Finish your hat by attaching a fur or yarn pom-pom.
Download Free PDF: