Pattern Description:
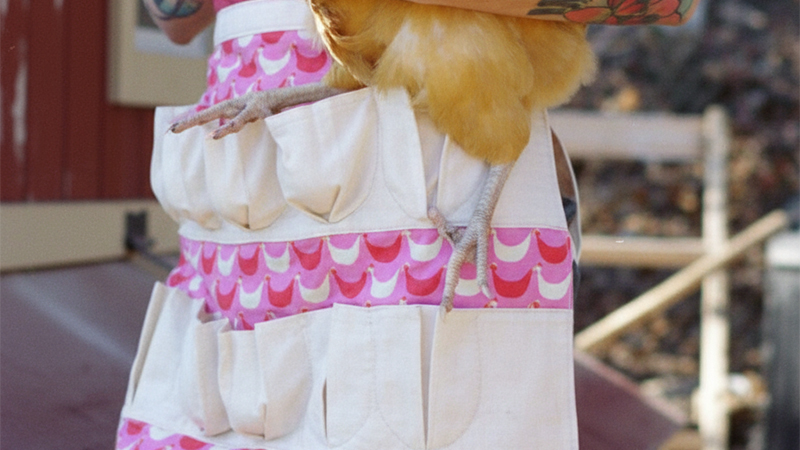
The Gathering Apron Pattern is a genius design for safely collecting eggs or other things. It features egg-shaped pockets that cradle the eggs like cups inside the apron.
This structure prevents the “little breakfast nuggets” from falling out, even when the wearer bends over to pet a cat or clean the coop. The pattern allows for different adult sizes and a child size, which holds eight eggs.
Materials Needed & Measurements:
The following materials and measurements are listed for making the apron:
| Item | Quantity/Description | |
| Pattern | Swoon Patterns Egg Gathering Apron pattern (free on their website) | |
| Main Fabric | 1/2 yard medium weight fabric | |
| Contrasting Fabric | 1 1/4 yards (Note: The author of the tutorial did not use a contrasting fabric) | |
| Interfacing | 1 1/4 yards lightweight fusible interfacing (Note: The author sometimes used canvas as interlining and skipped interfacing on main pieces) | |
| Tools/Notions | Sewing machine, thread, and notions | |
| Marking | Chalk pen or erasable pen | |
| Measuring | Ruler | |
| Holding | Clips and pins |
Instructions for Making the Gatherer Apron Pattern:

Preparation and Interfacing
Decide on the size you are going to make. The pattern allows for different adult sizes, and the child size holds eight eggs.
When making different adult sizes, you can simply fold over the pattern rather than tracing off a new pattern piece.
Once your pieces are cut, apply your interfacing. Follow the pattern instructions for applying lightweight fusible interfacing.
Note that the author of the tutorial used canvas as interlining for some pieces and skipped using interfacing on the main pieces.
Creating the Pocket Tubes
Next, focus on constructing the pocket portions. Take the long pocket panel piece and sew it RST (right sides together) along the long edge to form a tube.
Once sewn, turn the tube out and press it flat. Repeat this process for the second pocket panel.
Marking and Pressing the Pockets
Now you will mark the fold lines for the pockets. Grab your ruler and a chalk pen or erasable pen.
According to the instructions, use the ruler to measure the distance from the edges and between the pockets, marking “the heck out of the pocket tubes”.
The author found it helpful to make the vertical lines a few inches long. After marking, take the tubes to the iron and press them.
Attaching the Pocket Panels
Once the pockets are pressed, use clips and pins to secure the panel in place. Use pins to keep the pocket tubes attached to the apron itself, and use clips to keep the pocket folds together.
Utilize a tape measure and the pattern itself to ensure the pocket panels are placed in the exact designated locations.
Topstitch the bottom edge of the pocket panel to the apron. The author advises going “very slowly” during this process, “No pedal to the metal here”, and removing pins as you sew.
Sewing the Egg-Shaped Pockets
Choose a chalk or erasable pen to trace the shape onto the fabric. Line the top and bottom fold with the pattern piece and trace the shape to create the egg pockets.
The author found that clipping the pattern piece helped keep it in place while tracing. For the child size, you will make 8 egg shapes; an adult-sized apron requires 10.
The egg shape is designed to cradle the egg “like a cup, inside the apron,” preventing movement and spills unless the wearer is hanging upside down.
Continue tracing the pattern shape onto the apron for both pocket panels. Starting on one side, sew around the outline of each egg shape pocket.
Go slowly, as this involves “a lot of circular sewing”. The author suggests hand cranking the wheel a few times around the edges to ensure accuracy.
Assembling the Apron Body
After finishing the pockets, place the apron back and front pieces together RST (right sides together). Sew the sides and the bottom only. Ensure you clip your curves and trim the seam allowances.
Turn the apron right sides out. Use a chopstick or another turning tool to carefully poke out the corners and edges.
Creating the Waist Strap
The final step is the waist strap. Sew the waist tie in a manner similar to sewing any other piece of bias binding. Make the waist strip according to the pattern instructions.
Match the raw edge of one side of the strap to the top edge of the apron. Sew in the folded area where this raw edge is matched.
Next, fold the other side of the strap over and use clips to hold it in place. Clip the entire strap together. Turn the end under and then sew from one end to the other.
The pattern is described as wonderful. Although the instructions may include a step to baste the raw top pieces together, the author skipped this, noting it might be beneficial for a child or beginner sewist.
Upon completion, the apron is ready to safely gather eggs and is considered a useful farmer’s tool.
Download Free PDF: