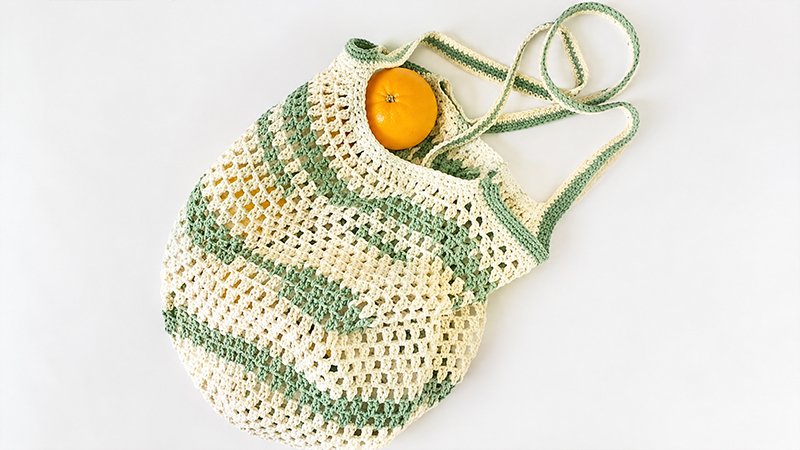
This stylish, eco-friendly market bag is a sustainable alternative to single-use plastic bags. Unlike traditional open-mesh market totes, this pattern utilizes a slightly denser “granny stitch” variation.
The tighter netting keeps smaller pieces of produce secure while remaining highly expandable and breathable.
The bag features a bottom-up construction, beginning with a flat hexagon base that transitions smoothly into a seamless cylindrical body. Thick, sturdy borders and matching shoulder straps are added at the top for lasting durability.
Pattern Details
-
Skill Level: Easy / Beginner-friendly
-
Finished Dimensions: Body measures roughly 14.5″ wide by 16″ tall when laid flat (excluding handles). The shoulder straps add an additional 15″ in height.
-
Gauge: 3 initial rounds of the hexagon should measure 4″ across its widest diagonal point.
Required Materials
-
Yarn: Approximately 465 yards of worsted weight (Medium, Size 4) cotton yarn. A durable 100% cotton yarn provides structure and washes well.
-
Hook: 4.5 mm (US 7) crochet hook.
-
Notions: Tapestry needle for weaving in ends, pair of scissors.
Stitch Directory (US Terms)
-
Ch: Chain
-
Dc: Double Crochet
-
Sc: Single Crochet
-
MC: Magic Circle
-
Sl St: Slip Stitch
-
Sp / Sts: Space / Stitches
-
Sc Dec (Single Crochet Decrease): Insert hook into next stitch, pull up a loop, insert hook into the following stitch, pull up a loop, yarn over, and pull through all three loops on your hook.
Step-by-Step Instructions
Part 1: The Hexagon Base
The base is worked in a continuous hexagon shape using standard granny stitch clusters. For rounds 1–4, you will establish six distinct corners to create the flat bottom.
-
Round 1: Create a Magic Circle. Chain 4 (this counts as your first double crochet and a chain-2 corner space). Inside the circle, work
[2 dc, ch 2]five times. Work 1 more dc into the ring. Join with a slip stitch into the 3rd chain of your starting chain-4. You will have 12 double crochets and 6 corner spaces. -
Round 2: Slip stitch into the first corner space. Chain 4, work 2 dc into that same space.
*Chain 1, then work a full corner cluster[2 dc, ch 2, 2 dc]into the next corner space. Repeat from*5 times around. To finish the round, chain 1, work 1 dc into your very first corner space, and slip stitch into the 3rd chain of the starting chain. (24 dc, 6 corner spaces, 6 side spaces). -
Round 3: Slip stitch into the corner space. Chain 4, work 2 dc into the same space.
*Chain 1, work 2 dc into the side chain space, chain 1, then work your corner cluster[2 dc, ch 2, 2 dc]into the next corner space. Repeat from*5 times around. Finish by chaining 1, working 2 dc into the last side space, chaining 1, adding 1 dc to the first corner space, and joining with a slip stitch to the 3rd starting chain. (36 dc). -
Round 4: Slip stitch into the corner space. Chain 4, work 2 dc into the same space.
*Work[ch 1, 2 dc]into each of the next two side chain spaces, chain 1, then work a corner cluster[2 dc, ch 2, 2 dc]into the corner space. Repeat from*5 times around. Finish the round by working your side spaces, adding 1 final dc to the starting corner, and joining with a slip stitch to the 3rd starting chain. (48 dc). -
Rounds 5–9: Continue growing the hexagon by following this established pattern sequence. You will add one additional 2-dc cluster along each side edge with every passing round, while keeping the
[2 dc, ch 2, 2 dc]corner increases identical. At the end of round 9, your flat base should measure roughly 12 inches from one point to the opposite point.
Part 2: The Main Body
In this section, you stop increasing at the corners. This forces the flat hexagon shape to bowl upward, creating the walls of your bag.
-
Round 10: Slip stitch into the first corner space. Chain 3 (this counts as a double crochet and a chain-1 space). Working all the way around the perimeter, place
[2 dc, ch 1]into every single chain-1 side space and chain-2 corner space. Once you reach the end of the round, place 1 dc into your starting space, and join with a slip stitch into the 3rd chain of your initial chain-3. (108 dc total). -
Round 11: Slip stitch into the next chain space. Chain 3 (counts as a dc and ch-1 space). Work
[2 dc, ch 1]into every chain space around the entire bag. Place 1 final dc in the starting space, and join with a slip stitch into the 3rd chain of the starting chain-3. -
Rounds 12–33: Repeat the exact instructions from Round 11. Do not cut your yarn after completing Round 33.
Part 3: Top Borders (Front & Back)
The top edge is flattened out using single crochet decreases to cinch the opening slightly before adding handles.
-
Front Border (Row 1): Slip stitch into the next chain space, chain 1 (does not count as a stitch). Work 27 single crochet decreases sequentially across the next section of stitches. (27 stitches remaining).
-
Front Border (Rows 2–3): Chain 1, turn your work. Place 1 single crochet into every stitch across. Fasten off at the end of Row 3.
-
Back Border (Row 1): Go back to the rim of Round 33. Skip 27 stitches away from the front border edge. Reattach your yarn to the next double crochet stitch. Chain 1, and work 27 single crochet decreases across this section. (27 stitches).
-
Back Border (Rows 2–3): Chain 1, turn your work. Place 1 single crochet into every stitch across. Do not cut your yarn at the end of Row 3.
Part 4: The Handles & Final Edging
The straps and final reinforcement are worked together in continuous rounds around the top opening of the bag.
-
Round 1: Chain 1. Single crochet 3 times down the vertical side of the back border. Work 27 single crochets across the unworked body stitches below. Single crochet 3 times up the vertical side of the front border. Chain 120 to form the first long strap (adjust this count if you prefer a shorter or longer strap). Connect to the opposite side of the front border with 3 single crochets down its side edge. Work 27 single crochets across the remaining unworked body stitches below. Single crochet 3 times up the side of the back border, then chain 120 for the second strap. Join to the beginning of the round.
-
Round 2: Single crochet into every stitch around the perimeter. When you reach the long handle chains, work your single crochets specifically into the back bumps of the chains to create a clean, sturdy edge. (306 stitches total).
-
Rounds 3–5: Single crochet in every stitch around the entire bag and handles to build up strap thickness.
-
Finishing: Fasten off your yarn, weave in all loose remaining tails securely with your tapestry needle, and block your bag if desired. Your market tote is ready for use!