Pattern Description:
The Granny Stripe Scarf Crochet Pattern is a super easy and a super size scarf. It is made with worsted-weight yarn and using a self-striping yarn cake for the project.
The finished scarf is approximately 70 inches by 11.5 inches, not including the fringe.
Materials Needed & Measurements:
- Yarn: Just under 400g of yarn. The pattern suggests a self-striping yarn cake and used yarn from KnitCrate.
- Yarn Weight: Worsted weight yarn.
- Hook:
- K/6.5 mm hook for the foundation row.
- J/6.0 mm hook for the remainder of the pattern.
- Notions:
- Yarn needle
- Scissors
- Measurements: Approximate Finished Size (not including fringe): 70″ X 11.5″.
Stitches & Abbreviations Used:
- ch – chain
- sc – single crochet
- foundation sc – foundation single crochet
- dc – double crochet
- CL – cluster – group of 3 dc in one space
Instructions for Making the Granny Stripe Scarf Pattern:
Starting the Foundation Row (Row 1)
You will begin by establishing the length of your scarf using a special foundation stitch:
- Using your K/6.5 mm hook, ch 2.
- Row 1: Starting in the 2nd ch from the hook, work foundation sc 178. This will create a row of 178 sc. The pattern notes that you can use any multiple of 3 + 1 for customizing the length. This foundation row provides a stretchy and clean edge for the scarf.
Changing Hooks
- After completing Row 1, you will change to your J/6.0 mm hook for all subsequent rows of the main body of the scarf.
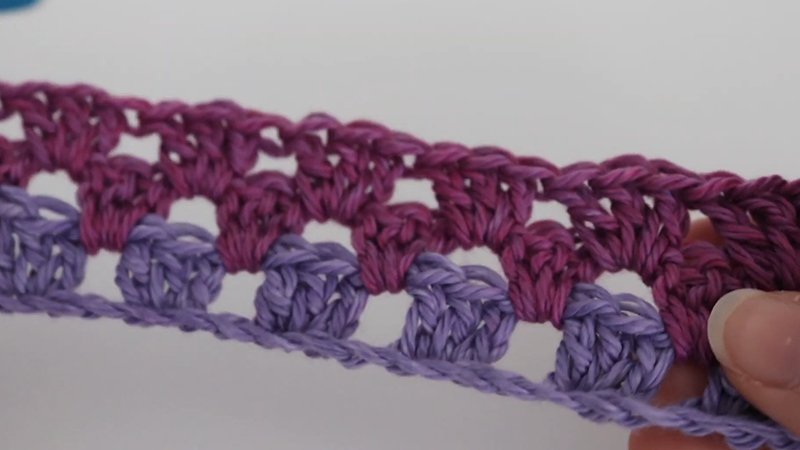
Building the Granny Stripes (Rows 2-4)
These rows establish the distinctive granny stripe pattern. Remember that a ch 3 counts as a dc for the beginning of rows where indicated.
- Row 2:
- Ch 3, then turn your work.
- Dc in the same stitch. This forms the first part of your granny stripe cluster.
- Now, you will repeat the following sequence across the row: skip 2 stitches, then work a CL (group of 3 dc) in the next stitch.
- Continue to repeat from to across the entire row. At the end of this row, you will have 178 dc.
- Row 3:
- Ch 3.
- Work a CL (group of 3 dc) in the space between the CL from the previous row, in each space across. The “space between the CL” refers to the gaps created by skipping stitches in the row below. This is where your new clusters will be placed to form the stripe effect.
- Finish the row by working a dc in the turning ch. This row will result in 179 dc.
- Row 4:
- Ch 3, then turn your work.
- Dc in the same stitch.
- Again, work a CL (group of 3 dc) in the space between the CL from the previous row, in each space across.
- Complete the row by working 2 dc in the turning ch space. This row should also result in 178 dc.
Repeating for Desired Width
- To achieve the desired width for your scarf, repeat rows 3 & 4.
- The pattern suggests repeating these rows from Row 5 through Row 25, or until you have reached your preferred width.
Finishing Your Scarf
Once you have reached your desired width, it’s time to complete your project:
- Fasten off your yarn.
- Weave in the ends neatly using your yarn needle.
Adding Fringe
Fringe adds a decorative touch to the scarf and is an optional step. The pattern provides specific instructions for adding fringe:
- The designer added 12 sections of fringe on each end of the scarf.
- Each of these fringe sections was made using six 10-inch pieces of yarn.
- After attaching all the fringe, it was then trimmed and steamed for a finished look.