Pattern Description:
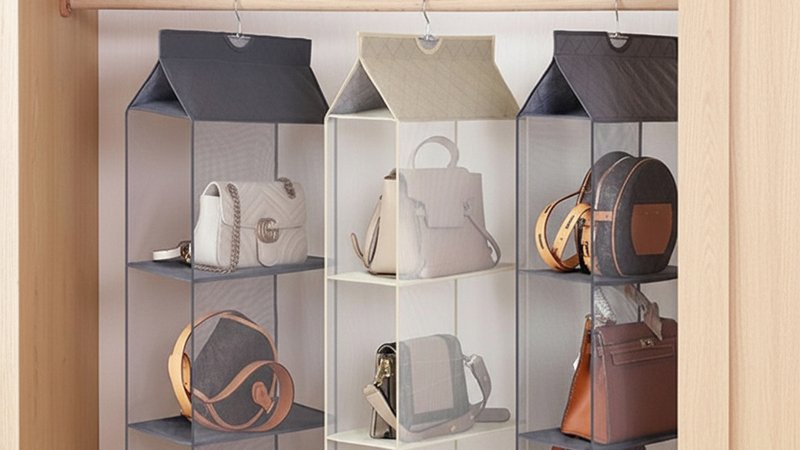
This customizable hanging organizer features 10” x 12” pocket units that can be made from fabric, mesh, or vinyl.
Units stack vertically to create organizers of any size, from a 2-pocket car model to a 5-pocket closet version. Optional features include a grommet panel and a hanging strap.
The pattern provides step-by-step instructions for cutting, assembling, stabilizing, and finishing, making it a quick, versatile project ideal for home or travel.
Materials Needed & Measurements:
The organizer is made up of ‘pocket units’ that are each 10” tall and 12” wide when finished.
For each ‘pocket unit’:
- Pocket Back: 1 fabric rectangle, 11” x 13”.
- Pocket Front Options:
- 1 mesh or vinyl rectangle, 8 1/2” x 13” OR
- 1 fabric rectangle, 17” x 13”.
- Pocket Binding: 1 fabric strip, 2” x 13”.
For the backing (not optional):
- Fabric: A long rectangle, 13” wide, and (10” times the number of pocket units plus 1”) tall.
- Examples: 2 pockets = 21” x 13”; 5 pockets = 51” x 13”.
- Stabilizer: A rectangle cut (or pieced together) the same size as the backing fabric rectangle.
For the optional ‘grommet panel’:
- Fabric: 1 fabric rectangle, 4” x 13”.
- Stabilizer: 1 strip, 1 1/2” x 12”.
- Hardware: 2 extra large eyelets (or similar).
For the optional ‘hanging strap’:
- Fabric: 1 strip, 4” x 16”.
Instructions for Making the Hanging Organizer Tote Bag Pattern:
Planning and Cutting
First, you must plan your organizer. Each finished ‘pocket unit’ is 10” tall and 12” wide. You can customize the organizer to fit your needs, such as a 2-pocket car organizer or a 5-pocket closet organizer.
You must decide whether each pocket front will be made from mesh, vinyl, or fabric.
- Cutting Requirements (Per Pocket Unit): For each unit, you need a pocket back (1 fabric rectangle, 11” x 13”) and a pocket binding strip (1 fabric strip, 2” x 13”).
The pocket front requires either 1 mesh or vinyl rectangle (8 1/2” x 13”) or 1 fabric rectangle (17” x 13”).
- Cutting the Backing: The backing piece (which is not optional) must be 13” wide. Its height is determined by the number of pocket units multiplied by 10”, plus 1”.
For example, a 5-pocket organizer requires a backing rectangle that is 51” x 13”. You will also need a stabilizer (like ByAnnies Soft and Stable Stabilizer, Pellon Flex Foam, or fusible fleece) cut to the same size as the backing fabric rectangle.
Pressing the Binding Strips
Prepare all of the binding strips by pressing them in a bias tape style. First, fold the strip in half lengthwise and press.
Then, open it up and fold the long edges to the center, pressing them. Finally, fold the strip in half again and press.
Sewing the Pocket Units
The beginning of the pocket assembly differs based on the material chosen for the pocket front.
- Prepare the Pocket Front:
- Mesh/Vinyl: If using an 8 1/2” x 13” piece of mesh or vinyl, wrap the binding strip around the top 13” edge. Secure it with clips or pins. Stitch in place close to the fold.
- Fabric: If using a 17” x 13” fabric rectangle, fold it in half to create an 8 1/2” x 13” rectangle. Wrap the binding strip around this folded (top) edge. Pin and stitch in place close to the fold.
- Assemble the Unit: Lay the pocket front on top of the pocket back (both right sides up) with the bottom edges aligned. Baste the side edges together. Repeat this process until all pocket units are sewn.
- Join the Pockets: Arrange the finished pocket units in the desired column order. Pin or clip them together one by one, connecting the top edge of one unit to the bottom edge of the next. Stitch all the pockets together to form the column.
Sewing the Grommet Panel (Optional)
If you decide to include a grommet panel:
- Fold the 4” x 13” panel strip in half lengthwise.
- Stitch the short ends using a 5/8” seam allowance. Turn the panel right side out and press it flat.
- Insert the 1 1/2” x 12” piece of stabilizer (such as fusible fleece or Soft and Stable) into the strip, note that this will be a tight fit. Baste the open edges together with a 1/4” seam allowance.
- Mark the placement in both corners and install the two extra large eyelets (or similar).
- Center the completed grommet panel on the top or bottom of the pocket column (right sides together) and baste it in place.
Sewing the Hanging Strap (Optional)
If you want a hanging strap (useful for a car organizer hanging from a seat headrest):
- Take the 4” x 16” strip and fold it in half lengthwise. Stitch the long edges together with a 1/2” seam allowance.
- Turn the strap right side out and press it flat.
- Baste the ends of the strap in place 1” from each edge, typically at the top of the organizer.
Sewing the Back of the Organizer
- Prepare the Backing: Apply the stabilizer to the backing fabric. If using fusible stabilizer, fuse it to the backing piece.
If using non-fusible stabilizer (like ByAnnies Soft and Stable), baste it 1/4” from the edges.
- Assemble: Place the stabilized backing piece on top of the column of pockets, right sides together. Pin or clip the edges all the way around.
- Stitch and Turn: Stitch all the way around with a 1/2” seam allowance, leaving a 6” opening for turning.
- Clip the corners, press the edges back at the opening, and turn the organizer right side out through the opening. Press it flat, being careful not to use the iron on any vinyl pockets.
- Pin or clip the edges of the opening and sew it closed.
Finishing
To ensure the pockets are secured to the stabilized backing, topstitch the organizer just below the bottom of each pocket.
Sewing this Hanging Organizer is very fast and easy, capable of being completed in an afternoon.