Pattern Description:
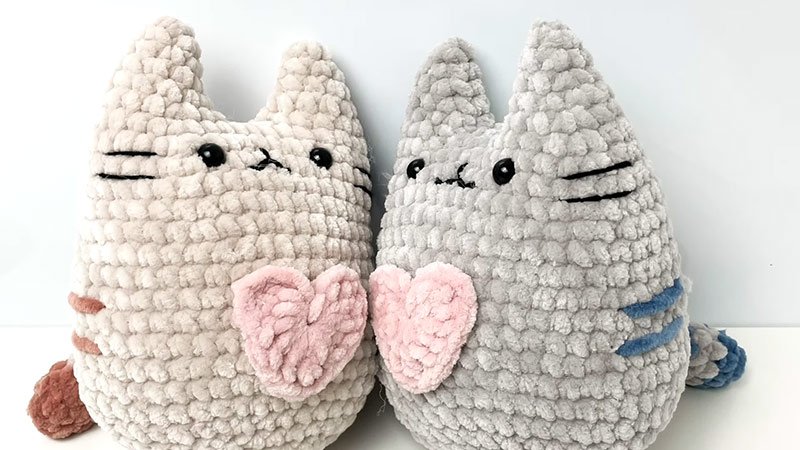
The Itty Bitty Crochet Kitty is an adorable, beginner-friendly amigurumi project that’s quick to whip up and oh-so-customizable.
Whether you’re new to crochet or just looking for a small, sweet pattern to play with, this tiny cat is the perfect fit.
Make it your own by using different colors, adding stripes or spots, or using novelty yarn for texture.
Materials & Sizing:
- Yarn:
- DK (Double Knit)/Light Worsted Weight Cotton Yarn
- Optional contrast color for stripes or details
- Recommended Brands:
- Vinni’s Colors Nikkim
- Paintbox Yarns Cotton DK
- La Mia Mini Cottony
- Lion Brand 24/7 Cotton DK (All 100% cotton)
- Hook Size:
- 3.25 mm (for a slightly larger kitty)
- 2.75 mm (for a smaller kitty)
- Notions:
- Yarn needle
- Embroidery floss (black, white, pink, tan)
- Stuffing
- Optional: 6-8 mm safety eyes
Size Notes: Finished size varies based on yarn and hook. Using a bulkier yarn or larger hook will yield a larger kitty. For a pocket-sized version, stick to DK weight and a 2.75 mm hook.
Abbreviations (US Terms):
- sc – single crochet
- sc2tog – single crochet 2 stitches together (decrease)
- dc – double crochet
- ch – chain
- MR – magic ring
Instructions for Making the Itty Bitty Crochet Kitty Pattern:
Crochet the Kitty Body:
- Rnd 1: Start with a magic ring, and crochet 6 sc into the ring. (6 sts)
- Rnd 2: 2 sc in each stitch around. (12 sts)
- Rnd 3: Sc in next st, 2 sc in next st, repeat around. (18 sts)
- Rnd 4: Sc in next 2 sts, 2 sc in next st, repeat around. (24 sts)
- Rnd 5: Sc in next 3 sts, 2 sc in next st, repeat around. (30 sts)
- Rnd 6: Sc in next 4 sts, 2 sc in next st, repeat around. (36 sts)
- Rnd 7-8: Sc in each stitch around. (36 sts)
- Rnd 9: Sc in next 4 sts, sc2tog, repeat around. (30 sts)
- Rnd 10-12: Sc in each stitch around. (30 sts)
- Rnd 13: Sc in next 3 sts, sc2tog, repeat around. (24 sts)
- Rnd 14-17: Sc around. (24 sts)
- Rnd 18: Sc in next 2 sts, sc2tog, repeat around. (18 sts)
- Rnd 19: Sc around. (18 sts)
Stuff the Body:
- Firmly stuff with fiberfill at this point. If you’re using safety eyes, attach them now- place them 5 rows down from the top, spaced 1-2 stitches apart.
- Rnd 20 – Closing the Body: Flatten the top and crochet through both sides to close: Ch 1, dc in first stitch, sc in next 7 sts, dc in last stitch. Fasten off and weave in the ends securely.
Tail Instructions:
- Rnd 1: Make a magic ring, work 5 sc into the ring. (5 sts)
- Rnd 2: 2 sc in each stitch around. (10 sts)
- Rnd 3: Sc around. (10 sts)
- Rnd 4: Sc2tog, sc in next 3 sts, repeat. (8 sts)
- Rnd 5-6: Sc around. (8 sts)
- Rnd 7: Sc2tog, sc in next 2 sts, repeat. (6 sts)
- Stuffing: Lightly stuff the base of the tail. Don’t overfill- leave the rest unstuffed for flexibility.
- Rnd 8-15: Sc in each stitch around. (6 sts) Fasten off and leave a long tail for sewing.
Assembly & Facial Features:
- Eyes:
- Stitch on eyes using black embroidery floss OR insert safety eyes before finishing the body.
- Placement: about 5 rows down from the top and 1-2 stitches apart.
- Nose & Whiskers:
- Stitch a tiny pink triangle nose using embroidery floss.
- Add whiskers using tan or white floss in a soft contrast color.
- Ears: No separate ear pieces! The double crochet stitches at each end of the final row of the body create the ear shapes naturally.
- Stripes/Details (Optional):
- Add stripes using contrast yarn or embroidery floss.
- Change yarn color every 2-3 rounds on the tail if desired.
- Tail Placement:
- Sew the tail to the back base of the kitty.
- Optional: Add a pipe cleaner inside for a bendable, poseable tail.
- To make the tail curve, anchor it to the side of the body with a few hidden stitches.
Tips & Personalization
- Use novelty yarn (like fuzzy or textured cotton blends) for a fun twist.
- Experiment with color combos- tabby, calico, or tuxedo cats are adorable variations.
- Make a mini kitty family by adjusting yarn weight and hook size!
Happy crocheting.
Download PDF