Pattern Description:
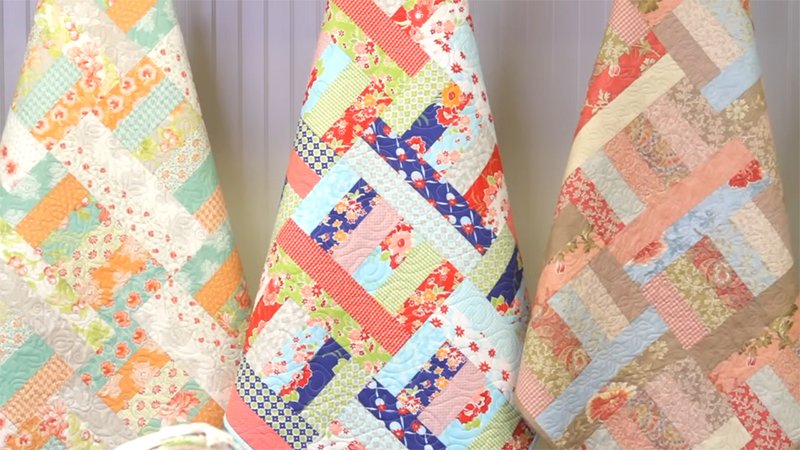
The Jelly Roll Jam Quilt Pattern is a free pattern for piecing a quilt with a finished size of 36 ½” x 36 ½”. The instructions utilize eighteen 2 ½” x Width of Fabric (WOF) strips divided into three sets.
These strips are assembled into Long Strip Units, subcut into smaller units, and combined to form nine 12 ½” x 12 ½” quilt blocks.
Materials Needed & Measurements:
| Item | Requirement/Measurement | |
| Finished Size | 36 ½” x 36 ½” | |
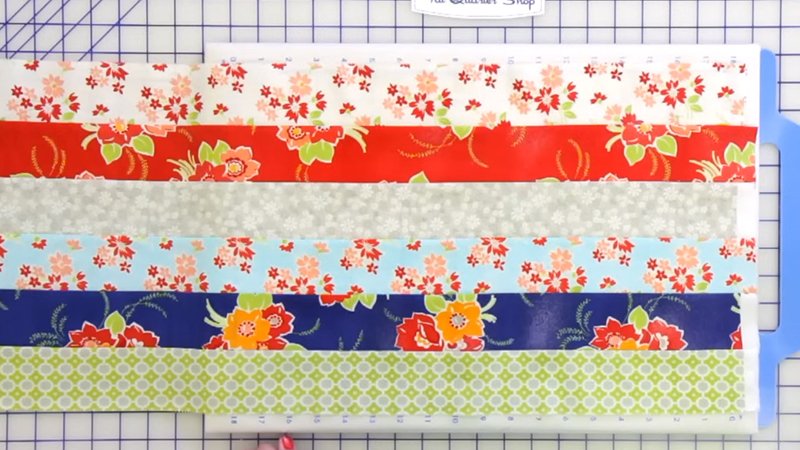
| Primary Fabric | One Jelly Roll® or forty 2 ½” x Width of Fabric strips | |
| (Note on Strips) | Eighteen 2 ½” x WOF strips are used for piecing one quilt, divided into three sets of six prints. | |
| Binding Fabric | ½ yard | |
| (Binding Cuts) | 5 – 2 ½” x Width of Fabric strips | |
| Backing Fabric | 1 ¼ yards | |
| Seam Allowance | ¼” seams are used throughout piecing. | |
| Long Strip Unit Size | 12 ½” x 42” (Make three total) | |
| Strip Block Unit Size | 6 ½” x 12 ½” (Make eighteen total, six from each Long Strip Unit) | |
| Strip Block Size | 12 ½” x 12 ½” (Block A, B, C – Make nine total) | |
| Row Size | 12 ½” x 36 ½” (Make three total) | |
| Quilt Center Size | 36 ½” x 36 ½” |
Instructions for Making the Jelly Roll Jam Free Quilt Pattern:
Preparation and Cutting
Before starting the piecing process, note that one Jelly Roll® contains enough fabric (forty 2 ½” x Width of Fabric strips) to make two 36 ½” x 36 ½” quilts.
- Strip Division: Before beginning, divide your forty 2 ½” strips into two sets of eighteen strips. The following instructions apply to piecing one quilt using eighteen 2 ½” x WOF strips.
- Set Assembly: Divide the eighteen 2 ½” x WOF strips intended for the quilt into three separate sets of six different prints. These three sets are referred to as Set One, Set Two, and Set Three.
- Binding Preparation: Cut the binding fabric (½ yard) into 5 – 2 ½” x Width of Fabric strips. (The backing fabric required is 1 ¼ yards).
Creating the Long Strip Units
The first major step involves assembling the six strips within each set into Long Strip Units.
- Assemble Strips: Assemble the six different 2 ½” x WOF strips in Set One together lengthwise, using ¼” seams and pressing according to the directional arrows.
- Unit Measurement: Once assembled, this combined piece is the Long Strip Unit. This unit should measure 12 ½” x 42”.
- Repeat: Make one Long Strip Unit from each of the three sets (Set One, Set Two, and Set Three). You will create three total Long Strip Units.
Subcutting the Strip Units
The three Long Strip Units must be cut down to form the individual units used for the quilt blocks.
- Subcut: Take each of the three Long Strip Units (12 ½” x 42”) and subcut them into smaller rectangular pieces.
- Measurements: These smaller pieces, referred to as Strip Block Units, should measure 6 ½” x 12 ½”.
- Total Units: You should make six Strip Block Units from each original Long Strip Unit. This process yields a total of eighteen Strip Block Units (six from Set One, six from Set Two, and six from Set Three).
Assembling the Strip Blocks
The next step is to combine the Strip Block Units to form nine large Strip Blocks, each measuring 12 ½” x 12 ½”. When assembling the units, pay close attention to where the word “TOP” is indicated so that the seams nest properly. You will make three of each block type (A, B, and C).
- Block A: Assemble two different Strip Block Units to create Block A. Block A combines Strip Block Unit 1 and Strip Block Unit 2. Make three Block A units.
- Block B: Assemble two different Strip Block Units to create Block B. Block B combines Strip Block Unit 1 and Strip Block Unit 3. Make three Block B units.
- Block C: Assemble two different Strip Block Units to create Block C. Block C combines Strip Block Unit 3 and Strip Block Unit 2. Make three Block C units.
Assembling the Quilt Center and Finishing
After creating the nine individual Strip Blocks (three A, three B, three C), assemble them into three rows.
- Assemble Rows: Assemble the blocks into three rows. Each Row should measure 12 ½” x 36 ½”. The arrangement for the three rows is as follows:
- Row 1: Block A, Block B, Block C (Make one).
- Row 2: Block C, Block A, Block B (Make one).
- Row 3: Block B, Block C, Block A (Make one).
- Assemble Quilt Center: Assemble the three completed rows as shown in the pattern instructions. The finished Quilt Center should measure 36 ½” x 36 ½”.
Finishing
The final steps involve preparing the binding and completing the quilt.
- Prepare Binding: Take the 5 – 2 ½” binding strips and piece them end to end.
- Complete Quilt: Quilt and bind the completed quilt center as desired.
Download Free PDF: