Pattern Description:
This round pillowcase pattern teaches you how to sew a stylish, fringe-trimmed cover for any round pillow form.
Using simple techniques and both machine and hand stitching, you’ll create a custom pillow that adds texture and charm to your décor.
The finished result is a soft, polished accent piece perfect for sofas, chairs, or cozy bedroom spaces.
Materials Needed & Measurements:
- Round Pillow Insert: Choose a polyester pillow form in your preferred size.
- Fabric: Use woven fabric for both the front and back. For frequently used pillows, select a tightly woven or upholstery-weight fabric for durability.
- Fringe Trim: Pick a trim that complements your fabric and adds a decorative edge.
- Basic Tools: Sewing machine, thread, scissors, pins or clips, rotary cutter, cutting mat, ruler, iron, fabric marking pen, hand needle, and sewing gauge.
Measurements and Cutting Directions
- Determine Diameter and Cut Fabric: Measure the pillow form’s diameter across the center from seam to seam. Cut two circles of fabric based on this diameter, using one of the following options:
- Option 1 – Full, Plump Pillow: Cut two circles the same size as the pillow form (e.g., two 16-inch circles for a 16-inch form).
- Option 2 – Slightly Softer Pillow: Cut two circles 1 inch larger than the pillow form (e.g., two 17-inch circles for a 16-inch form).
- Cut Fringe Trim: Measure the circumference of your pillow form, then cut the fringe trim several inches longer to allow for overlap. For example, a 45-inch circumference pillow requires about 51 inches of trim.
- Prepare Fabric and Trim: Press the fabric to remove wrinkles. If you plan to wash the pillow later, prewash and dry both fabric and trim to prevent shrinking or color bleeding.
Instructions for Making the Round Pillowcase Pattern:
Step 1: Attach the Fringe Trim
- Set Machine: Adjust the stitch length to a longer setting (around size 4) to avoid puckering.
- Position Trim: Place the trim along the fabric edge of one circle, ensuring the decorative fringe faces inward toward the fabric’s center. Pin or clip as desired.
- Sew Trim: Stitch close to the edge with a smaller seam allowance than ½ inch (since a ½″ allowance will be used later). Sew slowly to prevent catching the fringe in the stitches.
- Join Ends: Stop sewing a few inches from your starting point. Overlap the ends of the trim, cut one loop past the starting point, and nestle the ends together. Sew across the overlap and backstitch to secure.
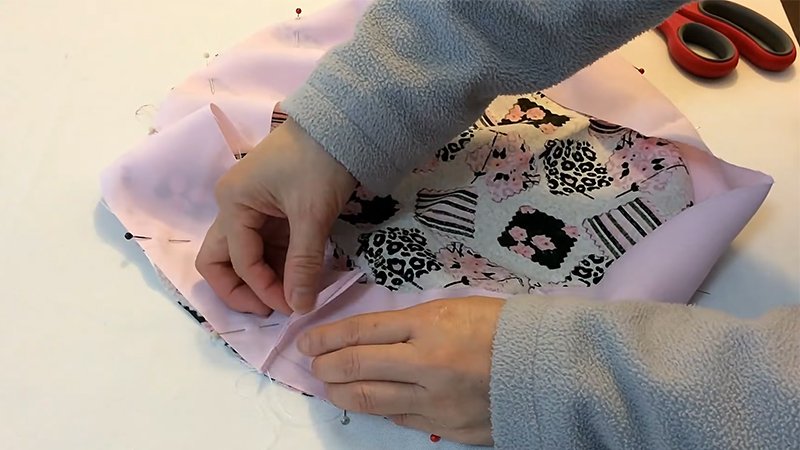
Step 2: Connect Front and Back
- Layer Fabric: Place the front piece (with fringe attached) right side up, with the fringe lying toward the center. Place the back fabric right side down on top. Align any directional patterns if applicable.
- Secure Layers: Pin or clip the layers at even intervals around the edge, starting with four main points (12:00, 3:00, 6:00, and 9:00) and filling in between. Ensure the edges align and the fringe remains inside.
- Mark Opening: Leave a 7-8 inch gap for inserting the pillow form later.
- Sew: Set the stitch length to medium (2-3). With the back piece facing up, sew around the edge using a ½″ seam allowance. Start and stop precisely at the marked points to leave the opening unstitched.
- Turn Right Side Out: Turn the cover right side out through the opening, ensuring the fringe lays neatly. Insert the pillow form and adjust until evenly filled.
Step 3: Close the Opening
- Prepare Edges: Fold the raw edge of the back fabric inward about ½″ to match the seam allowance.
- Hide Trim Base: Tuck the front fabric slightly over the woven base of the fringe so that only the decorative part is visible.
- Clip and Stitch: Clip the layers together. Using a doubled hand-sewing thread, neatly stitch the opening closed with small, invisible stitches.
Finishing Touch
Once complete, give your pillow a light press to smooth seams. The finished cover should look crisp and full, with the fringe forming a perfect decorative border.
This handmade pillow cover not only adds comfort but also serves as a beautiful accent piece, showcasing your sewing craftsmanship.
Download Free PDF: