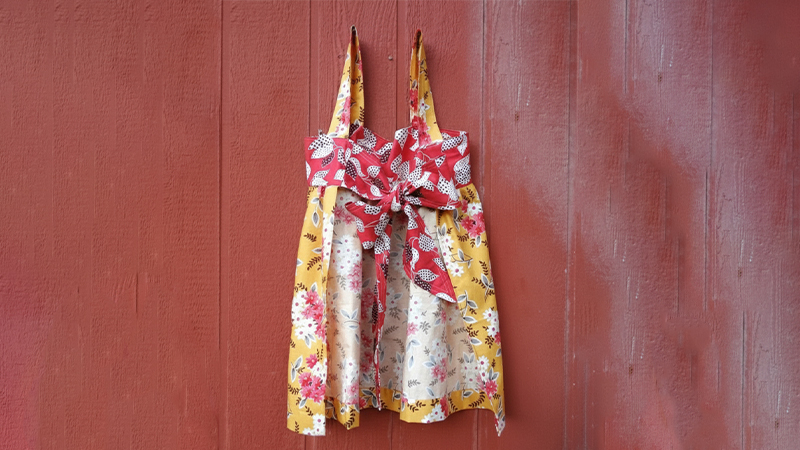
Pattern Description:
This is a simple, beginner-friendly DIY smock apron pattern perfect for quilting, cooking, or gardening.
It slips right over the head, eliminating neck ties, and uses shoulder straps to prevent neck strain.
The pattern offers a roomy fit, includes two large front pockets, and features mega/mongo ties in the back for adjustments. It is a quick and practical project.
Materials Needed & Measurements:
When making this DIY smock apron, the recommended fabric types are quilting cottons, canvas or home-decor fabric (for durability), or linen/cotton-linen blends (for softness and breathability).
The materials and measurements needed are:
| Item | Quantity & Measurement | |
| Ties | 2- 5″ X 42″ (or width of fabric) | |
| Smock top | 2- 5″ X 31″ | |
| Straps | 2- 5″ X 19″ (Note: it is suggested to confirm if this size works for you prior to cutting) | |
| Apron | 1- 24″ X 42″ (or width of fabric) | |
| Pockets | 2- 8″ X 8″ |
Instructions for Making the Smock Apron with Ties and Pockets Pattern:
1. Preparing the Straps
Start by making the shoulder straps. Take the two strap pieces and place them together with their right sides facing each other.
Pin the edges to keep them aligned. Stitch down both long sides using a straight seam, then turn the straps right side out.
Iron them flat, ensuring the seam lies along the back edge. To give the straps a professional look and added durability, topstitch along both sides.
This also prevents the straps from twisting after washing. Set them aside for later use.
2. Preparing the Ties
Next, prepare the apron ties. Lay your two tie pieces on a cutting mat. Using a ruler aligned with the 45-degree mark, trim one end of each tie diagonally so that it forms a pointed tip.
This adds a decorative finish to the ends. Only one end of each tie should be cut into a point. After trimming, stitch the ties with their right sides together along the sides, leaving the straight end open.
Clip the tip of each pointed end slightly to remove bulk, then turn the ties right side out. Press them flat with an iron and sew two topstitching lines along the sides for reinforcement and a neat appearance.
3. Hemming the Apron Skirt Sides
Before attaching any pieces together, hem the side edges of the main apron piece. Fold one side edge over ¼ inch and press it flat with an iron.
Fold it over another ¼ inch to enclose the raw edge, then sew down the fold to create a clean hem.
Repeat this process for the other side of the apron skirt. This gives the edges a finished, durable look and prevents fraying.
4. Attaching Straps to the Bodice
To prepare the bodice, first mark its center by folding it in half and pressing to create a crease. Place one strap edge 4 inches away from the center crease and pin it in position.
Repeat with the second strap on the other side. The opposite ends of the straps should be pinned 1½ inches from each side edge of the bodice.
Before final stitching, try the bodice on to check how the straps fall on your shoulders. You may prefer straight straps or a cross-back design, adjust the placement accordingly.
Once satisfied with the fit, place the second smock top piece over the first, right sides facing, and pin around the edges. Sew along the top edge to secure the straps between the two bodice layers.
5. Gathering and Attaching the Skirt
Prepare the apron skirt by sewing two rows of long, loose gathering stitches along the top edge (use a long stitch length, about 4).
Gently pull the threads to gather the fabric until it matches the width of the bodice. Spread the gathers evenly to ensure the apron falls smoothly.
Pin the gathered edge of the skirt to the bottom edge of the bodice, right sides facing. Adjust the gathers as needed for even distribution, then sew the skirt and bodice together with a regular stitch.
6. Finishing the Bodice and Attaching Ties
Press one bottom edge of the remaining bodice piece up by ¼ inch to create a clean fold. Insert the two apron ties between the two bodice layers at the side seams, ensuring the pointed ends extend outward.
Pin everything in place, taking care not to catch the gathered skirt fabric in your seam. Stitch along the lower edge of the bodice using a ½-inch seam allowance.
Once sewn, turn the bodice right side out, pulling the ties outward. Press the entire bodice flat with an iron.
The previously folded edge should naturally fall into place; pin it just above the stitching line that connects the skirt.
Topstitch along the edge to secure it neatly. The extra-long “mega ties” can now be tied at the back, offering a flexible, adjustable fit.
7. Finishing the Apron Hem
To hem the bottom of the apron, fold the lower edge ¼ inch up and press. Fold it up once more to the desired finished length, this can be adjusted depending on how long you want the apron to fall on your legs. Sew along the folded edge to complete the hem with a clean finish.
8. Adding the Pockets
For the final step, prepare the pockets. Fold and press the top edge of each 8″ × 8″ pocket piece ¼ inch, then another ¼ inch to form a small hem.
Stitch across the top to secure it. Fold the remaining three sides of the pocket ¼ inch in and press flat.
Place the pockets on the front of the apron where you prefer, commonly around hip height for easy reach.
Pin them securely and sew around the three folded sides twice for extra strength. Backstitch at the beginning and end of each seam to lock the stitches.
Download Free PDF: