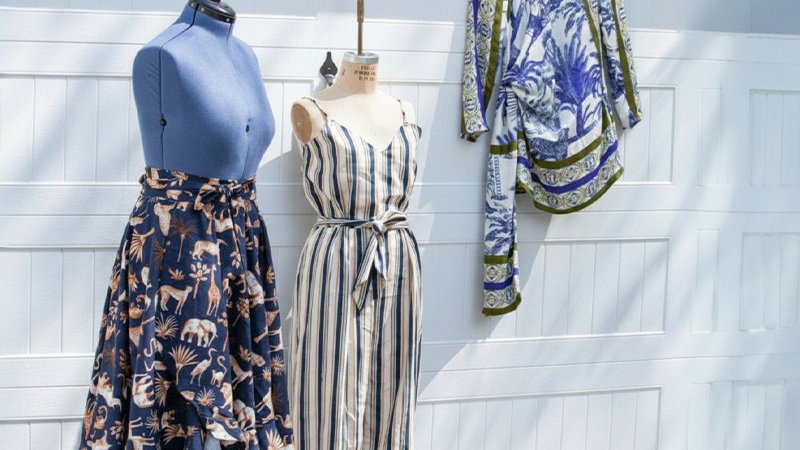
The Empress Dress
The Empress Dress silhouette is where modesty and sexy meet. This long-sleeve micro mini is designed to give you the confidence to own any space. The pattern pieces are fairly simple, making it a great option for panel prints.
Materials Needed & Measurements:
- Pattern: MDF158 – The Empress Dress Sewing Patten (available for download).
- Fabric Used: 3-4 panels Mood Exclusive Grimalkin Glare Viscose Batiste.
- Alternative Suggested Fabrics: Crepe, Charmeuse, or Sequins. Lighter weight satin (if not too stiff) is also recommended. Flannel can be used, though adjustments to sizing may be needed.
The Fern Jumpsuit
The Fern Jumpsuit is described as the epitome of comfort chic, increasing in popularity with current stay-at-home orders.
This piece is loose and breathable, slipping right on with ease, and is cinched at the waist with a belt.
Materials Needed & Measurements:
- Pattern: MDF185 – The Fern Jumpsuit Sewing Pattern (available for download).
- Fabric Used: 4-5 yards Mood Exclusive Linear Transcendence Natural Linen and Rayon Woven.
- Notions: 2 Natural Etched 2-Hole Wood Buttons – 44L/28mm.
- Alternative Suggested Fabrics: Linen, Double Cotton Gauze, or Crepe. Flannel can also be used.
The Cress Skirt
The Cress Skirt is an easy sew suitable for all skill levels and presents a universally flattering silhouette.
This wrap style requires only fabric and thread, as there are no finicky closures or zippers to worry about.
Materials Needed & Measurements:
- Pattern: MDF150 – The Cress Skirt Sewing Pattern (available for download).
- Fabric Used: 5 yards Mood Exclusive Hegemonic Hierarchy Linen and Rayon Woven.
- Notions: Only thread is needed aside from the fabric.
- Alternative Suggested Fabrics: Voile, African Prints, or Chambray. Flannel can also be used.
Instructions for Making the Tumunyana Collection Pattern:
Pre-Wash and Press
Always pre-wash and press fabrics before cutting. This prevents shrinkage and allows you to work with fabric in its true final form.
The Empress Dress
Cutting the Fabric
- Lay out your chosen panel prints or fabric. The dress benefits from bold panel placements, so plan your cutting carefully to highlight design elements.
- Using MDF158, cut out all required pieces: front, back, sleeves, and neckline facings. Ensure grainlines are followed for a balanced fit.
Sewing Steps
- Assemble the Bodice: Pin the front and back bodice pieces together at the shoulders and stitch. Finish seams with a zigzag or serger to prevent fraying.
- Insert Sleeves: Align sleeve notches with the armholes. Pin in place and sew carefully, easing in the sleeve cap. Press seams toward the bodice.
- Sew Side Seams: With right sides together, stitch from sleeve hem to dress hem in one continuous seam on both sides.
- Finish the Neckline: Apply facings or a bias binding depending on your fabric choice. Ensure the neckline lies flat without puckering.
- Hems: Turn up sleeve hems and the bottom hem by ½ inch, press, and stitch. For lightweight fabrics, a rolled hem may be preferable.
Styling Tip
This micro mini dress pairs well with boots or heels and works beautifully in viscose, satin, or sequined fabrics for a more glamorous finish.
The Fern Jumpsuit
Cutting the Fabric
- Spread out 4-5 yards of linen or chosen fabric.
- Cut the front, back, sleeve, and trouser pieces following MDF185. Don’t forget the belt and facing pieces.
- Mark buttonhole placements and waistline notches as indicated on the pattern.
Sewing Steps
- Assemble the Bodice: Sew the front and back bodice shoulder seams. Attach sleeves if included, or finish armholes neatly for sleeveless variation.
- Construct the Bottom: Join the front and back trouser legs along the inseam. Repeat for the other leg. Then, place one leg inside the other (right sides together) and stitch along the crotch seam.
- Attach Bodice and Bottom: Pin the bodice to the trousers at the waist, aligning notches. Stitch and finish seams.
- Button Closure: Create buttonholes on the front placket as marked. Attach the wooden buttons securely.
- Make the Belt: Fold the belt piece lengthwise, stitch, and turn right side out. Press flat. Thread through belt loops if desired or tie around the waist.
- Hems: Finish trouser hems to desired length. Linen works well with a simple double-fold hem.
Styling Tip
This jumpsuit offers both lounge-ready comfort and chic streetwear appeal. Wear belted for structure or loose for relaxed ease.
The Cress Skirt
Cutting the Fabric:
- Use 5 yards of fabric to cut the wrap skirt pieces from MDF150. The pattern is straightforward: two main panels and ties.
- Be sure to cut ties or waistbands on the grain for stability.
Sewing Steps:
- Assemble Skirt Panels: Finish raw edges of skirt panels with a serger or zigzag stitch.
- Attach Waistband/Ties: Sew ties or waistband pieces to the skirt top edge. Reinforce stitching at the ends for durability.
- Sew Hems: A wrap skirt benefits from a clean hem. Press up ½ inch, fold again, and stitch neatly all around.
- Closure: The skirt requires no zippers or snaps, just tie it securely at the waist.
Styling Tip
The wrap design makes this skirt adjustable and flattering. Use African prints for bold statements or chambray for a casual, everyday look.
Finishing Touches for All Pieces
- Press Every Seam: Pressing between each sewing step ensures a professional finish.
- Test Fit: Try on the garment before final hemming to make adjustments for length and comfort.
- Labeling: If sewing multiple pieces, consider adding custom tags or labels to keep track of your Tumunyana Collection wardrobe.
Download Free PDF: