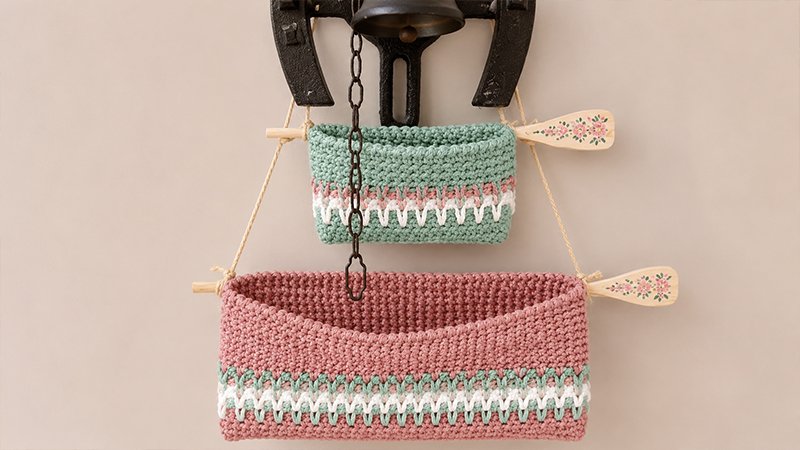
These Bohemian-style wall hanging pouches combine functionality with textured home decor. The pattern features a unique drop-stitch design on the front pocket face while maintaining a solid, durable backing.
You can make these in two sizes (large and small) to store mail, craft tools, or keys. They are suspended from rustic wooden dowels or tree branches using a simple cord.
Supplies Needed
-
Yarn: Bulky weight yarn (Category 5). The original pattern uses a soft, tape-style yarn (100g / 80m per skein) in five contrasting colors: Teal/Green-Blue (A), Gold (B), White (C), Aqua Blue (D), and Orange (E).
-
Hook: 5.5 mm (Size I-9)
-
Hardware: Two natural wooden branches or smooth dowels. One should measure 6 to 8 inches (for the small pouch), and the other 12 to 14 inches (for the large pouch).
-
Finishing: Hanging twine or cord, and a tapestry needle for weaving ends and assembly.
Stitch Key & Techniques (US Terms)
-
Ch (Chain): Foundational loop.
-
Sl St (Slip Stitch): Moving yarn across stitches without adding height.
-
Sc (Single Crochet): Standard low-profile stitch.
-
BLO (Back Loop Only): Insert your hook solely into the rear loop of the stitch to create a ribbed texture.
-
Crab St (Crab Stitch / Reverse Single Crochet): Worked from left to right instead of right to left to create a sturdy, corded border edge.
-
Drop St (Drop Stitch): Instead of working into the current row, insert your hook into the back loop of the designated stitch two or three rows directly below your current position. Catch the yarn, pull up a loose loop to match the height of your current row, and complete the stitch like a normal single crochet.
Sizing and Tension Guide
-
Gauge: 14 stitches by 13 rows equals a 4-inch (10 cm) square worked in BLO single crochet.
-
Large Pouch Dimensions: 12 inches wide by 6.25 inches tall.
-
Small Pouch Dimensions: 6 inches wide by 4 inches tall.
Step-by-Step Instructions
Important Pattern Note
Both bags are worked continuously in spiral rounds. Do not close your rounds with a slip stitch or turn your work unless specifically instructed. Use a stitch marker to keep track of the start of each round.
1. Large Pouch Pattern
-
Round 1: Using Color A, chain 40. Start in the second chain from your hook and place 2 single crochets. Work 1 single crochet in each of the next 37 chains. In the very last chain stitch, place 3 single crochets to round the corner. Pivot your work to crochet along the underside loops of your starting chain; work 37 single crochets across, and finish with 1 more single crochet in the starting space. (Total: 80 stitches)
-
Rounds 2–4: Work 1 single crochet into the back loop only (BLO) of every stitch around. (80 stitches). Cut Color A and secure. Attach Color B.
-
Round 5: Work 2 standard single crochets. Work 1 drop stitch into the back loop of the matching stitch from 3 rows down. Skip the stitch on your current row that sits directly behind this drop stitch, then work 1 regular single crochet. Repeat the sequence between the asterisks (*) 19 total times. Complete the round by working 40 standard single crochets across the back panel.
-
Round 6: Work 1 BLO single crochet into every stitch around. (80 stitches). Cut Color B and secure. Attach Color C.
-
Round 7: Work 2 standard single crochets. Work 1 drop stitch directly into the drop stitch from 2 rows down, then work 1 regular single crochet. Repeat between asterisks (*) 19 times. Finish with 40 regular single crochets across the back panel.
-
Round 8: Work 1 BLO single crochet into every stitch around. Cut Color C and secure. Attach Color D.
-
Rounds 9–10: Repeat the exact instructions from Rounds 7 and 8 using Color D. Cut Color D and secure. Attach Color B.
-
Rounds 11–12: Repeat the exact instructions from Rounds 7 and 8 using Color B. Cut Color B and secure. Attach Color A.
-
Round 13: Repeat the sequence from Round 7 using Color A.
-
Rounds 14–22: Work 1 BLO single crochet into every stitch around using Color A.
-
Round 23: Work the Crab Stitch (reverse single crochet) into every stitch around to create a decorative top rim. Fasten off and weave in all loose yarn tails.
2. Small Pouch Pattern
-
Round 1: Using Color E, chain 18. Start in the second chain from your hook and place 2 single crochets. Work 1 single crochet in each of the next 15 chains. In the final chain stitch, place 3 single crochets to curve around the edge. Pivot your work to crochet down the opposite side of the starting chain; work 15 single crochets, and finish with 1 single crochet in the starting space. (Total: 36 stitches)
-
Rounds 2–4: Work 1 BLO single crochet into every stitch around. (36 stitches). Cut Color E and secure. Attach Color C.
-
Round 5: Work 2 standard single crochets. Work 1 drop stitch into the back loop of the matching stitch 3 rows down. Skip the stitch on your current row directly behind this drop stitch, then work 1 regular single crochet. Repeat between asterisks (*) 8 total times. Complete the round with 18 standard single crochets across the back panel.
-
Round 6: Work 1 BLO single crochet into every stitch around. (36 stitches). Cut Color C and secure. Attach Color D.
-
Round 7: Work 2 standard single crochets. Work 1 drop stitch into the corresponding drop stitch 2 rows down, then work 1 regular single crochet. Repeat between asterisks (*) 8 times. Finish with 18 regular single crochets across the back panel.
-
Round 8: Work 1 BLO single crochet into every stitch around. Cut Color D and secure. Attach Color E.
-
Round 9: Repeat the instructions from Round 7 using Color E.
-
Rounds 10–12: Work 1 BLO single crochet into every stitch around using Color E.
-
Round 13: Work the Crab Stitch into every stitch around to finish the top edge. Fasten off and weave in all yarn tails.
Finishing & Hanging Assembly
-
Mounting: Position your wooden stick or branch horizontally against the back panel of the pouch, positioning it just below the textured crab-stitch border.
-
Securing: Thread a tapestry needle with Color A (for the large pouch) or Color E (for the small pouch). Whipstitch securely around the stick and through the back layer of the crochet fabric to anchor the pouch firmly to the wood.
-
Hanging: Tie a piece of rustic cord or twine tightly to both exposed ends of the wooden stick to create a hanging loop. Your functional wall organizer is complete and ready to hang.