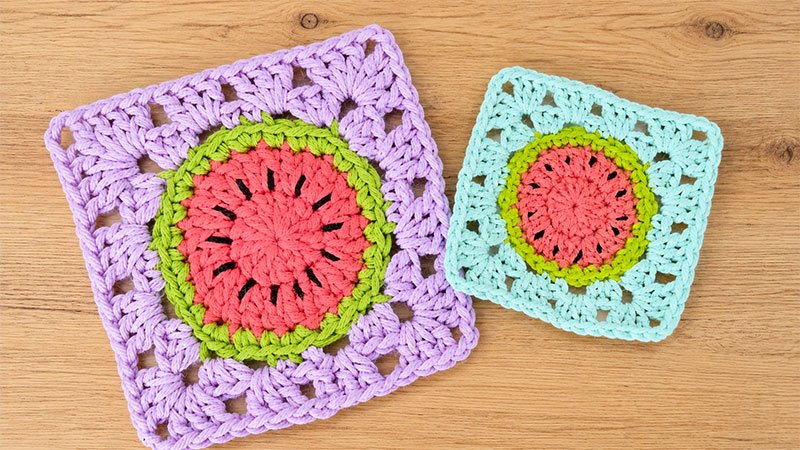
Bring a splash of summer to your next crochet project with this delightful Watermelon Granny Square! Perfect for blankets, coasters, or festive bunting, this pattern transforms a classic crochet staple into a juicy slice of watermelon.
By starting with a circular center to mimic the fruit and transitioning into a crisp, square border, this design beautifully captures the vibrant contrast between the sweet red center, the white pith, and the green rind.
What You Will Need
Materials & Tools
-
Yarn: Aran weight (Medium, Size 4) cotton yarn. You will need three colors:
-
Color A: Vibrant Red/Pink (for the flesh)
-
Color B: Soft Cream/White (for the inner rind)
-
Color C: Bright Lime Green (for the outer rind)
-
-
Hook: 4.5 mm (US 7) crochet hook
-
Notions: Tapestry needle for weaving in ends, black embroidery floss for the seeds, and scissors.
Project Specs
-
Finished Size: Approximately 4″ × 4″ (10 cm × 10 cm)
-
Gauge: 4 rounds of a standard granny square should equal a 4″ (10 cm) square.
Key Stitches & Abbreviations (US Terms)
-
Ch: Chain
-
Sl St: Slip Stitch
-
Sc: Single Crochet
-
Hdc: Half Double Crochet
-
Dc: Double Crochet
-
Inc (Increase): Work 2 stitches into the exact same stitch.
-
BLO: Back Loop Only (insert your hook only into the back strand of the stitch loop).
-
MC: Magic Circle / Magic Ring
-
[ ]: Work all instructions inside the brackets into the exact same stitch or space.
Step-by-Step Pattern Instructions
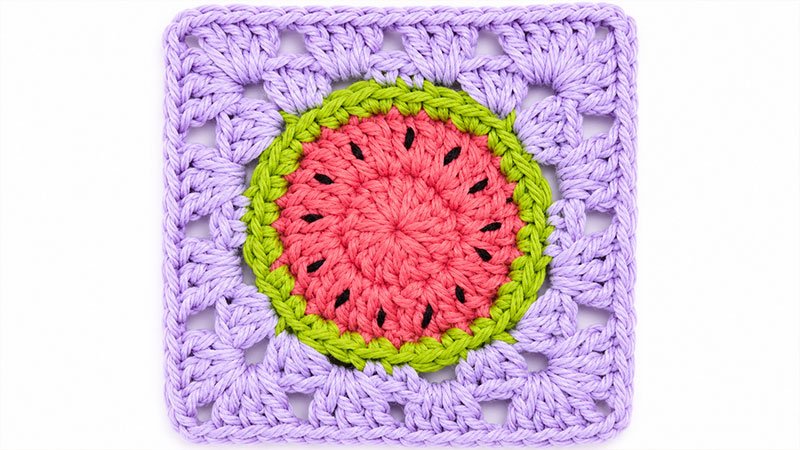
step 1: The Juicy Center (The Fruit)
We will begin by creating a flat circle using your red yarn to represent the watermelon flesh.
-
Round 1: Start by forming a Magic Circle. Chain 2 (this acts as a height guide and does not count as a stitch). Work 12 Double Crochets directly into the ring. Pull the tail to close the circle tightly, and close the round by making a slip stitch into the top of your very first double crochet. (Total: 12 stitches)
-
Round 2: Chain 2. Work a Double Crochet Increase (2 double crochets) into every single stitch around. Join with a slip stitch to the first double crochet of the round. Fasten off Color A and secure your yarn. (Total: 24 stitches)
Step 2: The Inner Rind
Next, we add the light inner ring of the watermelon rind.
-
Round 3: With the right side facing you, join Color B (Cream/White) into any stitch from the previous round. Chain 1. *Work 1 Single Crochet in each of the next 2 stitches, then work 1 Single Crochet Increase in the following stitch.* Repeat from * to * all the way around the circle. Join with a slip stitch to the first single crochet. Fasten off Color B. (Total: 32 stitches)
Step 3: Squaring the Circle (The Outer Rind)
Now, we will introduce the green outer rind and use clever stitch heights to transform our circle into a neat square shape.
-
Round 4: Facing the right side, join Color C (Green) into the Back Loop Only (BLO) of any stitch from Round 3.
-
Work 1 BLO Single Crochet in the same stitch you joined.
-
*Chain 1, skip the next 2 stitches. In the next stitch, work [3 BLO Half Double Crochets], chain 2, and work [3 BLO Half Double Crochets] all into that same stitch (this forms your first corner). Chain 1, skip 2 stitches, and work 1 BLO Single Crochet in each of the next 2 stitches.*
-
Repeat from * to * 3 more times until you reach the final sequence.
-
To finish the last side: Chain 1, skip 2 stitches, create your final corner [3 BLO Half Double Crochets, Chain 2, 3 BLO Half Double Crochets] in the next stitch, chain 1, skip the last 2 stitches, and work 1 BLO Single Crochet in the final stitch. Join with a slip stitch to the first single crochet of the round.
-
Step 4: Expanding the Border
This final round stabilizes the square structure using classic granny cluster sets.
-
Round 5: Slip stitch into the very next chain-1 space. Chain 2 (this counts as your first double crochet post), then work 2 Double Crochets into that same space. Chain 1.
-
*In the corner chain-2 space, work [3 Double Crochets, Chain 2, 3 Double Crochets]. Chain 1.
-
Work [3 Double Crochets] into the next chain-1 space, chain 1, and work [3 Double Crochets] into the following chain-1 space. Chain 1.*
-
Repeat from * to * 3 times around the square.
-
In the final corner space, work [3 Double Crochets, Chain 2, 3 Double Crochets], chain 1, then work [3 Double Crochets] in the last chain-1 space. Chain 1, and join with a slip stitch directly into the top of the first actual double crochet stitch (ignoring the starting chain space).
-
Cut your yarn, pull it through, and weave in all loose ends securely with your tapestry needle.
Finishing Touches: Adding the Seeds
Pro-Tip: Keep your embroidery stitches slightly loose so they don’t distort or pull the crochet stitches out of shape.
-
Thread your tapestry needle with a strand of black embroidery floss.
-
From the back of the square to the front, bring your needle up through Round 1 or Round 2 of the red section.
-
Make small, straight vertical or teardrop-shaped straight stitches to resemble watermelon seeds.
-
Scatter 5 to 8 seeds evenly around the red center.
-
Secure the floss on the back of the square, knot it gently, and snip away the excess.
Your Watermelon Granny Square is fully complete and ready to be blocked!