Pattern Description:
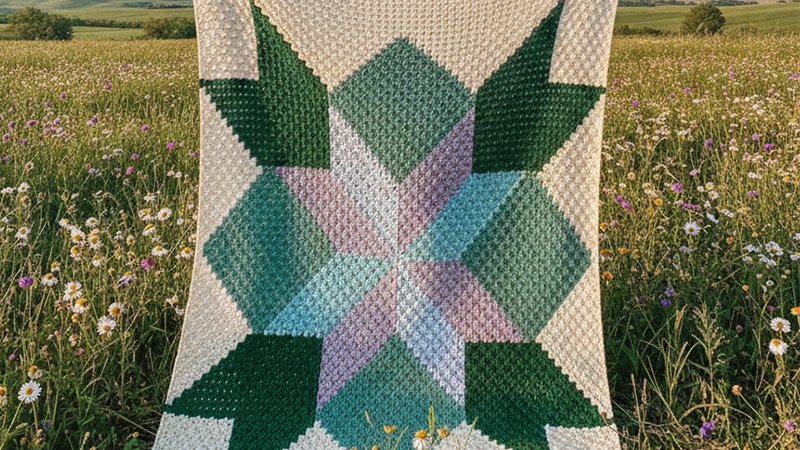
This is a free Corner-to-Corner (C2C) blanket pattern. It is a large-sized throw inspired by the beautiful barn quilts found dotting outbuildings and barns across the Midwest.
The design utilizes five colors of WeCrochet Brava Worsted yarn selected for a rustic yet modern palette. The completed blanket is intended to be an heirloom full of memories.
Materials Needed & Measurements:
Yarn:
- WeCrochet Brava Worsted
- Fiber Content: 100% Premium Acrylic
- Yardage: 218 yards/skein
- Colors and Skein Counts:
- C1 (Dove Heather) – 8 skeins
- C2 (Brindle) – 4 skeins
- C3 (Wine) – 3 skeins
- C4 (Charcoal Heather) – 2 skeins
- C5 (Denim) – 2 skeins
Tools:
- US H/5mm crochet hook, or size needed to meet gauge
- Scissors
- Darning Needle
Measurements:
- Gauge: 5 squares x 5 rows = 4″
- Finished Size (Full size throw): Approximately 53″ x 68″
Abbreviations Used:
- ch – chain
- sl st – slip stitch
- dc – double crochet
- C1 – Color 1 (Dove Heather)
- C2 – Color 2 (Brindle)
- C3 – Color 3 (Wine)
- C4 – Color 4 (Charcoal Heather)
- C5 – Color 5 (Denim)
- RS – right side
- WS – wrong side
Instructions for Making the Barn Quilt Blanket Pattern:
C2C Method
The standard C2C technique is used for increasing rows.
- Row 1: Ch 6. Dc in 4th ch from hook and each ch across, turn.
- Row 2: Ch 6, dc in 4th ch from hook and next 2 ch, slst to turning ch to join, ch 3, 3 dc in turning ch, turn. Row 3: Ch 6, dc in 4th ch from hook and next 2 ch, slst to turning ch to join, ch 3, 3 dc in turning ch, repeat from to across, turn.
- Repeat Row 3 until the corner (widest/tallest point) is reached.
- Starting a Straight Edge (for widest/tallest point): Slst in the first 3 dc, slst in the turning ch, ch 3, 3 dc in the turning ch. Then, slst to turning ch to join, ch 3, 3 dc in turning ch, repeat from to across, turn. You will then work the opposite rows as in the main pattern.
Written Instructions (Full Size Throw)
Increase Phase (Rows 1–66):
- Rows 1–21: Work using C1.
- Row 1: C1
- Row 2: (C1) x 2
- (… continue increasing by 1 C1 block each row until)
- Row 21: (C1) x 21
- Color Work Starts:
- Row 22: C3, (C1) x 10, C3, (C1) x 10
- Row 23: (C1) x 11, C3, (C1) x 9, C3, C1
- Row 32: (C1) x 5, (C3) x 12, (C1) x 15
- Row 44: C1, (C2) x 11, (C3) x 10, (C2) x 11, (C1) x 11
- Row 54: (C1) x 6, (C2) x 11, (C4) x 5, (C5) x 5, (C2) x 11, (C1) x 16
- Row 66 (Last Increase Row): C1, (C3) x 11, (C2) x 11, (C4) x 5, (C5) x 5, (C2) x 11, (C3) x 11, (C1) x 11
Corner
Decrease Phase (Rows 67–151):
- Row 67: (C1) x 11, (C3) x 11, (C4) x 11, (C5) x 5, (C4) x 4, (C5) x 11, (C3) x 11, (C1) x 2
- Row 86: (C1) x 11, (C3) x 11, (C2) x 11, (C5) x 5, (C4) x 5, (C2) x 11, (C3) x 11, C1
Corner
- Row 87: (C3) x 11, (C2) x 12, (C4) x 4, (C5) x 5, (C2) x 12, (C3) x 11, (C1) x 10
- Row 108: (C1) x 11, (C2) x 11, (C3) x 10, (C2) x 11, C1
- Row 120: (C1) x 15, (C3) x 12, (C1) x 5
- Row 131: (C1) x 21
Final Decrease Rows (Solid C1):
- Row 145: (C1) x 7
- Row 149: (C1) x 3
- Row 150: (C1) x 2
- Row 151: C1