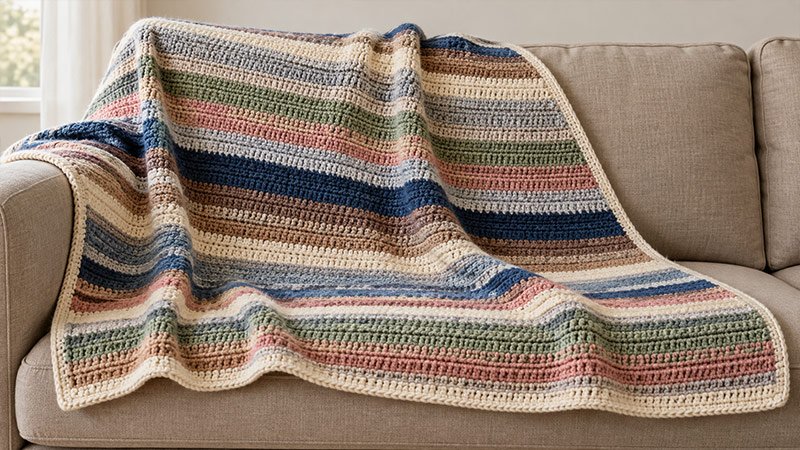
This scrap yarn blanket turns small balls of yarn into a striped throw. Half double crochet stitches make a plain fabric that lets each shade stand out.
Use thin stripes, wide bands, or a mix of both. The blanket is worked back and forth in one piece, then finished with a single crochet border.
Choose scraps of the same yarn weight to help keep the fabric even. The steps below include stitch counts, colour changes, and ways to adjust the size.
Materials
- Worsted-weight yarn: About 1,800–2,200 yards in total, including yarn for the border. The amount will vary with your gauge and yarn choice.
- 6 mm crochet hook, or the size needed to match the gauge.
- Two stitch markers to mark the row ends.
- Yarn needle for weaving in ends.
- Scissors.
- Tape measure.
Gauge: 12 hdc and 8 rows = 4 inches, measured on a swatch after washing and drying it as you plan to care for the blanket.
Finished size: About 42 × 54 inches, including a border about 1 inch wide. The body measures about 40 × 52 inches.
Colors
Choose scraps that have a similar thickness and can be washed in the same way.
For a simple mix, use:
- Light shades: Cream, pale grey, or beige.
- Medium shades: Denim blue, soft green, or muted rose.
- Dark shades: Navy, brown, or charcoal.
- Border shade: One colour with enough yarn to work around the whole blanket.
Place a light stripe next to a dark one to make the bands clear. Repeat one shade throughout the blanket to link the other colours.
For a planned stripe layout, repeat these band widths:
- 2 rows in one shade.
- 4 rows in a second shade.
- 2 rows in a third shade.
- 6 rows in a fourth shade.
- 2 rows in a fifth shade.
This makes a 16-row stripe sequence. Work it six times for 96 rows, then add two 4-row stripes to reach 104 rows. You can use different colours in each sequence.
Notes
- This pattern uses US crochet terms.
- Work the blanket in rows. Turn at the end of each row.
- The ch 2 at the start of a row does not count as a stitch.
- Each body row has 120 hdc.
- Work through both top loops of each stitch.
- Change colours on the last pull-through of the final stitch in a row.
- Cut yarn after each stripe unless you will use it again soon.
- Leave tails about 6 inches long for weaving in.
- Avoid large knots in the fabric. Join new yarn with tails that can be woven in.
- Check the width after the first few rows. A change in yarn thickness can make the edges widen or narrow.
- For a different width, chain your chosen stitch count plus 2.
- For a different length, add or remove rows.
- Size and yarn amounts are estimates. This written pattern has not been physically tested.
Abbreviations
- ch: Chain.
- hdc: Half double crochet.
- sc: Single crochet.
- sl st: Slip stitch.
- st / sts: Stitch / stitches.
- rep: Repeat.
- RS: Right side.
Free Pattern Instructions
Step 1: Make a Gauge Swatch
- Ch 20.
- Swatch Row 1: Hdc in the third ch from the hook and in each ch across. Turn. 18 hdc.
- Swatch Row 2: Ch 2. Hdc in each st across. Turn. 18 hdc.
- Rep Row 2 until you have 12 rows.
Wash and dry the swatch as you will the blanket. Measure the centre, away from the edges.
- If you have more than 12 sts in 4 inches, try a larger hook.
- If you have fewer than 12 sts in 4 inches, try a smaller hook.
Step 2: Make the Foundation Chain
- With your first colour, ch 122 loosely.
- Use a larger hook for the chain if it tends to feel tight. Switch back to your main hook for Row 1.
Step 3: Work the First Row
- Row 1: Hdc in the third ch from the hook. Hdc in each remaining ch across. Turn. 120 hdc.
- Place a marker in the first and last hdc.
Step 4: Work the Main Stitch Row
- Row 2: Ch 2. Hdc in the first st and in each st across. Turn. 120 hdc.
- Move the markers into the first and last hdc of the new row.
- Rows 3–104: Rep Row 2, changing colours at the end of rows to form your stripes.
- Count your stitches now and then. Each row should still have 120 hdc.
Step 5: Change Colours
At the last hdc of a row:
- Yarn over and insert the hook into the final st.
- Yarn over and pull up a loop. There are 3 loops on the hook.
- Drop the old yarn.
- Yarn over with the new colour and pull through all 3 loops.
- Turn. Ch 2 with the new colour and work the next row.
Cut the old yarn, leaving a tail about 6 inches long. Leave the same length on the new yarn.
Use this method for each stripe change.
Step 6: Join a New Scrap Within a Row
If a ball runs out before the row ends:
- Work the next hdc until 3 loops remain on the hook.
- Pull the new yarn through all 3 loops.
- Continue across the row.
- Leave both tails about 6 inches long.
Weave these tails in with a needle when the blanket is complete.
For stripes that run across the full width, use scraps large enough to finish at least one row.
Step 7: Finish the Blanket Body
After Row 104, fasten off.
Lay the blanket flat. Check that the row ends are even and that the fabric has no missed stitches.
Weave in the stripe tails on the back. Run each tail through several stitches, then reverse direction to help hold it in place. Avoid pulling the fabric tight.
Step 8: Add the Border
With the RS facing you, join the border yarn in a corner.
Round 1:
- Ch 1. Work 3 sc in the corner. Mark the middle sc.
- Sc in each st across the top edge.
- Work 3 sc in the next corner and mark the middle sc.
- Work sc evenly down the side. Start with about 3 sc for every 2 row ends.
- Work 3 sc in the next corner and mark the middle sc.
- Sc in each unused foundation ch across the bottom edge.
- Work 3 sc in the final corner and mark the middle sc.
- Work sc evenly up the remaining side.
- Sl st in the first sc to join.
Treat each corner as one space. Do not work into it again as part of the straight edge.
Lay the blanket flat before you continue:
- If the border ripples, use fewer stitches along the sides.
- If it pulls inward, use more stitches along the sides.
Round 2: Ch 1. Sc in each st around, working 3 sc in each marked corner st. Move each marker to the middle sc of the new corner group. Sl st in the first sc to join.
Rep Round 2 until the border is about 1 inch wide. This will usually take about 4–5 rounds in total, depending on your gauge.
Fasten off.
Step 9: Finish and Shape
Weave in all remaining ends.
Wash the blanket according to the care needs of all yarns used. Gently shape it while damp and dry it flat if the yarn allows.
Avoid stretching the edges. Once dry, check the yarn ends and trim any loose tips.