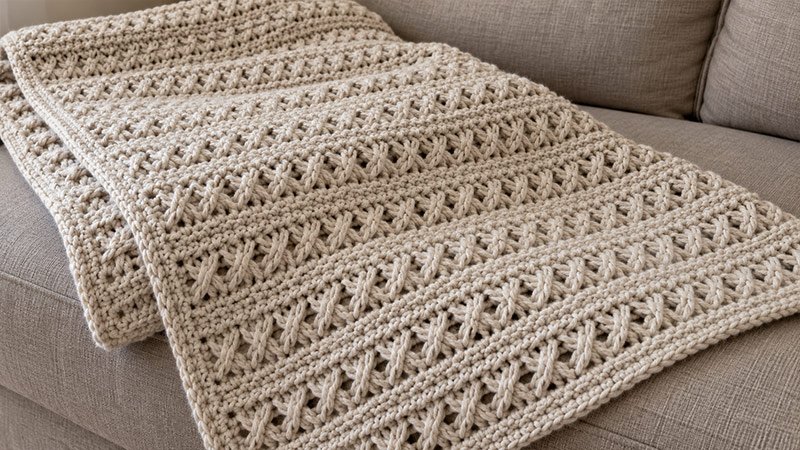
This throw uses crossed double crochet stitches. They form small pairs across the fabric. Rows of single crochet sit between them. These rows help keep the edges neat.
Work the throw in one piece. Add a plain border at the end. Use one shade to show the stitch shape. Or use stripes to change the tone.
The steps below give stitch counts and size notes. They also share tips to keep your work flat.
Materials
- Worsted-weight yarn: approximately 1,800–2,200 yards.
- 5.5 mm crochet hook, or the size needed to match gauge.
- Two stitch markers.
- Yarn needle.
- Scissors.
- Tape measure.
- Blocking mats and pins, if needed.
For yarn sold in 200-yard skeins, allow 9–11 skeins. Yarn use will vary with your gauge, fiber, and border tension.
Gauge
14 sts and 10 rows = 4 inches, measured over alternating crossed-dc and sc rows after washing and laying flat.
Make a swatch before starting:
- Ch 31.
- Follow Row 1 below to make 28 dc.
- Work Rows 2 and 3 as written.
- Rep Rows 2 and 3 until you have at least 14 rows.
- Wash and dry the swatch as directed on the yarn label.
- Measure across the middle, away from the edges.
Use a larger hook if you have too many sts per 4 inches. Use a smaller hook if you have too few.
Finished Measurements
Approximately 42 × 54 inches, including the border.
The main panel measures about 40 × 52 inches at the stated gauge. The border adds approximately 1 inch on each edge.
Pattern Notes
- Use US crochet terms for this pattern.
- Work the throw back and forth in rows.
- Turn at the end of each row.
- Ch 1 and ch 2 at the start of a row do not count as a st.
- Work through both top loops unless told otherwise.
- Each body row has 140 sts.
- Each crossed row has 1 edge dc, 69 crossed pairs, and 1 edge dc.
- Work the second dc of each pair across the front of the first dc.
- Keep the long strand that crosses each pair loose.
- Mark the first and last st of each row. This helps keep the edges straight.
- To change the width, start with an odd number of chains. Choose an even stitch count. Add 3 to get your starting chain count.
- To change the length, add or leave out full two-row repeats.
- Yarn needs and the final size are estimates. This written pattern has not been tested with yarn and a hook.
Abbreviations
- ch: Chain.
- sc: Single crochet.
- dc: Double crochet.
- sl st: Slip stitch.
- st / sts: Stitch / stitches.
- sk: Skip.
- rep: Repeat.
- RS: Right side.
- WS: Wrong side.
- crossed pair: Sk the next st, dc in the following st, then dc in the skipped st.
How to Work a Crossed Pair
- Sk the next unworked st.
- Work 1 dc in the following st.
- Yarn over. Bring the hook across the front of the dc just made.
- Insert the hook into the skipped st.
- Complete 1 dc in that skipped st.
These two dc form one crossed pair. For the next pair, skip the next unworked st beyond the pair you just finished.
Pattern Instructions
Step 1: Make the Foundation
Ch 143 loosely.
If the chain draws in, use a hook one size larger for the chain, then return to your main hook for Row 1.
Step 2: Work the Base Row
Row 1: Dc in the fourth ch from the hook. Dc in each ch to the end. Turn.
Count: 140 dc.
The three skipped chains do not count as a st.
Step 3: Work a Single Crochet Row
Row 2: Ch 1. Sc in each st across. Turn.
Count: 140 sc.
Do not work into the skipped foundation chains at the end.
Step 4: Work the First Crossed Row
Row 3: Ch 2. Dc in the first st. Work a crossed pair over the next 2 sts. Rep the crossed pair until 1 st remains. Dc in the last st. Turn.
Count: 140 dc, including 69 crossed pairs.
Mark this face as the RS. Each later crossed row will be worked with this same face toward you.
Step 5: Repeat the Stitch Pattern
- Row 4: Ch 1. Sc in each st across. Turn. 140 sc.
- Row 5: Ch 2. Dc in the first st. Work crossed pairs across to the last st. Dc in the last st. Turn. 140 dc.
- Rep Rows 4 and 5 through Row 129.
- Row 130: Ch 1. Sc in each st across. 140 sc.
- At gauge, the panel should measure approximately 40 × 52 inches. Fasten off.
Optional Stripe Changes
For stripes, change shades after any sc row:
- Work the last sc until 2 loops remain on the hook.
- Pull the new shade through both loops.
- Turn and work the next crossed row in the new shade.
- Leave tails long enough to weave in.
Keep each stripe an even number of rows so the changes fall at the same point in the repeat.
Step 6: Add the Border
Lay the panel flat with the RS facing up. Join yarn in the first st along the top edge.
Round 1:
- Ch 1.
- Sc across the top edge, working 3 sc in the final st to turn the corner.
- Work down the first side. As a starting guide, place 3 sc over each two-row section: 2 around the dc row end and 1 into the sc row end.
- Work 3 sc in the first foundation ch at the bottom corner.
- Sc across the foundation edge, working 3 sc in the last foundation ch.
- Work up the second side using the same spacing.
- Add 2 more sc into the starting st to complete that corner.
- Sl st to the first sc.
Work each corner only once. Adjust side spacing if needed: use fewer sts if the edge ripples, or more if it draws in.
Round 2: Ch 1. Sc in each st around, working 3 sc in the middle st of each corner group. Sl st to the first sc.
Rounds 3 and 4: Rep Round 2.
Fasten off. The border should measure about 1 inch wide. Add or omit a round if needed to suit your gauge.
Step 7: Finish the Throw
- Weave in all yarn tails on the WS.
- Wash according to the yarn label.
- Lay the throw flat and ease it into a rectangle.
- Keep the crossed stitches relaxed as you shape the fabric.
- Let the throw dry fully before use.