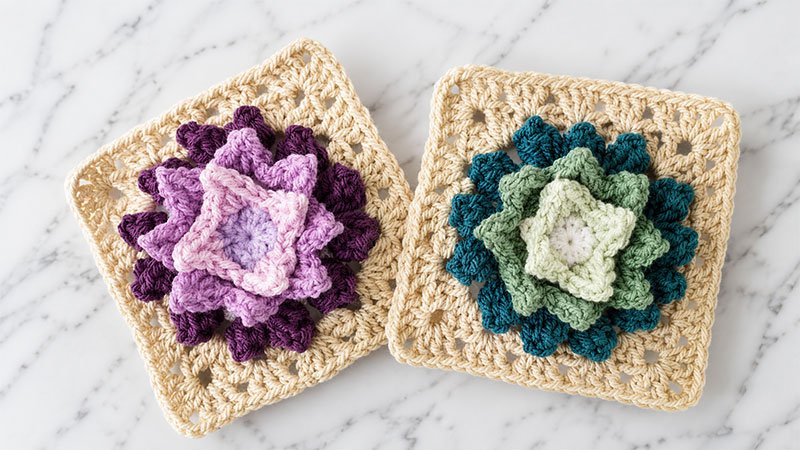
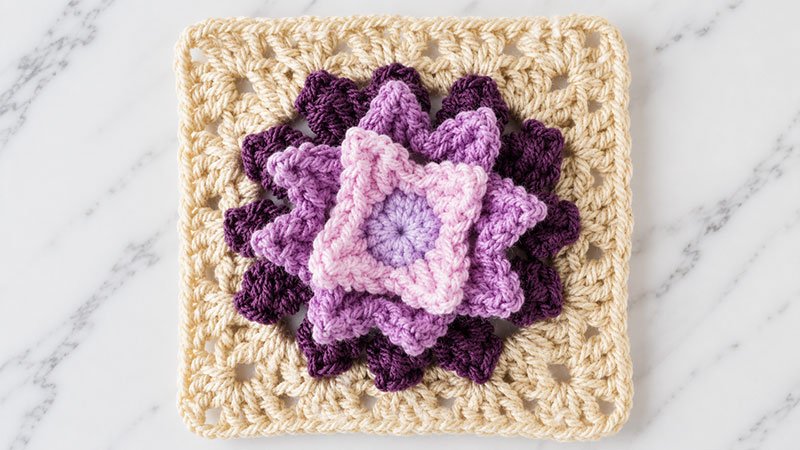
This beautiful square features a layered, dimensional floral center reminiscent of an artichoke blossom, built on a standard granny base.
-
Finished Size: 6 inches (15.2 cm) square
-
Skill Level: Intermediate (due to working around stitch posts and layering rounds)
Materials Needed
-
Hook: 6.0 mm (US J/10) crochet hook
-
Yarn: Aran weight (Medium / Category 4) yarn
-
Notions: Tapestry needle for weaving in ends, scissors, and optional stitch markers.
Special Stitch Guide
-
V-Stitch (V-st): Work 1 double crochet, chain 1, and 1 more double crochet all into the exact same designated stitch or space.
-
Picot Stitch (Picot): Chain 3, then insert your hook into the back bump of the very first chain you made and work a slip stitch.
-
Popcorn Stitch (Popcorn): Work 4 double crochets into the same space. Drop the loop from your hook. Insert your hook from front to back through the top of the first double crochet made, grab the dropped loop, and pull it through to close the cluster.
-
Working Around Stitches (Post Work): Instead of inserting your hook into the top loops of a stitch, you will wrap your hook around the vertical body (post) of the stitch.
Step-by-Step Written Instructions
The Foundation Ring
Form a Magic Circle (MC). Alternatively, chain 4 and slip stitch into the first chain to create a working ring.
Round 1: Creating the Core Base
This round establishes the first set of spaces we will build upon later.
-
Step 1: Chain 4 (this counts as your first double crochet plus a chain-1 space).
-
Step 2: Work 1 double crochet into the ring. This completes your very first modified V-stitch.
-
Step 3: Work [1 double crochet, chain 1, 1 double crochet] into the ring a total of 3 more times.
-
Step 4: Pull the magic circle tail to close the center tight. Join the round by working a slip stitch into the 3rd chain of your starting chain-4.
-
Round Total:
4 V-stitches (8 dc and 4 ch-1 spaces)
Round 2: The Inner Surface Framing
We will now work horizontally across the posts of Round 1 to create the anchor loops for our first set of petals.
-
Step 1: Insert your hook around the vertical post of the very first double crochet (the initial ch-3 from Round 1) and slip stitch.
-
Step 2: Chain 2. Move to the next 2 double crochet posts; work a slip stitch around the post of the first one, then a slip stitch around the post of the second one.
-
Step 3: Repeat the instructions from
*to*3 times until you approach the end of the circle. -
Step 4: Chain 2, slip stitch around the final double crochet post, and finish with a slip stitch into the first slip stitch of the round to secure it.
-
Round Total:
8 slip stitches, 4 chain-2 loops
Round 3: The First Petal Layer
If you want to switch colors for the petals, fasten off the old color and join your new yarn with a slip stitch inside any chain-2 loop from Round 2.
-
Step 1: Chain 1 (does not count as a stitch).
-
Step 2: Inside the first chain-2 loop, work the following sequence to shape a petal: [1 single crochet, 1 half double crochet, 1 Picot stitch, 1 half double crochet, 1 single crochet].
-
Step 3: Repeat that exact sequence inside each of the remaining three chain-2 loops around.
-
Step 4: Join with a slip stitch to the first single crochet of the round.
-
Round Total:
4 distinct 3D petals
Round 4: Expanding the Base
We will now drop back behind the petals to build on the chain-1 spaces from Round 1.
-
Step 1: Chain 1 (does not count as a stitch). Reach behind the Round 3 petals and slip stitch directly into the chain-1 space of the first V-stitch from Round 1.
-
Step 2: Chain 4 (counts as a double crochet plus a chain-1 space), then work 1 double crochet into that same space.
-
Step 3: Work another complete V-stitch [1 dc, ch 1, 1 dc] into this exact same space. (You now have 2 V-stitches in the first space).
-
Step 4: Move to the next chain-1 space from Round 1 and work 2 V-stitches into it. Repeat this for all remaining chain-1 spaces around.
-
Step 5: Join with a slip stitch to the 3rd chain of the starting chain-4.
-
Round Total:
8 V-stitches (16 dc and 8 ch-1 spaces)
Round 5: The Outer Surface Framing
Similar to Round 2, we are setting up loops for the next layer of petals by working around the posts of Round 4.
-
Step 1: If changing colors, fasten off and join your new yarn around the post of the first double crochet of Round 4. If keeping the same color, chain 1 and slip stitch around that same first post.
-
Step 2: Chain 2, then slip stitch around each of the next 2 double crochet posts.
-
Step 3: Repeat from
*to*7 times around the ring. -
Step 4: Chain 2, slip stitch around the final post, and join with a slip stitch to the very first slip stitch made.
-
Round Total:
16 slip stitches, 8 chain-2 loops
Round 6: The Second Petal Layer
-
Step 1: If changing colors, fasten off and join yarn inside any chain-2 loop from Round 5. If using the same color, chain 1.
-
Step 2: Into every single chain-2 loop around the circle, work: [1 single crochet, 1 half double crochet, 1 Picot stitch, 1 half double crochet, 1 single crochet].
-
Step 3: Join with a slip stitch to the first single crochet of the round.
-
Round Total:
8 distinct 3D petals
Round 7: Textured Flower Backing
We will now transition to textured popcorn stitches. These will be worked into the chain-1 spaces from Round 4, located behind the petals.
-
Step 1: If changing colors, join yarn in any Round 4 chain-1 space. If continuing with the same color, chain 1 and slip stitch into the nearest chain-1 space from Round 4.
-
Step 2: Chain 3 (counts as the first double crochet of your first popcorn). Complete a modified popcorn stitch in this space by working 3 more double crochets, dropping the loop, and pulling it through the top of the chain-3.
-
Step 3: Chain 2, then work a standard 4-dc Popcorn stitch into that same space. Chain 2. Move to the next chain-1 space and work [1 Popcorn, chain 2].
-
Step 4: Repeat from
*to*around the circle, alternating between putting two popcorns in one space and one popcorn in the next space. -
Step 5: Slip stitch into the top of the very first popcorn stitch to close.
-
Round Total:
12 Popcorn stitches, 12 chain-2 spaces
Squaring Off the Motif
Round 8: Shaping the Corners
This round transforms our circle into a square using varying stitch heights.
-
Step 1: If using a new color, join yarn in any chain-2 space from Round 7. If using the same color, slip stitch into the next chain-2 space and chain 1.
-
Step 2: In the first space, work [2 single crochet, 1 half double crochet]. In the next space (this forms the corner), work [1 half double crochet, 2 double crochet, chain 2, 2 double crochet, 1 half double crochet]. In the third space, work [1 half double crochet, 2 single crochet].
-
Step 3: Repeat the sequence in Step 2 three more times to complete the other three sides and corners of your square.
-
Step 4: Slip stitch to the first single crochet to join.
-
Round Total:
12 stitches along each side, plus 4 corner chain-2 spaces
Round 9: Solidifying the Square
For this round, rather than working into the top loops, we will create solid texture by inserting our hook between the posts of the stitches.
-
Step 1: Chain 2 (does not count as a stitch).
-
Step 2: Find the space between the posts of the first and last single crochets of the side. Work 3 double crochets into that space. Skip the next 3 stitches. Work 3 double crochets between the posts of the next 2 half double crochets. Skip 3 stitches. In the corner chain-2 space, work [3 double crochet, chain 2, 3 double crochet]. Skip 3 stitches, and work 3 double crochets between the posts of the next 2 half double crochets.
-
Step 3: Repeat from
*to*around all four sides. -
Step 4: Slip stitch to the first double crochet of the round to join.
-
Round Total:
15 double crochets per side, plus 4 corner chain-2 spaces
Round 10: The Border Edge
-
Step 1: Chain 1 (does not count as a stitch).
-
Step 2: Work 1 half double crochet into the top loops of every single stitch along the sides.
-
Step 3: When you reach each corner chain-2 space, work [2 half double crochet, chain 2, 2 half double crochet] directly into the corner space.
-
Step 4: Cleanly join the round with a slip stitch into the very first half double crochet.
-
Round Total:
19 half double crochets per side, plus 4 corner chain-2 spaces
Finishing Touch
Cut your yarn leaving a 6-inch tail. Pull the loop completely through, thread your tapestry needle, weave in all loose ends securely on the wrong side of the fabric, and snip the excess. Block your finished square to exactly 6 inches to make joining seamless!