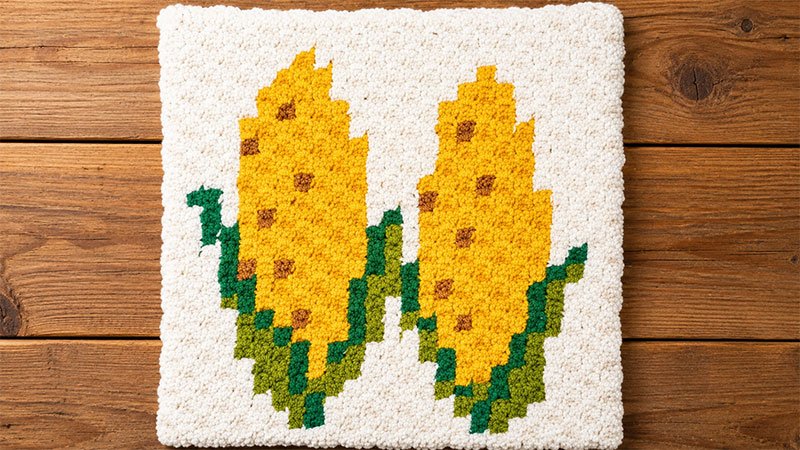
This delightful corner-to-corner (C2C) crochet pattern brings a touch of the autumn harvest to your yarn collection with a stylized corn-on-the-cob motif.
Featuring a bright yellow ear of corn nestled inside green husks against a clean, neutral backdrop, this square is perfect on its own as a washcloth or potholder. Alternatively, you can mix and match it with other seasonal squares to piece together a cozy blanket or tote bag.
You have the creative freedom to construct this pattern using either the Standard C2C method or the more compact Mini-C2C stitch technique.
Dimensions & Sizing
Depending on your chosen technique, your completed piece will yield the following approximate measurements:
-
Mini-C2C Finish: 12″ $\times$ 12″ (30.5 cm $\times$ 30.5 cm)
-
Standard C2C Finish: 17″ $\times$ 17″ (43 cm $\times$ 43 cm)
Gauge Metrics
To ensure your square matches the intended dimensions, check your tension using a 4″ (10 cm) square sample:
-
Mini-C2C: 8 blocks $\times$ 8 rows
-
Standard C2C: 6 blocks $\times$ 6 rows
Material Checklist
-
Crochet Hook: Size 5.5 mm (US I/9 / UK 5) or whichever size allows you to meet the gauge.
-
Yarn Type: Medium worsted/Aran weight yarn (Category 4).
-
Finishing Tools: A tapestry needle for weaving in yarn tails and sharp scissors.
Color Palette Allocation
The pattern relies on five distinct yarn shades. The approximate yardage needed for each is detailed below:
| Color Code | Suggested Name | Palette Role | Yardage Needed | Metric Equivalent |
| Color A | Champagne White | Background & Border | 19.2 yds | 17.6 m |
| Color B | Lime Green | Light Husk Accents | 2.5 yds | 2.3 m |
| Color C | Grass Green | Deep Husk Shading | 2.4 yds | 2.2 m |
| Color D | Buttercup Yellow | Corn Kernels | 9.4 yds | 8.6 m |
| Color E | Soft Fudge | Kernel Depth/Shadows | 1.1 yds | 1.0 m |
Technical Core Notes
-
Grid Framework: The pattern is worked diagonally from the bottom-right corner up to the top-left corner.
-
Reading the Instructions: The sequence details how many individual blocks to crochet in each specified color. For instance, (A) 3, (B) 2 means you will work 3 consecutive blocks using the Champagne White yarn, followed immediately by 2 blocks using the Lime Green yarn.
-
Row Terminology: [WS] denotes a Wrong Side row, and [RS] denotes a Right Side row.
-
Block Counts: The final number enclosed in parentheses at the absolute end of a row line indicates the total block count for that row.
-
Managing Yarn: Because of the frequent color transitions in the middle rows, utilizing bobbins for separate sections of yarn will prevent tangling on the wrong side of your project.
Row-by-Row Stitch Guide
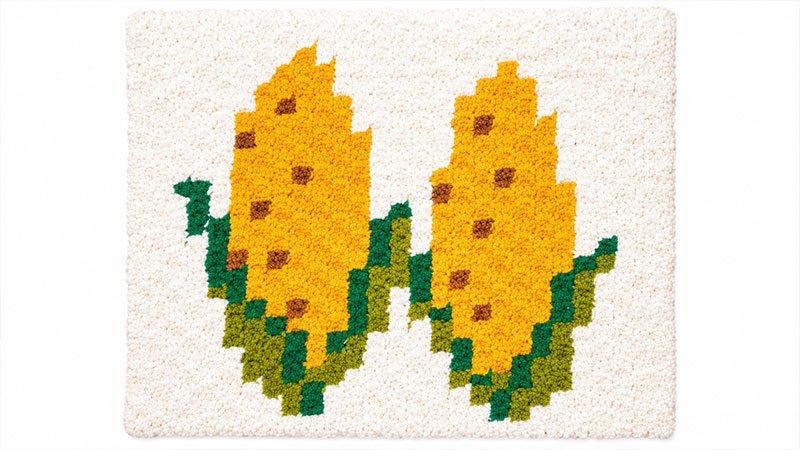
Part 1: The Increasing Section
In this phase, your project expands by one block with every completed row.
Row 1 [WS]: (A) 1. (1)
Row 2 [RS]: (A) 2. (2)
Row 3 [WS]: (A) 3. (3)
Row 4 [RS]: (A) 4. (4)
Row 5 [WS]: (A) 5. (5)
Row 6 [RS]: (A) 6. (6)
Row 7 [WS]: (A) 7. (7)
The green husks begin to emerge here:
Row 8 [RS]: (A) 4, (B) 3, (A) 1. (8)
Row 9 [WS]: (A) 1, (C) 1, (B) 3, (A) 4. (9)
Row 10 [RS]: (A) 4, (B) 2, (C) 2, (A) 2. (10)
Row 11 [WS]: (A) 2, (B) 2, (C) 2, (B) 2, (A) 3. (11)
Introducing the yellow corn kernels:
Row 12 [RS]: (A) 3, (B) 1, (C) 2, (D) 2, (C) 1, (A) 3. (12)
Row 13 [WS]: (A) 3, (B) 1, (D) 4, (C) 1, (B) 2, (A) 2. (13)
Row 14 [RS]: (A) 2, (C) 3, (D) 4, (C) 1, (A) 4. (14)
Row 15 [WS]: (A) 5, (C) 1, (D) 5, (A) 4. (15)
Introducing brown shadow accents for depth:
Row 16 [RS]: (A) 4, (D) 4, (E) 1, (D) 1, (B) 1, (A) 5. (16)
Row 17 [WS]: (A) 6, (B) 1, (D) 6, (A) 4. (17)
Row 18 [RS]: (A) 4, (D) 6, (C) 1, (A) 5, (C) 1, (A) 1. (18)
Row 19 [WS]: (A) 1, (B) 1, (C) 1, (B) 2, (A) 2, (B) 1, (D) 1, (E) 1, (D) 5, (A) 4. (19)
Row 20 [RS]: (A) 5, (D) 6, (C) 1, (A) 1, (B) 5, (A) 2. (20)
Row 21 [WS]: (A) 2, (B) 1, (C) 1, (D) 1, (C) 2, (B) 1, (A) 1, (C) 1, (D) 2, (E) 1, (D) 3, (A) 5. (21)
Row 22 [RS]: (A) 5, (D) 6, (C) 1, (B) 2, (C) 1, (D) 2, (C) 1, (B) 1, (A) 3. (22)
Row 23 [WS]: (A) 3, (B) 2, (C) 1, (D) 2, (C) 1, (B) 2, (A) 1, (D) 3, (E) 1, (D) 2, (A) 5. (23)
Row 24 [RS]: (A) 5, (D) 6, (A) 1, (B) 1, (C) 2, (D) 3, (B) 2, (A) 4. (24)
Row 25 [WS]: (A) 5, (B) 1, (C) 1, (E) 1, (D) 3, (C) 1, (B) 1, (A) 1, (E) 1, (D) 4, (A) 6. (25)
Part 2: The Decreasing Section (The Corner)
From this point forward, you will stop increasing at the beginning of rows. Each row will now decrease by one block to square off the top edges.
Row 26 [RS]: (A) 5, (D) 5, (A) 1, (C) 2, (D) 5, (B) 2, (A) 4. (24)
Row 27 [WS]: (A) 4, (B) 1, (C) 1, (D) 5, (A) 4, (D) 1, (E) 1, (D) 2, (A) 4. (23)
Row 28 [RS]: (A) 4, (D) 3, (A) 4, (D) 6, (B) 1, (A) 4. (22)
Row 29 [WS]: (A) 4, (C) 1, (D) 1, (E) 1, (D) 4, (A) 4, (D) 3, (A) 3. (21)
Row 30 [RS]: (A) 9, (D) 6, (C) 1, (B) 1, (A) 3. (20)
Closing up the husk details:
Row 31 [WS]: (A) 3, (C) 1, (E) 1, (D) 6, (A) 8. (19)
Row 32 [RS]: (A) 7, (D) 7, (C) 1, (A) 3. (18)
Row 33 [WS]: (A) 3, (C) 1, (D) 1, (E) 1, (D) 1, (E) 1, (D) 2, (A) 7. (17)
Row 34 [RS]: (A) 6, (D) 6, (C) 1, (A) 3. (16)
Row 35 [WS]: (A) 2, (C) 1, (A) 1, (D) 6, (A) 5. (15)
Row 36 [RS]: (A) 5, (D) 5, (A) 1, (C) 1, (A) 2. (14)
Row 37 [WS]: (A) 2, (C) 1, (A) 1, (D) 5, (A) 4. (13)
Finishing the final kernel blocks:
Row 38 [RS]: (A) 3, (D) 2, (E) 1, (D) 1, (E) 1, (A) 2, (C) 1, (A) 1. (12)
Row 39 [WS]: (A) 4, (D) 4, (A) 3. (11)
Row 40 [RS]: (A) 2, (D) 3, (A) 5. (10)
Final background corner reduction:
Row 41 [WS]: (A) 9. (9)
Row 42 [RS]: (A) 8. (8)
Row 43 [WS]: (A) 7. (7)
Row 44 [RS]: (A) 6. (6)
Row 45 [WS]: (A) 5. (5)
Row 46 [RS]: (A) 4. (4)
Row 47 [WS]: (A) 3. (3)
Row 48 [RS]: (A) 2. (2)
Row 49 [WS]: (A) 1. (1)
Finishing Touches
Pro-Tip for a Clean Finish: Because corner-to-corner crochet involves many color switches, you will have floating tails on your wrong side. To keep your work secure and neat, weave these ends back and forth through stitches of the same color at least three times before snipping the excess yarn.
-
Cut your working yarn after completing Row 49, leaving a 6-inch tail.
-
Pull the tail through the remaining loop to create a secure knot.
-
Thread your tapestry needle and carefully clean up all loose strands.
-
Blocking (Recommended): Lightly steam block or wet block your finished square. This relaxes the yarn fibers, defines the pixel corners, and coaxes the piece into a perfect, uniform square shape.