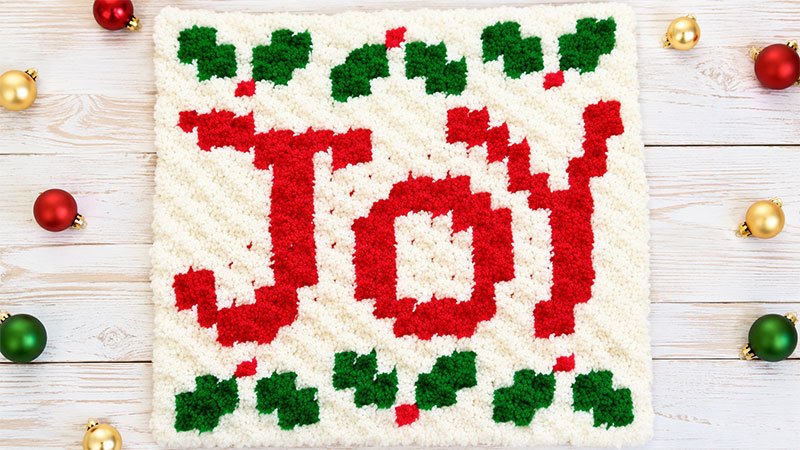
Bring a touch of handmade warmth to your holiday season with this festive corner-to-corner (C2C) crochet square. Featuring a cheery holiday motif, this afghan block is highly versatile—perfect for assembling into a large Christmas throw blanket, transforming into a seasonal throw pillow, or using as a standalone holiday wall hanging. Using classic holiday hues, it is an engaging project for crocheters looking to practice colorwork using the C2C method.
Project Specifications
-
Finished Dimensions: Approximately 13.2″ × 13.2″ (33.5 cm × 33.5 cm) square.
-
Gauge: 7.5 C2C pixel blocks square equal to 4″ (10 cm).
Supplies Required
Tools & Notions
-
Crochet Hook: 4.0 mm (Size US G/6 / UK 8)
-
Finishing: Tapestry needle for weaving in loose yarn ends and assembly.
Yarn Requirements
This pattern utilizes DK weight yarn (Group 3, Light). The original prototype featured a blend of Paintbox Yarns Simply DK and Stylecraft Special DK in the following shades:
-
Color A (Background): Soft Cream/White — approx. 175 yards (160 meters)
-
Color B (Main Text/Motif): Bright Rose Red — approx. 51.3 yards (47 meters)
-
Color C (Accent/Leaves): Vibrant Grass Green — approx. 36 yards (33 meters)
-
Color D (Detailing): Deep Matador Red — approx. 3 yards (2.8 meters)
Crochet Glossary (US Terminology)
-
Ch: Chain
-
Dc: Double Crochet
-
Sl St: Slip Stitch
-
St(s): Stitch(es)
-
Yo: Yarn over
-
RS / WS: Right Side / Wrong Side
Technical Guide & Special Stitches
Corner-to-Corner (C2C) Technique
This project is worked diagonally from one corner to the opposite corner, creating a grid of small “tiles” or “blocks.”
Working the Increase Section
-
First Block: Chain 5. Double crochet into the 3rd chain from your hook, then double crochet into the remaining 2 chains. (1 block completed).
-
Second Row Expansion: Chain 5 and turn your work. Double crochet into the 3rd chain from your hook and the next 2 chains. Slip stitch into the chain-2 space of your very first block to join them. Chain 2, then work 3 double crochets directly into that same chain-2 space.
-
Subsequent Rows: Chain 5 and turn. Double crochet into the 3rd chain from the hook and the next 2 chains. Slip stitch into the next available chain-2 space of the previous row’s block, chain 2, and work 3 double crochets into that same space. Repeat the steps between the asterisks across the row until you reach the edge.
Working the Decrease Section
Once you reach the widest point of the square (after Row 25), you will begin decreasing to square off the top edges:
-
Turn your work at the start of the row, then slip stitch across the top 3 double crochets of the last block made.
-
Slip stitch directly into the chain-2 space.
-
Continue your standard block pattern across: (Chain 2, work 3 double crochets in the chain space, slip stitch into the next block’s chain space) until you reach the final block of the row. Do not build a new block on top of the last one.
Smooth Color Changes: To ensure crisp transitions between your holiday colors, always pull your new yarn color through on the final Yarn Over (Yo) of the very last double crochet stitch in a block right before the change occurs.
Step-by-Step Row Instructions
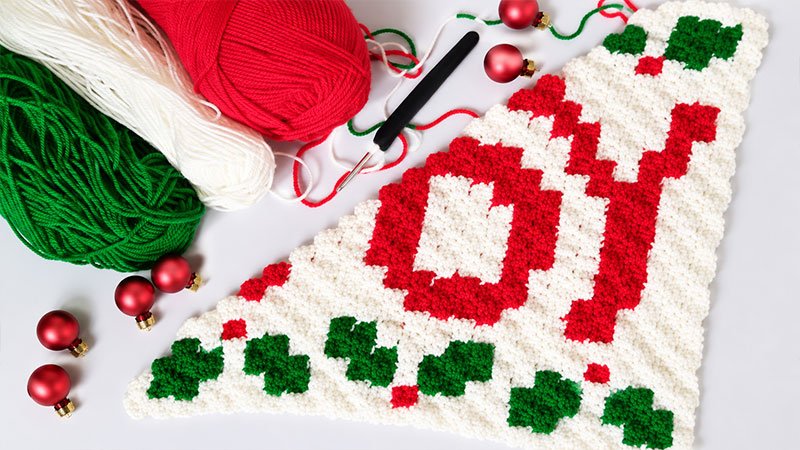
Each number in the parentheses at the very end of a line indicates the total block count for that specific row.
The Increase Section
-
Row 1 [RS]: (A) 1 block. (1)
-
Row 2 [WS]: (A) 2 blocks. (2)
-
Row 3 [RS]: (A) 1, (C) 1, (A) 1. (3)
-
Row 4 [WS]: (A) 1, (C) 2, (A) 1. (4)
-
Row 5 [RS]: (A) 2, (C) 1, (A) 2. (5)
-
Row 6 [WS]: (A) 2, (C) 2, (A) 2. (6)
-
Row 7 [RS]: (A) 3, (C) 1, (A) 3. (7)
-
Row 8 [WS]: (A) 1, (C) 2, (A) 5. (8)
-
Row 9 [RS]: (A) 4, (D) 1, (C) 3, (A) 1. (9)
-
Row 10 [WS]: (A) 2, (C) 2, (A) 6. (10)
-
Row 11 [RS]: (A) 4, (B) 1, (A) 6. (11)
-
Row 12 [WS]: (A) 6, (B) 3, (A) 3. (12)
-
Row 13 [RS]: (A) 3, (B) 3, (A) 3, (C) 2, (A) 2. (13)
-
Row 14 [WS]: (A) 1, (D) 1, (C) 3, (A) 4, (B) 2, (A) 3. (14)
-
Row 15 [RS]: (A) 3, (B) 2, (A) 5, (C) 2, (A) 3. (15)
-
Row 16 [WS]: (A) 2, (C) 1, (A) 3, (B) 2, (A) 3, (B) 2, (A) 3. (16)
-
Row 17 [RS]: (A) 3, (B) 2, (A) 2, (B) 4, (A) 2, (C) 2, (A) 2. (17)
-
Row 18 [WS]: (A) 3, (C) 1, (A) 2, (B) 2, (A) 1, (B) 2, (A) 2, (B) 3, (A) 2. (18)
-
Row 19 [RS]: (A) 1, (B) 3, (A) 1, (B) 1, (A) 1, (B) 2, (A) 2, (B) 2, (A) 1, (C) 2, (A) 1, (C) 1, (A) 1. (19)
-
Row 20 [WS]: (A) 1, (C) 2, (A) 1, (C) 1, (A) 2, (B) 1, (A) 3, (B) 2, (A) 1, (B) 1, (A) 2, (B) 2, (A) 1. (20)
-
Row 21 [RS]: (A) 2, (B) 1, (A) 3, (B) 1, (A) 1, (B) 1, (A) 4, (B) 1, (A) 4, (C) 1, (A) 2. (21)
-
Row 22 [WS]: (A) 2, (C) 2, (A) 4, (B) 1, (A) 3, (B) 2, (A) 1, (B) 1, (A) 6. (22)
-
Row 23 [RS]: (A) 6, (B) 1, (A) 2, (B) 1, (A) 3, (B) 2, (A) 4, (C) 1, (A) 3. (23)
-
Row 24 [WS]: (A) 1, (C) 2, (A) 6, (B) 2, (A) 2, (B) 2, (A) 1, (B) 1, (A) 4, (C) 2, (A) 1. (24)
-
Row 25 [RS]: (A) 1, (C) 3, (D) 1, (A) 2, (B) 1, (A) 2, (B) 2, (A) 1, (B) 2, (A) 5, (D) 1, (C) 3, (A) 1. (25)
The Decrease Section (Shaping the Corner)
-
Row 26 [WS]: (A) 1, (C) 2, (A) 2, (B) 2, (A) 3, (B) 4, (A) 2, (B) 1, (A) 4, (C) 2, (A) 1. (24)
-
Row 27 [RS]: (A) 3, (C) 1, (A) 2, (B) 2, (A) 2, (B) 3, (A) 2, (B) 4, (A) 4. (23)
-
Row 28 [WS]: (A) 3, (B) 5, (A) 7, (B) 1, (A) 2, (C) 2, (A) 2. (22)
-
Row 29 [RS]: (A) 2, (C) 1, (A) 10, (B) 2, (A) 2, (B) 1, (A) 3. (21)
-
Row 30 [WS]: (A) 2, (B) 1, (A) 3, (B) 2, (A) 7, (C) 1, (A) 1, (C) 2, (A) 1. (20)
-
Row 31 [RS]: (A) 1, (C) 1, (A) 1, (C) 2, (A) 3, (B) 1, (A) 2, (B) 2, (A) 3, (B) 1, (A) 2. (19)
-
Row 32 [WS]: (A) 1, (B) 2, (A) 3, (B) 2, (A) 1, (B) 2, (A) 3, (C) 1, (A) 3. (18)
-
Row 33 [RS]: (A) 2, (C) 2, (A) 3, (B) 1, (A) 1, (B) 2, (A) 4, (B) 1, (A) 1. (17)
-
Row 34 [WS]: (A) 6, (B) 3, (A) 4, (C) 1, (A) 2. (16)
-
Row 35 [RS]: (A) 3, (C) 2, (A) 2, (B) 2, (A) 6. (15)
-
Row 36 [WS]: (A) 5, (B) 2, (A) 2, (C) 3, (D) 1, (A) 1. (14)
-
Row 37 [RS]: (A) 2, (C) 2, (A) 3, (B) 1, (A) 5. (13)
-
Row 38 [WS]: (A) 4, (B) 1, (A) 7. (12)
-
Row 39 [RS]: (A) 6, (B) 2, (A) 3. (11)
-
Row 40 [WS]: (A) 2, (B) 2, (A) 2, (C) 2, (A) 2. (10)
-
Row 41 [RS]: (A) 1, (C) 3, (D) 1, (A) 1, (B) 1, (A) 2. (9)
-
Row 42 [WS]: (A) 1, (B) 1, (A) 3, (C) 2, (A) 1. (8)
-
Row 43 [RS]: (A) 3, (C) 1, (A) 3. (7)
-
Row 44 [WS]: (A) 2, (C) 2, (A) 2. (6)
-
Row 45 [RS]: (A) 2, (C) 1, (A) 2. (5)
-
Row 46 [WS]: (A) 1, (C) 2, (A) 1. (4)
-
Row 47 [RS]: (A) 1, (C) 1, (A) 1. (3)
-
Row 48 [WS]: (A) 2 blocks. (2)
-
Row 49 [RS]: (A) 1 block. (1)
Finishing Up
Fasten off your working yarn, leaving a tail if you need to sew pieces together later. Take your tapestry needle and carefully weave in all yarn tails securely on the wrong side (WS) of your work to ensure a clean finish.
Blocking your completed square is highly recommended to square up the edges nicely before joining it into a larger holiday design.