Pattern Description:
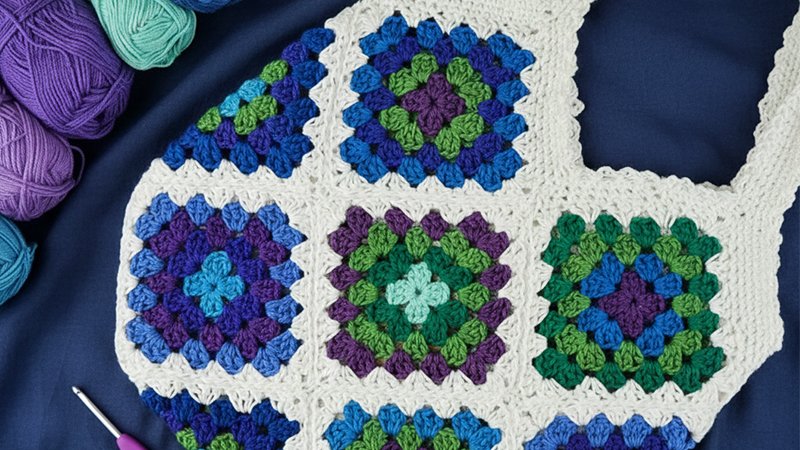
The C2C Granny Square Bag is a stylish sling bag made from eleven vibrant granny squares joined with a modern geometric layout.
Using join-as-you-go construction and reverse single crochet seams, it creates a sturdy yet lightweight accessory.
The design features bold color changes, crisp blocked squares, a neat crab-stitch border, and an adjustable Romanian Cord strap, making it both practical and visually striking.
Materials Needed & Measurements:
Materials
- Yarn: Lion Brand Pima Cotton (Weight: 4/medium – 186 yds, 3.5 oz/100 g).
- Color A: Mademoiselle [762-184P] – 1 ball/skein (approx. 80 g).
- Color B: Pewter [762-152B] – 1 ball/skein (approx. 88 g).
- Color C: Mineral Yellow [762-159S] – 1 ball/skein (approx. 82 g).
- Note: If crocheting the Halcyon Bucket Hat as well, two total skeins of Color A and one skein each of Color B and C will be enough for both projects.
- Crochet Hooks:
- Size I (5.5 mm) crochet hook (or size needed to obtain gauge).
- Size J (6.0 mm) crochet hook (or one size up from the smaller hook).
- Tools:
- Tapestry needle.
- 20 Stitch markers.
- T-Pins (for blocking).
- Steamer or iron with steam function (alternatively, use a spray bottle).
- Blocking board.
- Optional Items:
- Wooden button.
- Leather strap or thrifted belt.
Measurements
- Finished Granny Square Gauge (Before Blocking): Approx 4.75 x 4.75”.
- Blocking Size: All squares should be blocked to a standard size, approximately 5” X 5”.
- Bag Measurements:
- 12.5” at tallest point.
- 15” at widest point.
- Strap Length: Adjustable.
Abbreviations (US Terms)
ch – chain
chsp – chain space
cluster – set of three stitches
dc – double crochet
rsc – reverse single crochet
sc – single crochet
slst – slip stitch
st(s) – stitch(es)
RS – right side
Instructions for Making the C2C Granny Square Bag Pattern:
Granny Squares (Make 11 Total)
Granny squares are worked in the round with the RS facing throughout. Ch 3 counts as 1 dc.
- Foundation: Create a magic loop or ch 4, then slst to join into a loop.
- Round 1 (RS): Use Color A. Ch 3 tightly, 2 dc in loop, ch 1, [3 dc in loop, ch 1] three times; slst to top of ch to join. Fasten off (1 cluster per side).
- Round 2 (RS): Join Color B in any ch1sp. Ch 3 tightly, 2 dc in same sp, ch 2, 3 dc in same sp (corner made), ch 1, [3 dc, ch 2, 3 dc, ch 1] in three remaining ch1sps, slst to join. Fasten off (2 clusters per side).
- Round 3 (RS): Join Color C in any ch2sp. Ch 3 tightly, 2 dc in same sp, ch 2, 3 dc in same sp, ch 1, [3 dc, ch 1] in next ch1sp, [3 dc, ch 2, 3 dc, ch 1] in corner ch2sp, [3 dc, ch 1] in next ch1sp; rep from twice more, slst to join (3 clusters per side). Do not fasten off. (Each square should measure 3” across at this point).
- Round 4 (RS): Continuing with Color C. Ch 3 tightly, dc in next dc, [dc in each dc and ch1sp to corner, (dc, ch 2, dc) in corner] 3 times, dc in each dc and ch1sp to last corner, (dc, ch 2) in corner, slst to join. Fasten off (13 dc per side).
- Round 5 (RS): Join Color A in a dc along any side. Ch 3 tightly, dc in next dc, [dc in each dc to corner, (dc, ch 2, dc) in corner] 4 times, dc in each remaining dc, slst to join. Fasten off (15 dc per side).
Blocking Granny Squares
Use T-pins to pin each square to a blocking board, stretching them to a standard size of approximately 5” X 5”. Steam block using a steamer or iron, taking care not to touch the yarn directly, and allow them to dry. Blocking helps straighten out wonky squares before joining.
Joining Squares
All 11 squares are joined using creative geometry. Arrange the squares as illustrated in the pattern photographs (eight at a diagonal, two folded squares on the sides, and one closure flap square). Pin all squares together using stitch markers before beginning to avoid orientation mistakes.
Squares are joined using reverse single crochet (rsc), also known as the crab stitch. Rsc is worked in the opposite direction of typical crochet (right-handed crocheters work left to right).
- Attach Color B yarn towards the top of the bag.
- To Join: Ch 1, rsc though both squares in each chsp and dc to join squares continuously.
- Work continuously until a “dead end” is reached, then fasten off.
- Reattach yarn in a new square and continue joining until all 11 squares are secured.
Finishing Border
The border is worked around the top opening of the bag with the RS facing continuously.
- Round 1 (RS): With the backside of the bag facing you, attach yarn in the right intersection of the closure square. Ch 1, sc in each dc and chsp intersection around the top.
- Place (sc, ch 1, sc) in the corner of the closure square.
- At both side corners, sc up to the corner, ch 7 (for strap attachment), and continue with sc on the next square side.
- Sc on both sides of the closure square. On the second pass of the closure square corner, sc up to the corner, then ch 6 (button loop) and continue with sc on the last side. Modify the chain length if using a wooden button. Do not turn.
- Round 2 (RS): Ch 1, rsc in each sc around Round 1. Work 7 rsc in side ch loops and 6 rsc in the closure square button loop. Slst to the first rsc to join. Fasten off.
Roman Cord Strap
The strap is made using the Romanian Cord technique with the larger (Size J/6.0 mm) hook and two strands of Color B yarn held together. Separate Color B into two equal balls before starting.
- Foundation Row: Ch 2.
- Row 1: Sc in second ch from hook; rotate st clockwise.
- Row 2: Insert hook under the single loop at the “back” of the stitch; work 1 sc under this loop; rotate st clockwise.
- Row 3 and beyond: Insert hook under two loops at the “back” of the stitch; work 1 sc under these loops; rotate st clockwise.
- Rep Row 3 until the desired length is reached. The finished strap will stretch slightly when worn. Fasten off, weave in ends, and thread the strap through both side loops, tying it in a square knot. The strap is intended to be doubled over when carried.
Crocheted Button (Optional)
If substituting a wooden button, skip this section. Use Color B and the smaller hook. Work in a spiral.
- Foundation: Create a magic loop, leaving a 12” tail. Ch 1 and work 6 sc within (6).
- Round 2: 2 sc in each st (12).
- Rounds 3-4: Sc in each sc (12).
- Fasten off leaving a 15” tail. Whip st through each st of Round 4, use the excess foundation loop tail to stuff the button, then cinch the whip stitches closed using the final tail. Attach the button to the bag where desired.