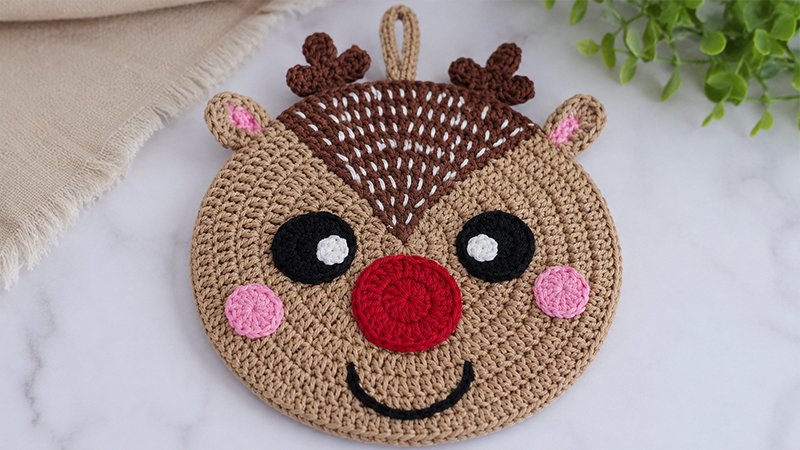
This festive crochet project creates a thick, double-layered holiday potholder featuring an adorable reindeer face. By using tapestry crochet for the front panel and layering it with a solid back panel, the potholder becomes durable and heat-resistant.
Separate components for the antlers, ears, and facial details are sewn on to give the character a charming, three-dimensional look.
Materials & Tools
-
Hook: 3.0 mm (US C/2) crochet hook
-
Yarn: DK weight (Group 3, Light) 100% cotton yarn in six colors:
-
Color A: Light Brown (Main body)
-
Color B: Dark Brown (Antlers and face accent)
-
Color C: Red (Nose)
-
Color D: Pink (Cheeks and inner ears)
-
Color E: Black (Eyes and mouth)
-
Color F: White (Pupils and head spots)
-
-
Notions: Tapestry needle and scissors
-
Finished Size: Approximately 6.1 inches (15.5 cm) in diameter
Pattern Stitches & Terms (US Abbreviations)
-
Ch: Chain
-
Sl St: Slip stitch
-
Sc: Single crochet
-
Hdc: Half double crochet
-
Dc: Double crochet
-
Inc: Increase (Work 2 stitches into the same stitch)
-
MR: Magic Ring / Magic Circle
-
Color Changes: Switch colors during the final yarn-over of the previous stitch. Carry the unused yarn color inside your stitches (tapestry style).
Step-by-Step Instructions
1. Solid Back Panel
Using Color A (Light Brown).
-
Round 1: Form a MR. Ch 2 (does not count as a stitch here and throughout), work 12 dc into the ring. Join with a sl st to the first dc. (12 sts)
-
Round 2: Ch 2, work 1 dc inc into every stitch around. Join. (24 sts)
-
Round 3: Ch 2, work 1 dc inc, then 1 dc 12 times. Join. (36 sts)
-
Round 4: Ch 2, work 1 dc in next 2 sts, then 1 dc inc 12 times. Join. (48 sts)
-
Round 5: Ch 2, work 1 dc inc, then 1 dc in next 3 sts 12 times. Join. (60 sts)
-
Round 6: Ch 2, work 1 dc in next 4 sts, then 1 dc inc 12 times. Join. (72 sts)
-
Round 7: Ch 2, work 1 dc inc, then 1 dc in next 5 sts 12 times. Join. (84 sts)
-
Round 8: Ch 2, work 1 dc in next 6 sts, then 1 dc inc 12 times. Join. (96 sts)
-
Round 9: Ch 2, work 1 dc inc, then 1 dc in next 7 sts 12 times. Join. (108 sts)
-
Fasten off and secure the yarn tails.
2. Tapestry Front Panel
Carry the unused yarn color along the top of your stitches and encase it as you work. Letters in parentheses indicate which color to use for those stitches.
-
Round 1: Start with Color B in a MR. Ch 2, (B) dc 2, switch to Color A, (A) dc 10. Change to B on the last stitch pull-through, join with a sl st. (12 sts)
-
Round 2: Ch 2, (B) dc inc in next 2 sts, switch to A, (A) dc inc in next 10 sts. Change to B, join. (24 sts)
-
Round 3: Ch 2, (B) dc inc, dc 1 twice. Switch to A, (A) dc inc, dc 1 10 times. Change to B, join. (36 sts)
-
Round 4: Ch 2, (B) dc inc, dc 2 twice. In the next stitch, create a split color increase by working 1 dc with B and 1 dc with A into the same stitch. With A, (A) dc 2, then dc inc, dc 2 9 times. Change to B, join. (48 sts)
-
Round 5: Ch 2, (B) dc inc, dc 3 twice, then dc inc. Switch to A, (A) dc 3, dc inc 9 times, dc 3. Change to B, join. (60 sts)
-
Round 6: Ch 2, (B) dc inc, dc 4 twice, dc inc, dc 1. Switch to A, (A) dc 3, then dc inc, dc 4 9 times. Change to B, join. (72 sts)
-
Round 7: Ch 2, (B) dc inc, dc 5 twice, dc inc, dc 2. Switch to A, (A) dc 3, then dc inc, dc 5 9 times. Change to B, join. (84 sts)
-
Round 8: Ch 2, (B) dc inc, dc 6 twice, dc inc, dc 3. Switch to A, (A) dc 3, then dc inc, dc 6 9 times. Change to B, join. (96 sts)
-
Round 9: Ch 2, (B) dc inc, dc 7 twice, dc inc, dc 4. Switch to A, (A) dc 3, then dc inc, dc 7 9 times. Join. (108 sts)
-
Fasten off and weave in all yarn ends.
3. Facial Features & Appliques
-
Nose: Using Color C, make a MR.
-
Round 1: Ch 2, 12 dc into ring. Join. (12 sts)
-
Round 2: Ch 2, dc inc in each stitch around. Join. (24 sts)
-
Fasten off, leaving a long thread for sewing.
-
-
Eyes (Make 2): Using Color E, make a MR.
-
Round 1: Ch 1, 11 hdc into ring. Join. (11 sts)
-
Round 2: Ch 1, hdc inc in each stitch around. Join. (22 sts)
-
Fasten off, leaving a long sewing tail.
-
-
Pupils (Make 2): Using Color F, make a MR.
-
Round 1: Ch 1, 6 sc into ring. Join. (6 sts)
-
Fasten off, leaving a sewing tail.
-
-
Cheeks (Make 2): Using Color D, make a MR.
-
Round 1: Ch 2, 12 dc into ring. Join. (12 sts)
-
Fasten off, leaving a sewing tail.
-
-
Ears (Make 2): Start with Color D, ch 4.
-
Row 1: Sc in 2nd ch from hook, sc in next ch, work 3 sc into the final ch. Turn to work along the opposite side of the starting chain: sc in the next 2 chains. Fasten off Color D.
-
Row 2: Attach Color A to the very first sc of Row 1. Ch 1, hdc in next 3 sts, work 6 dc into the center point stitch, hdc in the last 3 sts. Fasten off with a long tail.
-
-
Antlers (Make 4): Using Color B, ch 12.
-
Row 1: Dc in 3rd ch from hook, hdc in next ch, sc in next 2 chs.
-
First Point: Ch 6, dc in 3rd ch from hook, dc in next ch, hdc in next ch, sc in next ch. Work 1 sc into the side of the main stem’s last sc.
-
Second Point: Ch 5, dc in 3rd ch from hook, hdc in next ch, sc in next ch. Work 1 sc into the side of the first point’s final sc.
-
Base Stem: Work 1 sc back into the main foundation chain loop where your first point connected. Hdc in each of the remaining 6 chains down the main stem. Fasten off.
-
Thickening: Place two finished antler pieces directly on top of each other. Sew around the edges to join them into one thick antler. Repeat for the other pair.
-
Assembly & Finishing
-
Face Details: Position the nose just below the center of the front tapestry panel. Arrange the eyes (with pupils attached) and pink cheeks around it. Sew them down securely using your yarn needle.
-
Mouth & Spots: Use Color E to surface crochet a smile beneath the nose. Use Color F to embroider a few small decorative spots on the forehead.
-
Joining the Panels: Place the front and back circles together, wrong sides facing. Locate the top center stitch of the head. Insert your hook through the inner loops (back loop of the front panel, front loop of the back panel) of both pieces. Join Color A with a slip stitch.
-
Hanging Loop: Ch 20, then slip stitch back into the exact same starting loops.
-
Border: Slip stitch through the inner loops of both panels all the way around the circle to seal them together. Once you return to the hanging loop, work approximately 25 single crochets directly around the chain loop to make it thick and sturdy. Fasten off and hide the yarn tails inside the potholder.
-
Final Elements: Sew the double-thick antlers and the bases of the ears to the upper back edge of the potholder. Secure all remaining loose threads.