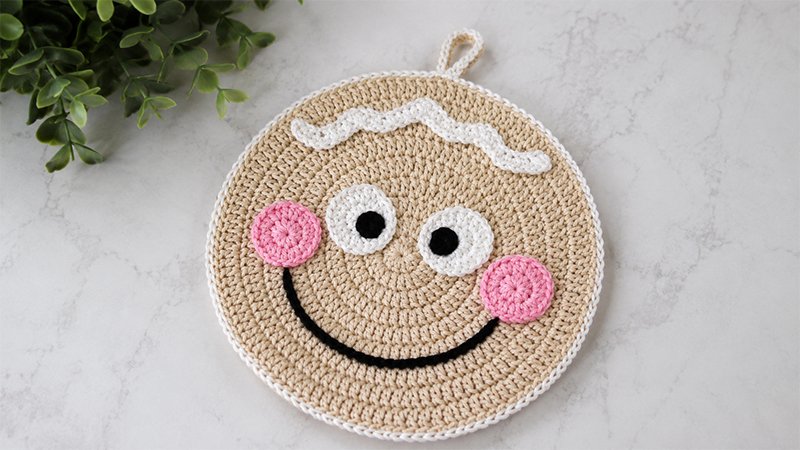
Bring holiday warmth into your kitchen with this charming, double-thick gingerbread person potholder. This project uses basic circular construction for the body, making it a great pattern for intermediate beginners.
By joining two flat discs together, you create a thick, heat-resistant pad that protects your hands and counters while adding festive decor to your home.
Supplies Needed
-
Yarn: Medium weight (Category 4) or DK weight (Category 3) 100% cotton yarn in four colors:
-
Color A: Medium Brown (Gingerbread body)
-
Color B: Cream/White (Icing details & border)
-
Color C: Pink (Cheeks)
-
Color D: Black (Eyes/Mouth)
-
-
Hook: 3.0 mm (US C) or size needed to obtain a tight gauge
-
Tools: Tapestry needle for assembly, scissors, and stitch markers
Key Terms & Techniques (US Terminology)
-
Ch: Chain
-
Sc: Single crochet
-
Hdc: Half double crochet
-
Dc: Double crochet
-
Sl St: Slip stitch
-
Inc: Increase (work two stitches into the same stitch)
-
Sc3tog: Single crochet three stitches together (insert hook in next st, yarn over, pull up loop x3. Yarn over, pull through all 4 loops).
-
Magic Ring (MR): An adjustable yarn loop used to start working in the round.
Step-by-Step Directions
1. The Potholder Base (Create 2)
You will make two identical circles using the brown yarn to form the thick front and back layers.
Using Color A (Brown), start with a Magic Ring.
-
Round 1: Chain 2 (does not count as a stitch here or throughout). Work 12 double crochets into the ring. Slip stitch to the first double crochet to close the round. (12 stitches)
-
Round 2: Chain 2. Work 2 double crochets into every stitch around. Slip stitch to close. (24 stitches)
-
Round 3: Chain 2. *Work 2 double crochets in the first stitch, then 1 double crochet in the next stitch. Repeat from * around. Slip stitch to close. (36 stitches)
-
Round 4: Chain 2. *Work 1 double crochet in each of the next 2 stitches, then 2 double crochets in the following stitch. Repeat from * around. Slip stitch to close. (48 stitches)
-
Round 5: Chain 2. *Work 2 double crochets in the first stitch, then 1 double crochet in each of the next 3 stitches. Repeat from * around. Slip stitch to close. (60 stitches)
-
Round 6: Chain 2. *Work 1 double crochet in each of the next 4 stitches, then 2 double crochets in the following stitch. Repeat from * around. Slip stitch to close. (72 stitches)
-
Round 7: Chain 2. *Work 2 double crochets in the first stitch, then 1 double crochet in each of the next 5 stitches. Repeat from * around. Slip stitch to close. (84 stitches)
-
Round 8: Chain 2. *Work 1 double crochet in each of the next 6 stitches, then 2 double crochets in the following stitch. Repeat from * around. Slip stitch to close. (96 stitches)
-
Round 9: Chain 2. *Work 2 double crochets in the first stitch, then 1 double crochet in each of the next 7 stitches. Repeat from * around. Slip stitch to close. (108 stitches) Cut the yarn and secure the ends.
2. White Icing Trim
This wavy strip creates the classic rick-rack icing look.
Using Color B (White), chain 41.
-
Row 1: Starting in the second chain from your hook, single crochet across the first 3 chains. *Work 2 single crochets in the next chain, single crochet in each of the next 3 chains, decrease across the next 3 chains using the sc3tog technique, then single crochet in each of the next 3 chains. Repeat from * three times total. Finish the row by working 2 single crochets in the next chain, single crochet in the next 3 chains, and sc3tog over the final 3 chains. (36 stitches) Fasten off, ensuring you leave a long yarn tail for sewing later.
3. Facial Features
-
Eyes & Cheeks (Create 2 in White, 2 in Pink): Using either Color B (White) for eyes or Color C (Pink) for cheeks, form a Magic Ring.
-
Round 1: Chain 1, work 11 half double crochets into the ring. Slip stitch to join. (11 stitches)
-
Round 2: Chain 1. Work 2 half double crochets into every stitch around. Slip stitch to join. (22 stitches) Fasten off, leaving a long tail for assembly.
-
-
Pupils (Create 2): Using Color D (Black), form a Magic Ring.
-
Round 1: Chain 1, work 6 single crochets into the ring. Slip stitch to join. (6 stitches) Fasten off, leaving a long tail.
-
Assembly & Finishing
Step 1: Embroider the Face
Take one of your brown circles to use as the front face.
-
Cheeks: Position the pink circles on the lower half of the face (spanning roughly rounds 5 to 8) and sew them down.
-
Eyes: Stitch the white circles just above the center point, nestled slightly between the cheeks.
-
Pupils: Secure the black circles directly onto the white eyes.
-
Mouth & Trim: Sew the wavy white icing strip along the bottom curve. Use a length of black yarn to surface-stitch a smile stretching from cheek to cheek between rounds 6 and 7. Secure all loose ends on the back of the disc.
Step 2: Combine the Layers & Add Hanging Loop
-
Stack the decorated face disc directly on top of the plain backing disc, ensuring the right sides face outward. Locate a stitch at the very top center of the head.
-
Insert your hook through the inner loops (the back loop of the front disc and the front loop of the back disc) of both pieces. Pull up a loop of Color B (White) and slip stitch to join.
-
Hanging Loop: Chain 20, then slip stitch back into that same starting spot.
-
Joining the Borders: Continue around the entire perimeter of the circle, working a slip stitch through the inner loops of both layers to seal the potholder closed. Keep your tension relaxed so the edges don’t pucker.
-
Finishing the Loop: When you return to the top, work single crochets directly over the chain-20 loop (about 25 stitches, or enough to fully cover the chain core).
-
Slip stitch to the base to secure, cut your yarn, and weave in the final ends.