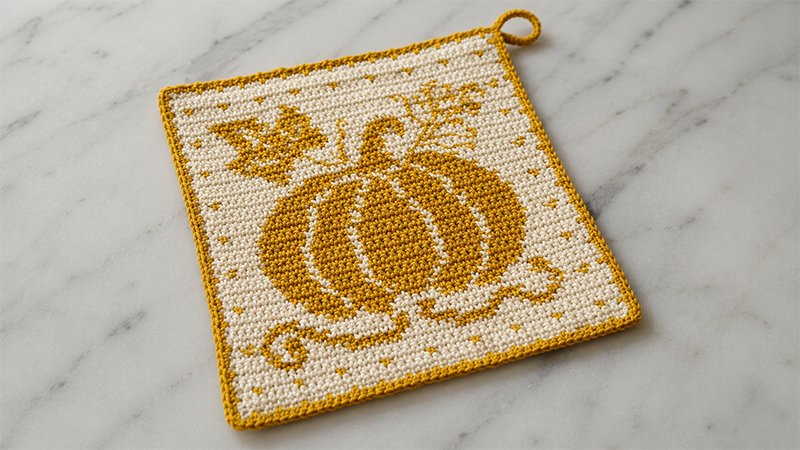
Celebrate the arrival of fall with this charming farmhouse-style potholder. This functional kitchen accessory uses tapestry crochet to create a classic pumpkin motif, making it a perfect quick project to bring cozy, rustic vibes to your home before the cold weather sets in.
Project Specifications
Finished Dimensions
-
Width: 6.7 inches (17 cm)
-
Height: 7.3 inches (18.5 cm)
Materials Needed
-
Hook: 3.0 mm (US Size D-3 / UK 11)
-
Yarn: Light worsted weight / DK cotton yarn (such as Paintbox Yarns Cotton DK) in two high-contrast colors:
-
Color A (Main/Background): Approx. 62 yards (56.5 meters)
-
Color B (Pattern/Pumpkin): Approx. 38 yards (35 meters)
-
-
Notions: Tapestry needle for weaving in ends and embroidery.
Gauge
-
28 single crochet stitches by 26 rows = 4 inches (10 cm) square, worked using the tapestry crochet method.
Terminology & Special Techniques
Abbreviations (US Terms)
-
Ch: Chain
-
Drop St: Drop Stitch
-
Hdc: Half Double Crochet
-
RS: Right Side
-
Sc: Single Crochet
-
Sk: Skip
-
Sl St: Slip Stitch
-
St(s): Stitch(es)
-
WS: Wrong Side
-
Yo: Yarn Over
Special Stitch Instructions
-
Backstitch (Embroidery): Bring your needle up through the fabric from the back, then make a straight stitch backward into the end of your previous stitch. Move the needle forward along the back side, bringing it up one stitch-length ahead to start the next one.
-
Drop Stitch (Drop St): Work into the corresponding stitch located two rows below your current working row. Insert hook, yarn over, and pull up a long loop to match the height of your current row. Yarn over and pull through both loops on the hook.
Working Notes
-
This pattern uses the tapestry crochet technique where the unused color is carried along inside the stitches.
-
The turning chain-1 does count as the first stitch of the row and is always worked in Color A.
-
Row 3 establishes the Right Side (RS). All odd-numbered rows are worked on the right side; all even-numbered rows are worked on the wrong side.
-
Maintain a constant stitch count of 45 stitches per row throughout the main body.
-
Turn your work at the end of every row.
Step-by-Step Pattern Instructions
Main Body
Using Color A, chain 46.
-
← Row 1 [RS]: Starting in the second chain from your hook, work 1 sc into every chain across. (45 sts)
-
→ Row 2 [WS]: Work 45 sc using Color A.
-
← Row 3 [RS]: (A) 2, (B) 1,
8 times, (A) 2.
-
→ Row 4 [WS]: Work 45 sc using Color A.
-
← Row 5 [RS]: (A) 37, (B) 2, (A) 6.
-
→ Row 6 [WS]: (A) 4, (B) 2, (A) 2, (B) 1, (A) 5, (B) 6, (A) 6, (B) 5, (A) 5, (B) 2, (A) 7.
-
← Row 7 [RS]: (A) 6, (B) 1, (A) 2, (B) 1, (A) 3, (B) 1, (A) 4, (B) 3, (A) 3, (B) 1, (A) 5, (B) 3, (A) 3, (B) 2, (A) 2, (B) 1, (A) 4.
-
→ Row 8 [WS]: (A) 2, (B) 1, (A) 1, (B) 1, (A) 2, (B) 2, (A) 1, (B) 2, (A) 8, (B) 1, (A) 2, (B) 1, (A) 8, (B) 3, (A) 4, (B) 1, (A) 2, (B) 1, (A) 2.
-
← Row 9 [RS]: (A) 5, (B) 1, (A) 14, (B) 2, (A) 3, (B) 1, (A) 8, (B) 2, (A) 3, (B) 1, (A) 5.
-
→ Row 10 [WS]: (A) 6, (B) 3, (A) 4, (B) 3, (A) 1, (B) 3, (A) 6, (B) 3, (A) 1, (B) 3, (A) 4, (B) 2, (A) 6.
-
← Row 11 [RS]: (A) 6, (B) 2, (A) 3, (B) 3, (A) 1, (B) 5, (A) 1, (B) 2, (A) 1, (B) 5, (A) 1, (B) 4, (A) 11.
-
→ Row 12 [WS]: (A) 11, (B) 4, (A) 1, (B) 4, (A) 1, (B) 4, (A) 1, (B) 5, (A) 1, (B) 4, (A) 9.
-
← Row 13 [RS]: (A) 2, (B) 1, (A) 5, (B) 4, (A) 1, (B) 5, (A) 1, (B) 6, (A) 1, (B) 4, (A) 1, (B) 5, (A) 6, (B) 1, (A) 2.
-
→ Row 14 [WS]: (A) 9, (B) 4, (A) 1, (B) 4, (A) 1, (B) 8, (A) 1, (B) 4, (A) 1, (B) 4, (A) 8.
-
← Row 15 [RS]: (A) 7, (B) 5, (A) 1, (B) 4, (A) 1, (B) 8, (A) 1, (B) 4, (A) 1, (B) 5, (A) 8.
-
→ Row 16 [WS]: (A) 8, (B) 4, (A) 1, (B) 5, (A) 1, (B) 8, (A) 1, (B) 5, (A) 1, (B) 4, (A) 7.
-
← Row 17 [RS]: (A) 6, (B) 5, (A) 1, (B) 5, (A) 1, (B) 8, (A) 1, (B) 5, (A) 1, (B) 5, (A) 7.
-
→ Row 18 [WS]: (A) 2, (B) 1, (A) 4, (B) 5, (A) 1, (B) 5, (A) 1, (B) 8, (A) 1, (B) 5, (A) 1, (B) 5, (A) 3, (B) 1, (A) 2.
-
← Row 19 [RS]: (A) 6, (B) 5, (A) 1, (B) 5, (A) 1, (B) 8, (A) 1, (B) 5, (A) 1, (B) 5, (A) 7.
-
→ Row 20 [WS]: (A) 7, (B) 5, (A) 1, (B) 5, (A) 1, (B) 8, (A) 1, (B) 5, (A) 1, (B) 5, (A) 6.
-
← Row 21 [RS]: (A) 6, (B) 6, (A) 1, (B) 4, (A) 1, (B) 8, (A) 1, (B) 4, (A) 1, (B) 6, (A) 7.
-
→ Row 22 [WS]: (A) 7, (B) 6, (A) 1, (B) 5, (A) 1, (B) 6, (A) 1, (B) 5, (A) 1, (B) 6, (A) 6.
-
← Row 23 [RS]: (A) 2, (B) 1, (A) 4, (B) 6, (A) 1, (B) 4, (A) 1, (B) 6, (A) 1, (B) 4, (A) 1, (B) 6, (A) 5, (B) 1, (A) 2.
-
→ Row 24 [WS]: (A) 8, (B) 6, (A) 1, (B) 5, (A) 1, (B) 4, (A) 1, (B) 5, (A) 1, (B) 6, (A) 7.
-
← Row 25 [RS]: (A) 8, (B) 5, (A) 1, (B) 5, (A) 1, (B) 4, (A) 1, (B) 5, (A) 1, (B) 5, (A) 9.
-
→ Row 26 [WS]: (A) 10, (B) 5, (A) 2, (B) 4, (A) 1, (B) 3, (A) 1, (B) 4, (A) 1, (B) 5, (A) 9.
-
← Row 27 [RS]: (A) 10, (B) 5, (A) 1, (B) 4, (A) 1, (B) 1, (A) 1, (B) 4, (A) 1, (B) 6, (A) 11.
-
→ Row 28 [WS]: (A) 2, (B) 1, (A) 10, (B) 5, (A) 4, (B) 1, (A) 1, (B) 1, (A) 2, (B) 1, (A) 1, (B) 5, (A) 8, (B) 1, (A) 2.
-
← Row 29 [RS]: (A) 13, (B) 4, (A) 1, (B) 7, (A) 1, (B) 4, (A) 15.
-
→ Row 30 [WS]: (A) 12, (B) 1, (A) 9, (B) 4, (A) 19.
-
← Row 31 [RS]: (A) 20, (B) 2, (A) 10, (B) 3, (A) 10.
-
→ Row 32 [WS]: (A) 8, (B) 6, (A) 9, (B) 3, (A) 19.
-
← Row 33 [RS]: (A) 2, (B) 1, (A) 5, (B) 2, (A) 6, (B) 1, (A) 2, (B) 2, (A) 8, (B) 3, (A) 3, (B) 1, (A) 1, (B) 1, (A) 4, (B) 1, (A) 2.
-
→ Row 34 [WS]: (A) 6, (B) 3, (A) 1, (B) 3, (A) 1, (B) 4, (A) 6, (B) 5, (A) 9, (B) 1, (A) 6.
-
← Row 35 [RS]: (A) 5, (B) 2, (A) 1, (B) 1, (A) 1, (B) 1, (A) 6, (B) 3, (A) 5, (B) 5, (A) 1, (B) 1, (A) 1, (B) 4, (A) 8.
-
→ Row 36 [WS]: (A) 8, (B) 1, (A) 1, (B) 1, (A) 1, (B) 3, (A) 1, (B) 3, (A) 26.
-
← Row 37 [RS]: (A) 8, (B) 2, (A) 2, (B) 1, (A) 14, (B) 1, (A) 1, (B) 1, (A) 1, (B) 3, (A) 1, (B) 3, (A) 7.
-
→ Row 38 [WS]: (A) 2, (B) 1, (A) 4, (B) 2, (A) 1, (B) 1, (A) 1, (B) 4, (A) 1, (B) 1, (A) 20, (B) 2, (A) 2, (B) 1, (A) 2.
-
← Row 39 [RS]: (A) 8, (B) 1, (A) 2, (B) 1, (A) 15, (B) 4, (A) 1, (B) 3, (A) 2, (B) 2, (A) 6.
-
→ Row 40 [WS]: (A) 5, (B) 6, (A) 4, (B) 2, (A) 17, (B) 1, (A) 10.
-
← Row 41 [RS]: (A) 29, (B) 1, (A) 15.
-
→ Row 42 [WS]: Work 45 sc using Color A.
-
← Row 43 [RS]: (A) 2, (B) 1,
8 times, (A) 2.
-
Rows 44–45: Work 45 sc using Color A. Do not break yarn; continue directly to the border.
Decorative Border
Round 1 [RS]: With Color A and the right side facing you, evenly space 45 single crochets along each of the four sides of the potholder. To form the corners, work 1 sc into the last stitch of your current side, chain 1, then work your next sc into the first stitch of the adjacent side. Finish the round by slip stitching into your very first border stitch. (Each side will have 45 sc, separated by ch-1 corner spaces).
Round 2 [RS]: Switch to Color B to execute the slip stitch/drop stitch textured edging:
Work
along the side.
At the regular corners, work
directly into the ch-1 corner space. Repeat this pattern around the bottom and right edges.
-
-
Hanging Loop (Top Right Corner): Slip stitch into the top-right ch-1 space, chain 20, and slip stitch back into that same space. Turn your work, make 25 single crochets around the chain loop you just created, slip stitch once more into the corner space, and turn back.
-
Continue the sl st/drop st pattern across the top edge.
-
At the final corner, work
in the ch-1 space. Secure with a slip stitch into the initial slip stitch of the round. Fasten off and hide your yarn tails.
Finishing Touches
Thread a length of Color B onto your tapestry needle. Using the backstitch method, carefully embroider the finer stem lines for the leaf and floral details over your crocheted fabric. Once complete, weave in any remaining yarn ends securely. Your autumn potholder is ready to use!