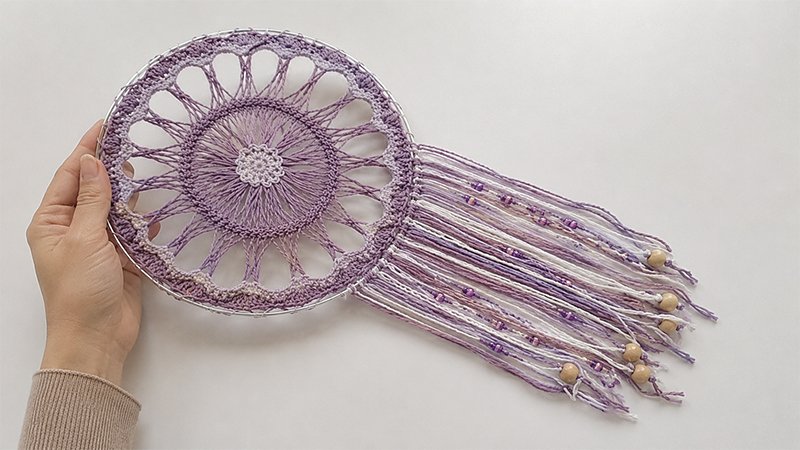
This project creates an 8-inch circular wall hanging featuring a distinct flower-like center made from a strip of hairpin lace. The lace strip is gathered tightly in the middle and fanned out toward the edges, then secured into a metal or wooden hoop and finished with a lush, flowing fringe. It is a wonderful way to bring a breezy, summer aesthetic to any craft room or living space.
Materials Needed
-
Yarn: Sport weight (Size 2, Fine) cotton yarn. Choose 4 complementary colors (e.g., vibrant pinks, yellows, and greens) to create a bright palette. You will need roughly 50–60 yards for the main dreamcatcher and another 50–60 yards for the fringe.
-
Hooks & Tools: 4.0 mm (US G/6) crochet hook, and an adjustable hairpin crochet loom.
-
Structure: One 8-inch (20 cm) wooden or metal craft hoop.
-
Notions: Tapestry needle, stitch marker, and decorative beads (optional).
Sizing & Gauge
-
Finished Size: 8 inches (20 cm) in diameter (excluding fringe).
-
Gauge: 9 single crochets across by 12 rows high equals a 2-inch (5 cm) square.
Stitch Abbreviations (US Terms)
-
Ch: Chain
-
Sc: Single crochet
-
Dc: Double crochet
-
Sl St: Slip stitch
-
St(s): Stitch(es)
-
MC: Magic Circle
-
Yo: Yarn over
-
Sk: Skip
Special Stitch: 5-Double Crochet Bobble
Yarn over, insert hook into the specified stitch, yarn over, and pull up a loop. Yarn over and draw through the first 2 loops on your hook (2 loops remain). Repeat this process 4 more times into the exact same stitch. Once you have 6 loops remaining on your hook, yarn over one final time and pull through all 6 loops to secure the bobble.
Step-by-Step Instructions
Part 1: The Hairpin Lace Center Strip
-
Set the guide bars of your hairpin loom to a width of 2.75 inches (7 cm).
-
Using your main color and the 4.0 mm hook, crochet a standard hairpin lace strip until you have exactly 60 long loops on each side of the loom.
-
Secure the live working loop with a stitch marker so it does not unravel when you slide it off the loom.
Part 2: Forming the Dreamcatcher Core
Note: To make the seam where the strip connects look seamless, leave the first 2 loops of your strip free at the start. You will combine them with the last 3 loops at the very end of the round to make a complete group of 5.
-
Round 1: Start by making a Magic Circle. Work 6 sc into the ring. Join with a sl st to the very first sc. (6 sts total).
-
Round 2: You will now connect the inner side of your hairpin strip to this tiny circle by grouping the long loops together. Work 2 increases into every stitch of your circle. For each increase, work: [1 sc, then a sl st that goes directly through a gathered group of 5 hairpin loops]. Repeat this around all 6 stitches of the circle. (You will have 12 sc and 12 loop groupings).
-
Remove the stitch marker from your hairpin strip and use a sl st to join the two ends of the strip together, turning it into a flat, circular wheel.
Part 3: Growing the Flower Edging
Note: To keep the outer edge seamless, start your groupings from the second loop of the strip. The first loop will be joined with the final two loops at the end of the round.
-
Round 3: Join your yarn to the outer loops of the hairpin strip, gathering them into groups of 3. Work 3 sc directly into the first group of 3 loops, then ch 3. Gather the next 3 loops together, work 3 sc into them, ch 3. Repeat from * all the way around the wheel (20 loop groups total). Join with a sl st to your first sc. (120 sts).
-
Round 4: Ch 1. Work 1 sc into every sc from the previous round, and place 3 sc inside every 3-chain space around the perimeter. Join with a sl st to the first st. (120 sts).
-
Round 5: Ch 1, 1 sc. Work 1 Bobble st in the next stitch, followed by 1 sc in each of the next 5 stitches. Repeat from * 19 times. Finish the round with 1 Bobble st and 1 sc in each of the last 4 stitches. Join with a sl st. (120 sts). Fasten off and tidy up your loose ends with a tapestry needle.
Assembly & Finishing Touches
Attaching to the Hoop
-
Cut a piece of yarn roughly 60 inches (150 cm) long and thread it onto your tapestry needle.
-
Position your finished crochet mandala centered inside the 8-inch hoop.
-
Bring your needle from back to front through any stitch on the outermost edge of your crochet work. Wrap the yarn up and over the hoop from front to back.
-
Skip one stitch on your crochet edge, and repeat the process through the next stitch. Continue lacing the piece to the hoop tightly all the way around, tie it off securely, and weave in the tail.
Adding the Fringe
-
Cut between 42 and 72 strands of yarn, each measuring about 35 inches (88 cm) long.
-
Take a few strands at a time, fold them perfectly in half to create a loop at the top.
-
Use your crochet hook to pull that loop from front to back under the bottom edge of the hoop.
-
Reach through the loop, grab the long yarn tails, and pull them through the loop to lock the fringe in place with a cow hitch knot. Tighten firmly.
-
Optional: Slide decorative wooden or plastic beads onto the fringe strands, or accent them with small braids to give your dreamcatcher a personalized, rustic finish.