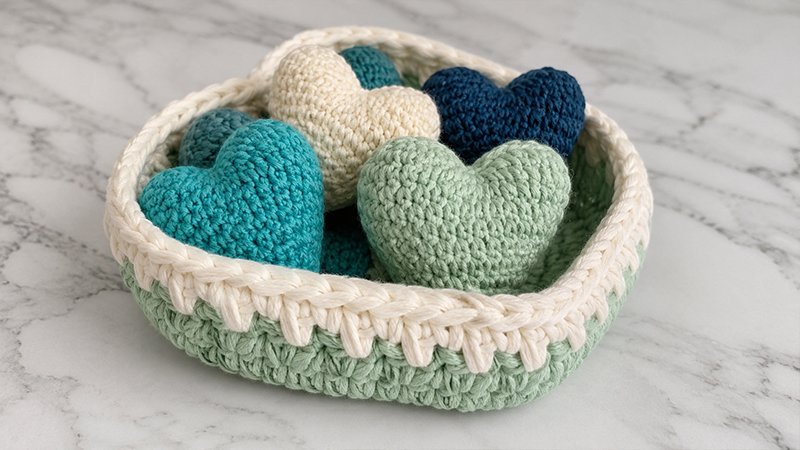
This project uses a heart-shaped wooden base as the foundation, making it incredibly sturdy and easy to start. You will work a base round of single crochets directly into the wood, followed by a unique crossed-loop texture for the body, and finish with a clean, contrasting color band at the top.
Because the main stitch pattern works over any number of stitches, you can use this guide for any heart-shaped wooden base, regardless of its size or number of holes. Just ensure you place extra stitches (increases) around the sharp curves and the bottom tip to keep the basket flat and properly shaped.
Materials Needed
-
Yarn: Super bulky T-shirt yarn (5–6 wpi) in two contrasting colors (Color A for the main body, Color B for the top rim).
-
Hook: 8.0 mm (US L-11 / UK 0) crochet hook.
-
Base: One 15-cm wooden heart-shaped basket bottom with pre-drilled holes.
-
Notions: Tapestry needle for weaving in thick yarn, scissors.
Pattern Abbreviations (US Terms)
-
Ch: Chain
-
Sc: Single crochet
-
Inc: Increase (work 2 single crochets into the exact same hole or stitch)
-
Sl st: Slip stitch
-
St(s): Stitch(es)
-
Yo: Yarn over
Step-by-Step Instructions
Round 1: The Foundation Round
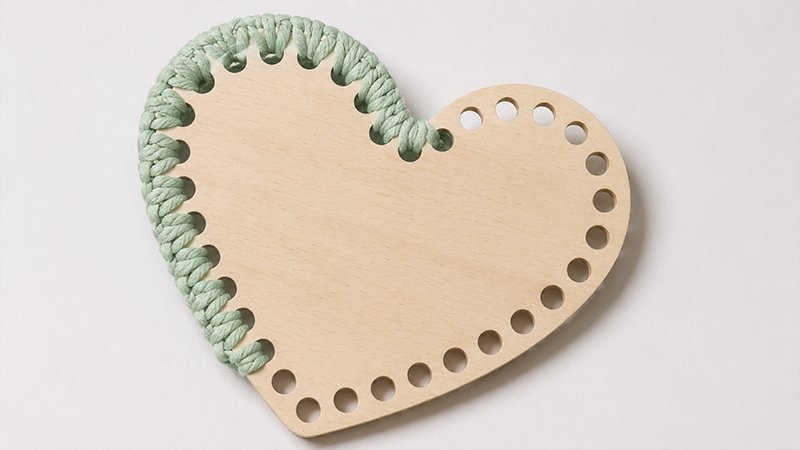
Goal: Secure the yarn to the wooden base and create the first row of stitches.
-
Hold the wooden heart with the right side facing up. Insert your hook into the center-top hole (the dip of the heart) and pull up a loop of Color A. Secure it with a slip knot.
-
Single crochet once into each of the next 4 holes.
-
Work an increase (2 single crochets) into each of the next 3 holes to navigate the first rounded curve.
-
Single crochet once into each of the next 10 holes along the straight side.
-
In the very bottom point of the heart, work 3 single crochets into that single hole to create a sharp, clean tip.
-
Single crochet once into each of the next 10 holes going up the opposite straight side.
-
Work an increase (2 single crochets) into each of the next 3 holes to navigate the second rounded curve.
-
Single crochet once into the remaining 4 holes.
-
Finish the round by working a slip stitch into the very first single crochet you made. (Total: 44 stitches)
Round 2: Establishing the Textured Stitch
Goal: Create the crossed-loop pattern that builds the walls of the basket.
-
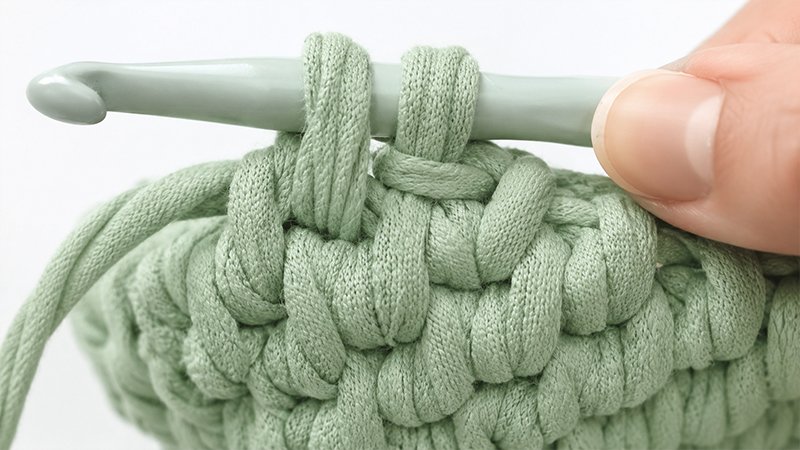
Step 1: Chain 1. Insert your hook into the next stitch, yarn over, and pull up a long loop so it matches the height of your current row. You now have two loops on your hook.
-
Step 2: Carefully slide your crochet hook out of both loops.
-
Step 3: Use your hook to pick up only the second loop (the one on the left). Pull it gently over to the right side so it crosses directly in front of the first loop.
-
Step 4: Put your hook back through the first loop as well.
-
Step 5: Yarn over and pull through both loops to lock them in place.
-
Step 6: Chain 1. This chain creates a small space (gap) between your stitches, which you will use in the next rows.
-
Repeat Steps 1 through 6 for every single crochet from Round 1.
-
Join the end of the round with a slip stitch into the top of your very first textured stitch.
Rounds 3–7: Building the Walls
-
Chain 1.
-
Work the exact same textured stitch sequence (Steps 1–6 from Round 2), but instead of working into standard stitches, insert your hook directly into the spaces created by the Chain-1 spaces from the previous round.
-
At the end of each round, join with a slip stitch to the first stitch.
Round 8: Adding the Contrast Band
-
Drop Color A and attach Color B.
-
Chain 1 and repeat the textured stitch sequence (Steps 1–6) into the spaces of Round 7.
-
Join with a slip stitch.
Round 9: The Top Edging
-
Chain 1.
-
Work 1 standard single crochet into every Chain-1 space from the previous round. This creates a clean, solid border.
-
Fasten off the yarn and cut it, leaving a short tail.
Finishing Touches
-
Decorative Base Detail: To hide the wooden edge and give the base a sewn look, cut an 80-cm (31.5-inch) strand of Color A. Thread it onto a tapestry needle. Starting from the inside of the basket at the top-center hole, weave the yarn in and out of the holes all the way around the perimeter. Tie off the ends on the inside.
-
Weaving Ends: Use your tapestry needle to hide all remaining loose yarn tails securely inside the thick stitches of the basket walls. Shape the basket with your hands to make the sides stand up straight.