If you love a tough, outdoorsy look with cozy texture, a rugged crochet vest is the perfect project. This pattern is beginner-friendly (confident beginner) and uses simple shaping, thick stitches, and a clean ribbed edge to get that “rugged” feel. You’ll crochet two panels (back + front), seam the shoulders and sides, then add edging.
Finished Look + Sizing
This vest is slightly boxy with a straight armhole and V-neck opening (no buttons, no collar). It’s easy to adjust for any size.
Choose your size (approx. chest):
- S: 34–36 in (86–91 cm)
- M: 38–40 in (97–102 cm)
- L: 42–44 in (107–112 cm)
- XL: 46–48 in (117–122 cm)
Length: cropped-to-hip range (you decide).
Materials
- Yarn: Worsted (4) or Aran (heavy 4) for rugged texture
- About 900–1400 yards depending on size and length
- Hook: 5.5 mm (I/9) or size needed for gauge
- Stitch markers (2–6)
- Tapestry needle
- Scissors
- Measuring tape
Gauge (Important)
Make a 4” (10 cm) swatch in the main stitch:
14 sts x 10 rows = 4” (approx, in Half Double Crochet)
If your fabric is too stiff, go up a hook size. If too loose, go down.
Stitches + Abbreviations
- ch = chain
- sc = single crochet
- hdc = half double crochet
- sl st = slip stitch
- st(s) = stitch(es)
- RS/WS = right side/wrong side
- FLO = front loop only
Rugged Texture Stitch (Main Stitch):
We’ll use hdc in FLO for a ribbed, sturdy look without being complicated.
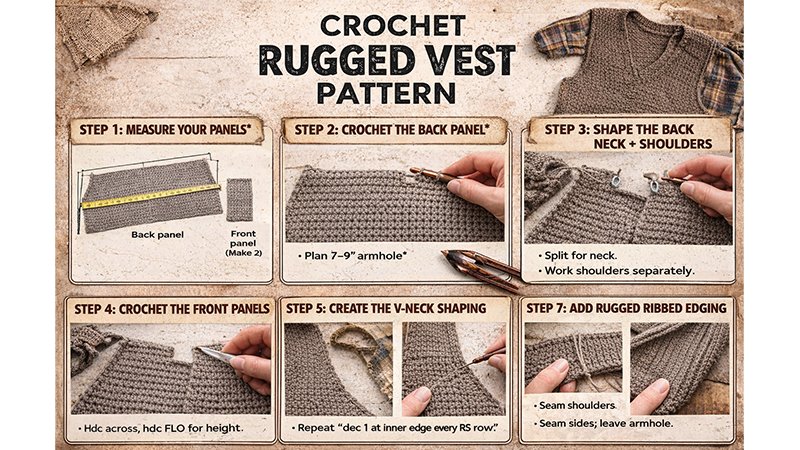
Step 1: Measure Your Panels
You’ll crochet rectangles and add simple neck shaping.
Panel width (each panel):
- Back panel width = about 50–55% of chest circumference
- Front panel width = about 22–25% of chest circumference each (two fronts)
Example for 40” chest (M):
- Back: ~21–22” wide
- Each front: ~9–10” wide
Tip: If you don’t want to calculate, use a vest you like and measure it flat.
Step 2: Crochet the Back Panel
Foundation Chain
Chain until it matches your back panel width.
- S: ~72–78 ch
- M: ~80–86 ch
- L: ~88–94 ch
- XL: ~96–104 ch
(These are estimates—match your measurement.)
Row 1
- Hdc in 3rd ch from hook, hdc across.
- Ch 2, turn.
Rows 2–Until Armhole Height
- Hdc in FLO across.
- Ch 2, turn.
Continue until the piece reaches armhole start point, usually:
- About 12–14” from bottom edge (or where your underarm would sit).
Step 3: Shape the Back Shoulders + Neck
We’ll create a basic neck opening by working the shoulders separately.
Decide neck width:
- S/M: 7–8”
- L/XL: 8–9.5”
Mark it:
- Lay your back panel flat.
- Count total stitches across your last row.
- Place two stitch markers to mark the center neck stitches you will skip.
Shoulder Row (Neck Split)
- Work in pattern across to first marker.
- Turn (leave neck stitches unworked).
- Work only this shoulder section for 2–4 rows to build shoulder height.
Fasten off.
Second Shoulder
Join yarn at the far edge and repeat for the other shoulder.
Back panel done.
Step 4: Crochet the Two Front Panels
The front panels are narrower rectangles with a V-neck slope.
Foundation Chain
Chain to match one front panel width.
Approx estimates:
- S: 34–38 ch
- M: 38–42 ch
- L: 42–46 ch
- XL: 46–52 ch
Straight Section (Bottom to Underarm)
Work the same as the back:
- Row 1: hdc across
- Row 2+: hdc FLO across
Until it reaches the same armhole start height as the back.
Step 5: Create the V-Neck Shaping (Each Front Panel)
Now we gradually narrow the inner edge to form a V.
Set your “inner edge”
For the left front panel, the inner edge is the right side of the fabric.
For the right front panel, the inner edge is the left side.
V-neck decrease method (simple + clean)
On every right-side row, you will:
- Decrease 1 stitch at the inner edge by turning early.
How to do it:
- Work across in pattern, but stop 2 stitches before the inner edge.
- Work hdc in next st, then skip last st.
- Ch 2, turn.
On the next row (WS row), work fully across your remaining stitches.
Repeat this decrease every other row until the front panel reaches the same total height as the back and the shoulder width matches.
Front shoulder height
Work the last few rows straight (no more decreases) so the shoulder depth is similar to the back (2–4 rows).
Fasten off.
Repeat for the second front panel (mirror it).
Step 6: Assemble the Vest
Shoulder Seams
- Place front panels on top of the back panel, RS facing.
- Seam shoulders using sl st or whip stitch.
Side Seams
- Fold the vest with RS together.
- Seam from bottom up, leaving an armhole opening:
- Leave 7–9” open for armholes (or match your body/vest).
Weave in ends.
Step 7: Add Rugged Ribbed Edging
Edging makes it look finished and structured.
Bottom Hem + Armholes + Front Opening
Work 1 round of sc evenly around each opening:
- Bottom hem: sc across, place 1–2 extra sc at corners
- Armholes: sc around, keep it flat (don’t bunch)
- Front opening + V-neck: sc evenly, add extra sc at the V point for stability
Fasten off if desired, or continue to ribbing.
Ribbing (Optional but recommended)
Ribbing is made by working a thin band in sc BLO (back loop only).
How:
- Attach yarn at an edge.
- Ch 7 (or 9 for thicker rib).
- Sc in 2nd ch from hook, sc across (6 sc).
- Sl st into the next edge stitch on the vest, sl st into next edge stitch.
- Turn, sc BLO back across the ribbing strip.
- Ch 1, turn, sc BLO across again.
- Repeat around the opening.
Do this for:
- Bottom hem (best place for rugged look)
- Optional: front opening and armholes
Weave in ends.
Fit Adjustments (Fast Tips)
- Wider vest: add chains to each panel width.
- Longer vest: crochet more rows before armholes.
- Deeper V-neck: start decreasing earlier.
- More rugged texture: use tweed yarn, heather, or wool blend.
Done!
You’ve made a Crochet Rugged Vest with strong texture, clean seams, and a durable edge—perfect over tees, thermals, or hoodies.
If you want, tell me your chest size, desired length, and yarn weight, and I’ll convert this into exact stitch counts for your size.