
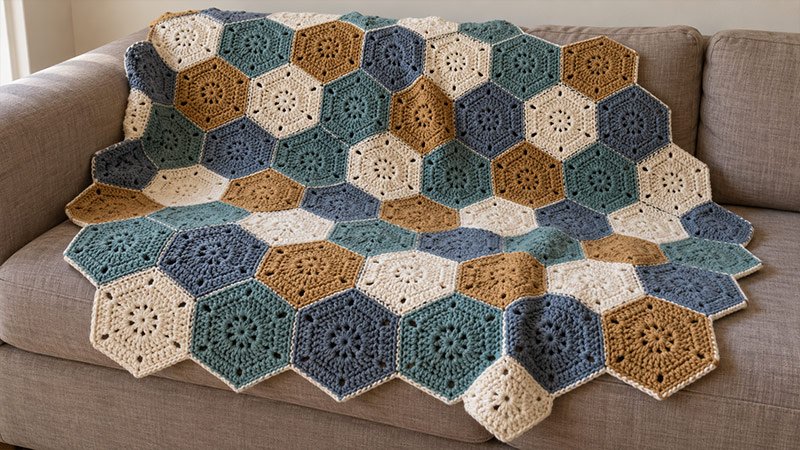
The Hexagons Throw Blanket is a soft patchwork throw. It uses joined crochet shapes with six sides. Work each hexagon from the center out. Use rounds of double crochet. Chain spaces form the six corners.
Use cream, teal, slate blue, and golden brown. Sew the shapes in columns. Stagger the columns to give the throw gently shaped edges.
Skill level: Confident beginner.
This new design was written for this request. The pattern has not been tested with a sample. The size and yarn amounts are estimates. Make and measure one hexagon first. Then start the full throw.
Materials
- Worsted-weight yarn, Category #4.
- US H/8 5.0 mm crochet hook, or the size needed to meet gauge.
- Yarn needle.
- Scissors.
- Measuring tape.
- Six stitch markers.
- Pins or blocking mats, if needed.
Choose yarns with the same weight and similar fiber content. A soft, washable yarn works well.
Yarn & Yardage
Allow about 3,300 yards total, including yarn for seams and a small allowance for gauge changes.
| Color | Shade | Hexagons | Estimated yardage |
|---|---|---|---|
| A | Cream | 20 | 1,200 yards |
| B | Teal | 14 | 800 yards |
| C | Slate blue | 14 | 800 yards |
| D | Golden brown | 8 | 500 yards |
Each hexagon may use about 45–55 yards. Measure the yarn used for your test motif to refine the amount you need.
Abbreviations
- ch: Chain.
- dc: Double crochet.
- sl st: Slip stitch.
- st / sts: Stitch / stitches.
- sp / sps: Space / spaces.
- RS: Right side.
- WS: Wrong side.
- rep: Repeat.
- rnd: Round.
Special Stitches
Double Crochet — dc
- Yarn over.
- Put the hook in the stated st or sp.
- Yarn over. Pull up a loop.
- Yarn over. Pull through two loops.
- Yarn over. Pull through the last two loops.
Hexagon Corner
Work (2 dc, ch 2, 2 dc) in the same ch-2 sp.
The ch-2 sp forms the corner. The dc groups add stitches to the two sides that meet there.
Flat Whipstitch Seam
Place two hexagons side by side with their RS facing up. Pass the needle through the back loop of each matching edge stitch.
Keep the sewing yarn loose enough for the seam to lie flat.
Size
- Each hexagon: About 7 inches from point to point and 6 inches between opposite flat sides.
- Finished throw: About 38½ inches wide × 51 inches long, measured at the widest points.
- Layout: 56 hexagons, arranged in 7 staggered columns of 8.
The top, bottom, and side edges follow the hexagon shapes.
Gauge
Make one hexagon with six rounds. It should measure about:
- 7 inches from point to opposite point.
- 6 inches from one flat side to the opposite side.
Wash and dry it as the yarn label states. Then check its size.
- If it is too small, try a larger hook.
- If it is too large, try a smaller hook.
Use this finished hexagon as your gauge swatch.
Pattern Notes
- Use US crochet terms.
- Work in joined rounds. Do not turn.
- The first ch 3 counts as one dc.
- Join each rnd to the top of that ch 3.
- Each rnd has six ch-2 corner sps.
- Work through both loops unless told otherwise.
- Leave an 8-inch tail when you fasten off.
Pattern Instructions
1. Make the First Hexagon
Use any one of the four colors.
Foundation: Ch 4. Sl st in the first ch to form a ring.
Round 1
- Ch 3, dc in the ring, ch 2.
- Work (2 dc in the ring, ch 2) five times.
- Sl st to the top of the beginning ch 3.
Count: 12 dc and 6 ch-2 sps. Each side has 2 dc.
Round 2
- Ch 3. Dc in the next dc.
- Work (2 dc, ch 2, 2 dc) in the next ch-2 sp.
- Rep [dc in each dc to the next ch-2 sp; work (2 dc, ch 2, 2 dc) in that sp] five times.
- Sl st to the top of the beginning ch 3.
Count: 36 dc and 6 ch-2 sps. Each side has 6 dc.
Round 3
- Ch 3. Dc in each remaining dc to the next ch-2 sp.
- Work (2 dc, ch 2, 2 dc) in that sp.
- Rep [dc in each dc to the next ch-2 sp; work (2 dc, ch 2, 2 dc) in that sp] five times.
- Dc in any remaining dc before the beginning ch 3.
- Sl st to the top of the beginning ch 3.
Count: 60 dc and 6 ch-2 sps. Each side has 10 dc.
Rounds 4–6
Rep Round 3.
| Round | Total dc | Dc per side | Corner sps |
|---|---|---|---|
| 4 | 84 | 14 | 6 |
| 5 | 108 | 18 | 6 |
| 6 | 132 | 22 | 6 |
Fasten off. Leave an 8-inch tail.
Each new round adds 24 dc to the motif.
2. Check the Motif
Lay the hexagon flat.
Check that:
- It has six clear corners.
- Each side has 22 dc.
- Each corner has one ch-2 sp.
- The center lies flat.
- It measures about 7 × 6 inches after washing and drying.
If it cups or ripples, check the stitch counts and corner spaces first. Keep the ch-2 spaces relaxed.
3. Make All 56 Hexagons
Make:
- 20 hexagons in A.
- 14 hexagons in B.
- 14 hexagons in C.
- 8 hexagons in D.
Wash and dry the motifs as directed on the yarn label. Shape them to the same size without stretching them hard.
Let them dry fully before joining.
4. Lay Out the Blanket
Place each motif with a flat side at the top and bottom. Its left and right corners should point sideways.
Arrange 7 columns, with 8 hexagons in each column.
Read each column from top to bottom:
| Column | Color order |
|---|---|
| 1 | A, B, C, A, D, B, C, A |
| 2 | C, A, B, D, A, C, B, A |
| 3 | A, D, C, B, A, B, C, A |
| 4 | B, C, A, D, B, A, C, A |
| 5 | A, C, B, A, D, C, B, A |
| 6 | C, B, A, D, C, A, B, A |
| 7 | A, B, C, D, A, C, B, A |
Move Columns 2, 4, and 6 down by half a hexagon, about 3 inches.
The slanted sides should meet neatly. Keep the layout in place while you sew.
5. Sew Each Column
Use A and a yarn needle.
- Place the first two motifs in Column 1 side by side. Keep them in their planned spots.
- Match the flat sides that touch. Join the bottom of the top motif to the top of the one below.
- Match all 22 dc on these sides.
- Sew through the back loops with a flat whipstitch.
- Secure each end through the corner spaces that match.
- Join the next motif in the same way.
- Keep going until all eight motifs are joined.
Rep for the other six columns.
Keep the seam loose. Do not pull it tight. Each column should lie flat.
6. Join the Columns
Put the sewn columns back in the staggered layout.
- Place Columns 1 and 2 side by side.
- Match each pair of slanted sides that touch.
- Sew the 22 matching dc on each shared side.
- Pass the yarn through the corner spaces. Use these spaces to secure each seam end.
- Sew along the full length of the columns.
- Join Column 3 to Column 2.
- Keep going until all seven columns are joined.
Where three motifs meet, pass the sewing yarn through their corner spaces. This will close any small gap. Keep the join soft and flat.
Sew only the sides that touch in the layout. Leave the outer sides free.
7. Finish the Throw
Weave all yarn tails through several stitches on the WS. Change direction once to help hold each end in place.
Wash the throw as directed on the yarn label. Lay it flat and gently shape the seams and edges.
Let it dry fully before use. The final round of each motif forms the outer edge; no added border is needed.
Adjust the Size
- For more length: Add the same number of motifs to each column.
- For more width: Add two columns to keep the staggered layout balanced.
- For larger motifs: Add rounds using the Round 3 method.
Each extra round adds 4 dc per side. Larger motifs or a larger layout will need more yarn.


