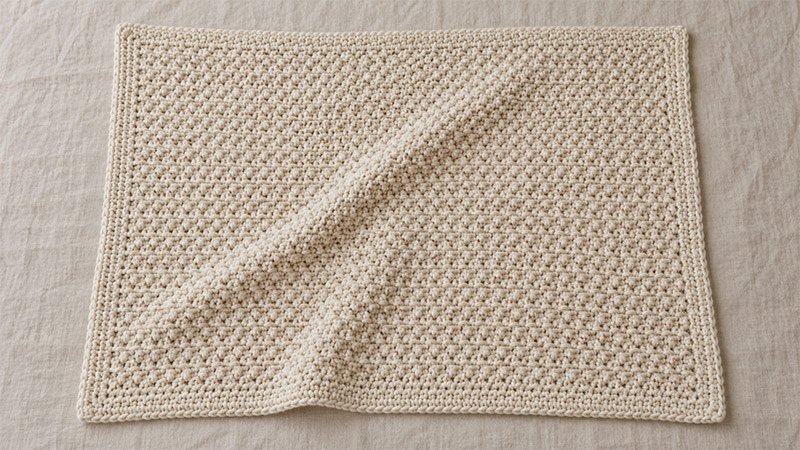
The Nest Baby Blanket is a simple crochet blanket with a close texture and a plain border. Alternating single crochet and double crochet stitches creates small raised sections across the fabric. A single crochet edging frames the blanket without adding lace or fringe.
This pattern uses US crochet terms. It suits a confident beginner who can work basic stitches and keep an even stitch count.
The instructions below are an original design, rather than a reproduction of a particular published Nest blanket pattern. Finished measurements and yarn needs are estimates; check your gauge before starting.
Materials
- Approximately 1,000–1,150 yards (915–1,050 meters) of DK weight, category 3 yarn, including the border.
- Choose a soft, washable yarn with a smooth finish.
- 4 mm crochet hook, or the size needed to obtain gauge.
- Yarn needle.
- Scissors.
- Measuring tape.
- Four removable stitch markers.
Finished Size
Approximately 30 × 36 inches (76 × 91 cm), including the border, after washing and drying flat.
The blanket body measures approximately 28 × 34 inches (71 × 86 cm) before the border.
Gauge
16 sts and 14 rows = 4 inches (10 cm) in the alternating sc and dc pattern, measured after washing and drying flat.
Make a Gauge Swatch
- Ch 25.
- Sc in the 2nd ch from the hook. Dc in the next ch. *Sc in the next ch, dc in the next ch; rep from * across. Turn. 24 sts.
- Ch 1. Sc in the first st, dc in the next st. *Sc in the next st, dc in the next st; rep from * across. Turn. 24 sts.
- Rep Step 3 until the swatch has 22 rows.
- Wash and dry the swatch as you plan to wash the blanket.
- Measure the center 4 inches (10 cm), keeping the edges outside the measured area.
If you have more than 16 sts across 4 inches, try a larger hook. If you have fewer than 16 sts, try a smaller hook. Check row gauge as well, since it affects the blanket’s length.
Stitch Abbreviations
- ch: Chain
- sc: Single crochet
- dc: Double crochet
- sl st: Slip stitch
- st / sts: Stitch / stitches
- rep: Repeat
- rnd: Round
- approx.: Approximately
- *: Repeat the instructions following this symbol as directed
Pattern Notes
- Work the blanket body in turned rows.
- Ch 1 at the start of a row does not count as a st.
- Work the first sc of each row into the first st.
- Every body row begins with sc and ends with dc.
- From Row 2 onward, work sc into each dc from the previous row and dc into each sc.
- Each body row contains 112 sts.
- Place a marker in the first and last st if you find the edges hard to identify.
- Work through both loops unless otherwise stated.
- Count your sts regularly to keep the sides straight.
- To change colors or join a new ball, complete the last yarn-over of a st with the new yarn. Leave tails long enough to weave in securely.
- The border is worked in joined rounds without turning.
- This design has no designated right side. Choose either side to face you when adding the border.
Adjusting the Size
For a different width, begin with an odd number of chains. The foundation chain minus one gives an even number of working sts.
At the stated gauge:
Desired body width in inches × 4 = approximate body stitch count.
Round to the nearest even number, then add 1 for the foundation chain.
For a different length, repeat the body row until you reach your chosen measurement. Allow approx. 2 inches (5 cm) of additional width and length for the border. Larger sizes require more yarn.
Pattern Instructions
Step 1: Make the Foundation Chain
Ch 113 loosely.
If your foundation chains tend to be tight, use a hook one size larger for the chain only. Return to the main hook before starting Row 1.
Step 2: Work Row 1
Sc in the 2nd ch from the hook, dc in the next ch.
*Sc in the next ch, dc in the next ch; rep from * to the end.
Turn.
Stitch count: 112 sts — 56 sc and 56 dc.
Step 3: Work Row 2
Ch 1, sc in the first st, dc in the next st.
*Sc in the next st, dc in the next st; rep from * to the end.
Turn.
Stitch count: 112 sts.
The first sc sits in the final dc of the previous row.
Step 4: Continue the Blanket Body
Rows 3–119: Rep Row 2.
At gauge, the body should measure approx. 28 × 34 inches (71 × 86 cm).
Check the length with the blanket resting flat and unstretched. If needed, add or remove rows to reach approx. 34 inches (86 cm).
Fasten off.
Step 5: Prepare for the Border
Lay the blanket flat with your chosen side facing up.
Identify the four corner sts and place a marker in each one. A corner st will receive 3 sc in the first border rnd.
Join yarn with a sl st in the upper-right corner st, ready to work across the top edge.
Step 6: Work Border Rnd 1
Ch 1, work 3 sc in the same corner st. Mark the middle sc as the new corner.
Work 1 sc in each top-edge st until the next marked corner st. Work 3 sc in that corner st and mark the middle sc.
Continue down the first side:
- Work approx. 8 sc for every 7 row ends.
- Spread the sts evenly along the edge.
- Work into the side fabric securely, rather than around loose strands.
At the bottom corner, work 3 sc in the marked corner st. Mark the middle sc.
Work 1 sc in each unused foundation ch along the bottom edge until the next corner. Work 3 sc in that corner st and mark the middle sc.
Work up the remaining side using the same spacing as the first side.
Sl st to the first sc to join. Do not turn.
For a body with 119 rows, aim for approx. 136 sc along each side between the corner groups. Treat this as a spacing guide; the edge should lie flat.
Step 7: Check the Border
Lay the blanket flat before continuing.
If an edge ripples, remove a few sts along that edge and space the remaining sts evenly. If an edge pulls inward, add a few evenly spaced sts.
Keep 3 sc in each corner, with the middle sc marked.
Step 8: Work Border Rnd 2
Ch 1, sc in each st around, working 3 sc in each marked corner st.
Move each marker to the middle sc of the new corner group.
Sl st to the first sc to join. Do not turn.
Each rnd increases the stitch count by 8 sts.
Step 9: Complete the Border
Rnds 3–4: Rep Rnd 2.
Check that the border lies flat after each rnd.
After Rnd 4, measure the border. If it is less than approx. 1 inch (2.5 cm) deep and you want the stated finished size, work another rnd in the same manner.
Fasten off, leaving a tail of approx. 6 inches (15 cm).
Step 10: Finish the Blanket
- Remove all markers.
- Weave in each tail on the reverse side, passing through several sts and changing direction to secure it.
- Wash according to the yarn label.
- Lay flat and gently shape to approx. 30 × 36 inches (76 × 91 cm).
- Allow the blanket to dry fully before storing or using it.
Use the blanket for supervised cuddles or floor time. Keep loose blankets out of an infant’s sleep space.