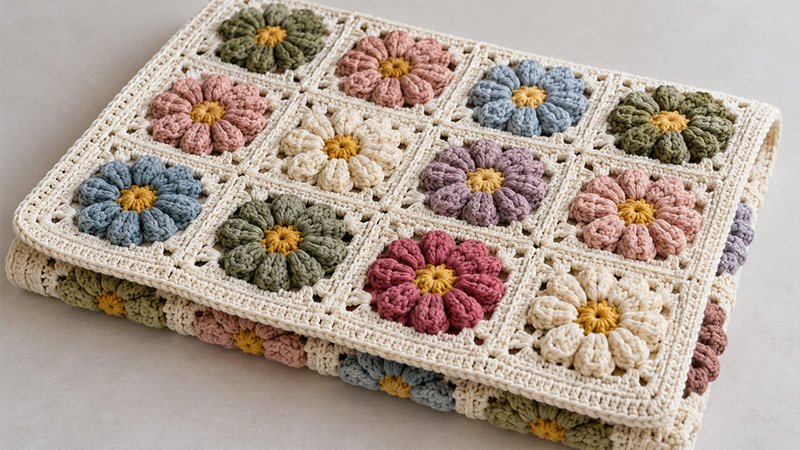
The Flower Meadow Blanket is made from flower squares joined into a simple grid. Each square has a small center, eight raised petals, and a plain outer frame.
You can use one petal color throughout or mix several shades while keeping the frames the same.
The squares are worked separately, making this a handy project to work on in short sessions. A narrow border finishes the blanket without drawing attention away from the flowers.
Supplies
- Yarn: Approximately 1,500–1,800 yards of worsted-weight yarn.
- Color A, flower centers: 100–150 yards.
- Color B, flower petals: 350–450 yards total.
- Color C, square frames, joining, and border: 1,050–1,200 yards.
- Hook: 5 mm crochet hook, or the size needed to meet gauge.
- Yarn needle.
- Scissors.
- Stitch markers.
- Measuring tape.
- Blocking mat and rustproof pins.
Choose yarns of the same weight and fiber type. A smooth, washable yarn will help show the petal texture and make care easier.
Yarn amounts are estimates and will vary with tension, yarn choice, and joining method.
Size
Target finished size: Approximately 38 × 50 inches, including the border.
- Each blocked square: 6 × 6 inches.
- Number of squares: 48.
- Layout: 6 squares across and 8 squares down.
- Joined blanket before the border: Approximately 36 × 48 inches.
Joining tension and border width can change the final measurements slightly.
To change the size, add or remove whole squares. Each extra row or column adds approximately 6 inches before the border.
Gauge
One completed square, through Rnd 5, should measure approximately 6 × 6 inches after blocking.
Make a complete square to check gauge.
- If it measures less than 6 inches, try a larger hook.
- If it measures more than 6 inches, try a smaller hook.
- Block the sample gently before taking the final measurement.
Matching the square size matters more than matching a separate stitch-and-row gauge.
Abbreviations
- beg: Beginning.
- ** BLO:** Back loop only.
- ch: Chain.
- ch-1 sp: Chain-1 space.
- ch-2 sp: Chain-2 space.
- dc: Double crochet.
- pc: Popcorn stitch.
- rep: Repeat.
- rnd: Round.
- RS: Right side.
- sc: Single crochet.
- sl st: Slip stitch.
- sp / sps: Space / spaces.
- st / sts: Stitch / stitches.
- WS: Wrong side.
- yo: Yarn over.
- [ ]: Work the enclosed instructions as directed.
Special Stitches:
Popcorn Stitch — pc
- Work 5 dc into the indicated st.
- Remove the hook from the working loop.
- Insert the hook from front to back through the top of the first dc in that group.
- Place the dropped loop back on the hook.
- Pull the loop through the first dc.
This completes 1 pc.
Do not add a closing chain. Work only the chains stated in the round instructions.
Beginning Popcorn — beg pc
- Ch 3; this counts as the first dc.
- Work 4 dc into the same st.
- Remove the hook from the working loop.
- Insert the hook through the top of the beg ch-3.
- Pick up the dropped loop and pull it through.
This completes the beg pc.
Three-Double-Crochet Group
Work 3 dc into the indicated sp.
Corner
Work (3 dc, ch 2, 3 dc) into the indicated corner sp.
Notes About Pattern
- Work each square in joined rounds with the RS facing throughout.
- Do not turn between rounds.
- The beg ch-3 counts as 1 dc in Rnds 3–5.
- Chains between popcorns form the spaces used in the next round.
- Work granny-style groups into spaces, rather than into individual dc stitches.
- Keep the ch-1 spaces relaxed so the square lies flat.
- Fasten off between colors as instructed.
- Make all squares with the same hook and similar tension.
- Weave in ends before assembling the blanket.
- Block the squares to the same size without stretching the flower centers.
- Stitch counts exclude chains unless stated otherwise.
Pattern Instructions
Step 1: Make the Flower Center
- With Color A, make a magic ring.
- Rnd 1: Ch 1, work 8 sc into the ring. Pull the ring closed. Sl st into the first sc to join. [8 sc]
- Fasten off Color A.
- If you prefer to avoid a magic ring, ch 4 and sl st into the first ch to form a ring. Work Rnd 1 into that ring.
Step 2: Make the Petals
- Join Color B with a sl st in any sc.
- Rnd 2: Work beg pc in the same st, ch 2. Work [pc in next sc, ch 2] 7 times. Sl st into the top of the beg pc to join. [8 pc, 8 ch-2 sps]
- Fasten off Color B.
- Gently push the popcorns toward the RS if needed. Count all eight petals before continuing.
Step 3: Turn the Flower Into a Square
Join Color C with a sl st in any ch-2 sp.
Rnd 3:
- Ch 3, work 2 dc, ch 2, and 3 dc in the same sp. First corner made.
- Ch 1, work 3 dc in the next ch-2 sp.
- Ch 1, work a corner in the next ch-2 sp.
- Rep Steps 2–3 twice more.
- Ch 1, work 3 dc in the final unused ch-2 sp.
- Ch 1, sl st into the top of the beg ch-3 to join.
Count: 36 dc, 4 corner ch-2 sps, and 8 ch-1 sps.
Each side has one 3-dc group between its corners.
Step 4: Add the First Frame Round
Rnd 4:
- Sl st across the next 2 dc and into the corner ch-2 sp.
- Ch 3, work 2 dc, ch 2, and 3 dc in the same corner sp.
- Ch 1, work 3 dc in the next ch-1 sp.
- Ch 1, work 3 dc in the next ch-1 sp.
- Ch 1, work a corner in the next corner ch-2 sp.
- Rep Steps 3–5 twice more.
- Along the final side, work [ch 1, 3 dc in next ch-1 sp] twice.
- Ch 1, sl st into the top of the beg ch-3 to join.
Count: 48 dc, 4 corner ch-2 sps, and 12 ch-1 sps.
Each side now has two 3-dc groups between its corners.
Step 5: Complete the Square
Rnd 5:
- Sl st across the next 2 dc and into the corner ch-2 sp.
- Ch 3, work 2 dc, ch 2, and 3 dc in the same corner sp.
- Work [ch 1, 3 dc in next ch-1 sp] 3 times.
- Ch 1, work a corner in the next corner ch-2 sp.
- Rep Steps 3–4 twice more.
- Along the final side, work [ch 1, 3 dc in next ch-1 sp] 3 times.
- Ch 1, sl st into the top of the beg ch-3 to join.
Count: 60 dc, 4 corner ch-2 sps, and 16 ch-1 sps.
Each side now has three 3-dc groups between its corners.
Fasten off and weave in the ends.
Step 6: Make and Block All Squares
Make 48 squares in total.
For an even mix of four petal colors, make 12 squares in each color.
Block each square to approximately 6 × 6 inches, following the yarn’s care instructions. Keep the corners square and allow the pieces to dry fully before joining.
Step 7: Arrange the Blanket
Lay out the squares in 8 rows of 6 squares.
Turn all squares with the RS facing up. Move the colors around until you are happy with the arrangement.
Take a photo of the layout to use as a guide during assembly.
Step 8: Join the Squares
Use Color C and a yarn needle to whipstitch the squares together.
- Place two neighboring squares side by side with the RS facing up.
- Match the corners and the stitches along the edges.
- Sew through the corresponding outer loops along both edges.
- At each ch-1 sp, pass the needle beneath the corresponding chain on each square.
- Secure the corner spaces together without pulling them tight.
- Continue until all six squares in the row are joined.
Join all eight rows in the same way, then sew the rows together.
Keep the seams relaxed. Tight seams can reduce the blanket’s size and cause the fabric to pucker.
Step 9: Work the Border Foundation
With the RS facing, join Color C in any outer corner ch-2 sp.
Border Rnd 1:
- Ch 1, work 3 sc in the corner sp. Mark the middle sc.
- Work 1 sc in each dc and 1 sc in each ch-1 sp along the edge.
- At a junction between squares, work 1 sc in each of the two adjoining corner sps.
- Work 3 sc in each of the remaining three outer blanket corners, marking the middle sc.
- Continue around and sl st into the first sc to join.
Do not work extra stitches into the seam itself.
Lay the blanket flat. If the edge ripples or pulls inward at a junction, adjust the stitches there before continuing.
Step 10: Finish the Border
- Border Rnd 2: Ch 1, sc in each st around, working 3 sc in each marked corner st. Move each marker to the middle sc of the new corner group. Sl st into the first sc to join.
- Border Rnd 3: Rep Border Rnd 2.
- Fasten off and weave in the remaining ends.
Step 11: Final Finishing
Spread the blanket flat and check the seams and corners.
Gently block the border if needed, following the yarn’s care instructions. Let the blanket dry fully before folding or using it.