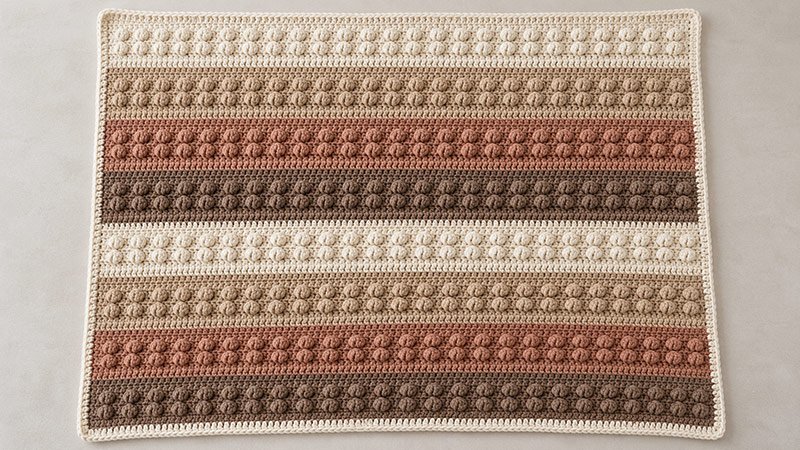
The Boho Puff Stripes Crochet Blanket pairs raised puff stitches with plain single crochet bands.
Cream, sand, clay, and muted brown stripes give the blanket a simple, earthy look. Each stripe uses the same 16-row repeat, which makes the pattern easy to follow once you finish the first section.
The puff rows are worked from the wrong side. This helps the raised stitches sit on the front of the blanket. A plain border finishes the edges without adding more texture.
These instructions describe an original blanket design using standard crochet stitches. Finished measurements and yarn amounts are estimates and depend on your gauge.
Skill level: Confident beginner
Terminology: US crochet terms
Materials
- Yarn: Approximately 2,000–2,300 yards of worsted-weight yarn.
- Color A, cream: 850–950 yards, including the border.
- Color B, sand: 400–450 yards.
- Color C, clay: 400–450 yards.
- Color D, muted brown: 350–450 yards.
- Hook: 5.5 mm crochet hook, or the size needed to meet gauge.
- Tapestry needle: For weaving in yarn ends.
- Scissors.
- Stitch markers: For marking corners and row ends.
- Measuring tape.
Use yarns with the same weight and similar fiber content so the stripes wash and stretch evenly.
Size
Estimated finished size: 36 inches wide × 44 inches long, including the border.
Blanket body: Approximately 34½ inches wide × 42½ inches long.
Gauge: Approximately 14 sts and 18 rows = 4 inches in sc, after washing and drying as directed on the yarn label.
The puff sections may change your row gauge. For a closer size estimate, make a swatch that includes one complete 16-row pattern repeat.
To adjust the width: Begin with an even number of chains. Your first row will have an odd number of stitches.
To adjust the length: Add or remove complete 16-row stripes. Each stripe adds approximately 3½ inches at the stated gauge.
Stitches
Abbreviations
- ch: Chain.
- sc: Single crochet.
- sl st: Slip stitch.
- st / sts: Stitch / stitches.
- yo: Yarn over.
- rep: Repeat.
- RS: Right side.
- WS: Wrong side.
- rnd: Round.
- puff: Puff stitch.
Single Crochet — sc
Insert the hook into the indicated st, yo, and pull up a loop. Yo and pull through both loops on the hook.
Puff Stitch — puff
- Yo and insert the hook into the indicated st.
- Yo and pull up a loop to approximately the height of a double crochet.
- Repeat Steps 1–2 twice more in the same st. You will have 7 loops on the hook.
- Yo and pull through all 7 loops.
- Ch 1 to secure the puff.
The securing ch does not count as a stitch. On the following row, work into the top of the puff and skip its securing ch.
Pattern Notes
- The turning ch 1 does not count as a st.
- Each body row contains 121 sts.
- Each puff row contains 60 puffs and 61 sc.
- Turn after every body row.
- Mark the RS after completing Row 1.
- All puff rows are worked with the WS facing you. Gently push each puff toward the RS.
- Change colors during the final pull-through of the last sc before a new stripe.
- Cut the old color after each stripe, leaving a 6-inch tail.
Pattern Instructions
Step 1: Choose Your Stripe Order
Work twelve stripes in the following order. Each stripe contains 16 rows.
| Stripe | Rows | Color |
|---|---|---|
| 1 | 1–16 | A — Cream |
| 2 | 17–32 | B — Sand |
| 3 | 33–48 | A — Cream |
| 4 | 49–64 | C — Clay |
| 5 | 65–80 | D — Muted brown |
| 6 | 81–96 | B — Sand |
| 7 | 97–112 | A — Cream |
| 8 | 113–128 | C — Clay |
| 9 | 129–144 | D — Muted brown |
| 10 | 145–160 | B — Sand |
| 11 | 161–176 | C — Clay |
| 12 | 177–192 | A — Cream |
Step 2: Make the Foundation
- With Color A, ch 122 loosely.
- If your starting chains tend to be tight, use a hook one size larger for the foundation chain. Return to your main hook for Row 1.
Step 3: Work the First Stripe
- Row 1 — RS: Sc in the second ch from the hook and in each remaining ch. Ch 1, turn. 121 sc.
- Place a marker on this side of the fabric to identify the RS.
- Rows 2–4: Sc in each st across. Ch 1, turn. 121 sc per row.
- Row 5 — RS: Sc in each st across. Ch 1, turn. 121 sc.
- Row 6 — WS, puff row: Sc in the first st. *Puff in the next st, sc in the next st; rep from * across. Ch 1, turn. 60 puffs and 61 sc.
- Row 7 — RS: Sc in each st across, working into the top of each puff and skipping its securing ch. Ch 1, turn. 121 sc.
- Row 8 — WS: Rep Row 6.
- Row 9 — RS: Rep Row 7.
- Row 10 — WS: Rep Row 6.
- Row 11 — RS: Rep Row 7.
- Row 12 — WS: Rep Row 6.
- Rows 13–16: Sc in each st across. Ch 1, turn. 121 sc per row.
- On Row 13, remember to skip the securing ch after each puff.
- During the final pull-through of Row 16, change to Color B.
Step 4: Work the Second Stripe
- The stitch sequence below is used for every remaining stripe.
- Stripe Rows 1–5: Sc in each st across. Ch 1, turn. 121 sc per row.
- Stripe Row 6: Sc in the first st. *Puff in the next st, sc in the next st; rep from * across. Ch 1, turn. 60 puffs and 61 sc.
- Stripe Row 7: Sc in each st across, skipping each puff’s securing ch. Ch 1, turn. 121 sc.
- Stripe Row 8: Rep Stripe Row 6.
- Stripe Row 9: Rep Stripe Row 7.
- Stripe Row 10: Rep Stripe Row 6.
- Stripe Row 11: Rep Stripe Row 7.
- Stripe Row 12: Rep Stripe Row 6.
- Stripe Rows 13–16: Sc in each st across. Ch 1, turn. 121 sc per row.
- Change to the next color during the final pull-through of Stripe Row 16.
Step 5: Complete the Blanket Body
Rep the 16-row stripe sequence from Step 4, following the color table, until you have completed all twelve stripes.
You should finish with:
- 192 body rows.
- 121 sts across.
- 48 puff rows.
After the final row, fasten off. Weave in the stripe ends before adding the border.
Step 6: Work the First Border Round
With the RS facing, join Color A in the first st after any corner.
Rnd 1:
- Ch 1 and sc in the same st.
- Sc evenly around the blanket.
- Along the top and bottom edges, work 1 sc in each st or foundation ch.
- Along each side edge, begin with approximately 1 sc in each row end.
- Work 3 sc in each corner.
- Mark the middle sc of each corner group.
- Sl st to the first sc to join.
Check that the blanket lies flat. If a side draws inward, add a few evenly spaced sts along that edge. If it ripples, reduce the number of side-edge sts.
Step 7: Finish the Border
- Rnd 2: Ch 1. Sc in each st around, working 3 sc in each marked corner st. Move each marker to the middle sc of the new corner group. Sl st to the first sc.
- Rnd 3: Rep Rnd 2.
- Fasten off and weave in all remaining ends.
Step 8: Wash and Shape
- Wash the blanket according to the yarn label.
- Gently press out excess water without wringing.
- Lay it flat and straighten the edges.
- Adjust the corners so the blanket forms an even rectangle.
- Allow it to dry fully, keeping the puff stitches raised.