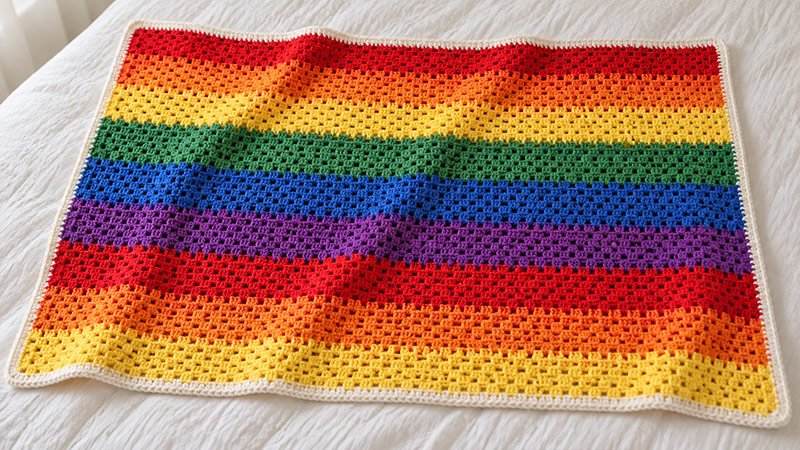
This Rainbow Moss Stitch Crochet Blanket uses single crochet and chain spaces to form a soft, close fabric. Bands of red, orange, yellow, green, blue, and purple run across the blanket, with a simple cream border around the edges.
The moss stitch has a one-row repeat after the foundation row. Each single crochet goes into a chain space from the row below, making the pattern easy to follow once the first few rows are complete.
This pattern uses US crochet terms. The instructions are written for this design, though common crochet stitches and methods may appear in other patterns.
Materials
- Yarn: Approximately 1,200–1,400 yards of worsted-weight yarn in total.
- Rainbow colors: Approximately 170–200 yards each of red, orange, yellow, green, blue, and purple.
- Border color: Approximately 180–200 yards of cream.
- Hook: 5 mm crochet hook, or the size needed to meet the suggested gauge.
- Scissors
- Yarn needle
- Measuring tape
- Stitch markers, optional.
Choose yarns with the same weight and similar fiber content so the stripes wash and stretch evenly.
Pattern Notes
- Skill level: Beginner.
- Finished size: Approximately 25 × 31 inches, including the border.
- Suggested gauge: 20 stitch positions and 20 rows = 4 inches in moss stitch. Each sc and each ch-1 space counts as one stitch position.
- Make a swatch before starting. Gauge affects the finished size and the amount of yarn required.
- The blanket is worked flat in rows. Turn at the end of each row.
- The starting ch 2 counts as the edge chain space, not as a sc.
- Work into the chain spaces rather than into the tops of the sc stitches.
- Each completed body row has 60 sc, with 59 ch-1 spaces between them and one edge ch-2 space.
- Place a marker in the starting ch-2 space if it is hard to see.
- To adjust the width, begin with an even number of chains. Keep the foundation chain loose or use a slightly larger hook for the chain only.
- To adjust the length, work more or fewer rows. Changing the stripe sizes will also change yarn requirements.
- Weave in all ends securely. Avoid adding fringe, buttons, or other loose decorations to a blanket intended for a baby.
Abbreviations
- ch: Chain
- sc: Single crochet
- sl st: Slip stitch
- st / sts: Stitch / stitches
- sp: Space
- sk: Skip
- rep: Repeat
- RS: Right side
Moss Stitch
For this pattern, moss stitch means alternating sc and ch 1, while skipping the sc stitches from the previous row. On later rows, work each sc into a ch-1 sp.
Color Sequence
Work 10 rows in each color:
- Red
- Orange
- Yellow
- Green
- Blue
- Purple
Repeat this 60-row sequence twice, then work another 10 rows each in red, orange, and yellow. The blanket body has 150 rows.
Pattern Instructions
Step 1: Make the Foundation Chain
With red, ch 122 loosely.
Do not count the loop on your hook as a chain.
Step 2: Work Row 1
- Sc in the fourth ch from the hook. The three skipped chains form the starting edge space.
- Ch 1, sk the next ch, sc in the next ch.
- Rep Step 2 across, ending with a sc in the last ch.
- Turn.
Count: 60 sc. There are 59 ch-1 spaces between the sc stitches, plus the starting edge space.
Step 3: Work Row 2
- Ch 2.
- Sk the first sc.
- Sc in the first ch-1 sp.
- Ch 1, sk the next sc, sc in the next ch-1 sp.
- Rep from * to * across the row until only the last sc and the starting edge space remain.
- Ch 1, sk the last sc, sc into the starting edge space.
- Turn.
Count: 60 sc, 59 ch-1 spaces between them, and one starting ch-2 space.
Step 4: Complete the First Stripe
Rows 3–10: Rep Row 2 with red.
Check the edges as you work. Each row should begin with ch 2 and end with a sc in the previous row’s starting edge space.
Step 5: Change to Orange
Change colors during the final sc of Row 10:
- Insert the hook into the final edge space.
- Yarn over with red and pull up a loop.
- Drop red.
- Yarn over with orange and pull through both loops.
- Cut red, leaving a tail of approximately 6 inches.
- Turn.
Row 11: With orange, ch 2 and work as for Row 2.
Rows 12–20: Rep Row 2 with orange.
Step 6: Continue the Rainbow Stripes
Continue repeating Row 2, changing colors every 10 rows.
| Rows | Color |
|---|---|
| 1–10 | Red |
| 11–20 | Orange |
| 21–30 | Yellow |
| 31–40 | Green |
| 41–50 | Blue |
| 51–60 | Purple |
| 61–70 | Red |
| 71–80 | Orange |
| 81–90 | Yellow |
| 91–100 | Green |
| 101–110 | Blue |
| 111–120 | Purple |
| 121–130 | Red |
| 131–140 | Orange |
| 141–150 | Yellow |
Keep 60 sc in every row.
After Row 150, fasten off, leaving a 6-inch tail.
Step 7: Prepare for the Border
- Lay the blanket flat.
- Check that the sides are straight and that no rows have missing stitches.
- Weave in the stripe ends along stitches of the matching color.
- Choose either side as the RS and keep it facing you while adding the border.
Step 8: Work Border Round 1
Join cream at a corner.
- Ch 1; this does not count as a st.
- Work 3 sc in the corner and mark the middle sc.
- Across the top edge, work 1 sc in each sc and 1 sc in each ch-1 sp.
- Work 3 sc at the next corner, marking the middle sc.
- Along the side, begin with approximately 1 sc in each row end.
- Work 3 sc at the bottom corner, marking the middle sc.
- Across the foundation edge, work 1 sc in each stitch base and each gap beneath a ch-1 sp.
- Work 3 sc at the remaining corner, marking the middle sc.
- Work up the second side to the starting corner.
- Join with a sl st to the first sc.
Do not count a corner placement again as an ordinary edge stitch.
Lay the blanket flat during this round. If the border ripples, use fewer stitches along the sides. If it pulls inward, add a few stitches evenly along the sides.
Step 9: Work Border Round 2
- Ch 1.
- Sc in each st around.
- Work 3 sc in each marked corner st, moving the marker to the new middle sc.
- Join with a sl st to the first sc.
Do not turn between border rounds.
Step 10: Work Border Round 3
Rep Border Round 2.
Fasten off and leave a 6-inch tail. Weave in the remaining ends securely.
Step 11: Finish the Blanket
Wash according to the yarn label. Gently shape the blanket into a rectangle and lay it flat to dry, without stretching the edges.