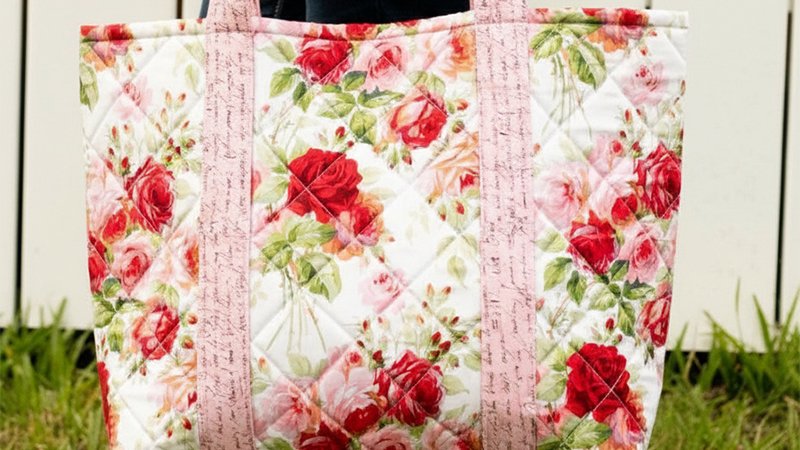
Pattern Description:
This super easy and fast-to-sew DIY big quilted tote bag features beautiful details. Its finished size is approximately 14” tall, 19” wide, and 4” deep, excluding the straps.
The pattern incorporates an attached lining and simple French seams, resulting in a design with no raw edges visible on the inside.
Flexible foam stabilizer, such as ByAnnie Soft and Stable, gives the bag its desired shape.
Materials Needed & Measurements:
| Material | Measurement (Total needed for project) | Cut Measurements (for key pieces) | Notes/Type |
| Fabric for the bag | 1 yard | One rectangle 33” tall and 42” wide. | If using directional fabric, the exterior print will be right side up, but the interior print will be upside down. |
| Fabric for the straps | 1/2 yard | Two 6” x 40” strips and four 6” x 10” strips. | These pieces are sewn together to make two 6” x 59” strips. |
| Foam Stabilizer | 1/2 yard | One rectangle 16” x 40”. | Must be at least 40” wide (ByAnnie Soft and Stable is 60” wide). This ingredient helps give the bag its beautiful shape. |
| Fusible Interfacing for the straps | 1/2 to 1 yard | Enough 6” strips to cover two straps measuring 6” x 49” with a slight overlap. | Pellon 809 Decor-Bond offers a crisp, firm feel. Pellon SF101 woven fusible interfacing is simpler to work with. |
Instructions for Making the Free Big Tote Bag Pattern:
Cutting
- Bag Fabric: Cut one rectangle measuring 33” tall and 42” wide from the main bag fabric. Be aware that if using directional fabric, the design will be right side up on the exterior, but upside down on the interior of the finished bag.
- Foam Stabilizer: Cut one rectangle measuring 16” x 40” from the foam stabilizer. It is suggested to mark the large foam piece with a pen and ruler before cutting.
If using light-colored fabric, cut inside any dark lines to prevent them from showing through.
- Strap Fabric: From the strap fabric, cut two strips measuring 6” x 40” and four strips measuring 6” x 10”.
These pieces are cut and sewn specifically so that the strap seams will be sewn to the bag, meaning they are not directly subjected to the weight of the bag contents.
- Fusible Interfacing: Cut enough 6” strips of fusible interfacing to cover two 6” x 49” straps with a slight overlap.
For a crisp, firm feel, Pellon 809 Decor-Bond can be used, though it requires patience for complete fusion; alternatively, Pellon SF101 woven fusible interfacing fuses faster and folds easier.
Attach the Foam Stabilizer
- Place the foam stabilizer piece against the wrong side of the main bag fabric rectangle. The 40” long edge of the foam should be centered on one of the 42” long edges of the fabric and positioned 1/2” away from the raw edge. Pin the foam stabilizer in place.
- Baste the foam stabilizer to the fabric, sewing 1/8” away from the edge of the foam.
- Fold the fabric over the stabilizer, ensuring it is flat on both sides. At the top, there will be a fold, and at the bottom, there will be two fabric raw edges with the stabilizer sandwiched between them.
- Turn the piece over so the basting stitches from Step 2 are visible, and pin the raw edges together along the bottom edge.
Note that it is more crucial for the fabric to be smooth on both sides than for the bottom raw edges to perfectly line up.
- Baste again, sewing directly on top of the previous line of basting stitches, catching both layers of fabric this time.
Topstitching and Optional Quilting
- Select one side of the main bag piece to be the exterior. If using directional fabric, choose the side where the print is right side up. The opposite side will serve as the interior of the tote.
- Topstitch along the top (folded) edge of the bag, sewing 1/2” away from the fold.
- Optional Quilting: If quilting is desired, perform it now, keeping all quilting stitches below the topstitching line across the top.
Diagonal lines in two directions, wavy lines, straight lines, or free motion quilting may be used, or the quilting step can be skipped entirely.
If the raw edges become uneven during quilting, do not worry, as extra fabric was added for trimming.
- Use a ruler to locate the edge of the foam, and trim the excess fabric 1/2” past the edge of the foam on both sides. (The example piece shrunk to 40” wide after quilting).
- Draw a vertical line down the exact center of the width of the piece (on the exterior side) using a fabric pen, such as a Frixion pen.
- Topstitch along this center vertical line, starting at the bottom raw edge and stopping at the topstitching line along the folded edge. Either backstitch neatly or pivot 180 degrees and sew back down to the bottom edge. This vertical line will function as one of the side “seams” on the finished bag.
Make the Straps
- Assembly: For each strap, sew a 6” x 10” piece to both ends of a 6” x 40” strip using a 1/4” seam allowance to create two 6” x 59” strips. Press the seams open.
- Interfacing: Apply 6” wide fusible interfacing strips to the back of both strap pieces. Leave 1/2” without interfacing at both short ends, and if overlapping interfacing strips, allow for a 1/4” overlap for smooth coverage.
- Folding and Pressing: Fold each strap in half lengthwise and press. Open the strap, fold the long edges to the center, and press again. Fold in half once more, press, and secure the folded edges together with Wonderclips.
- Strap Topstitching: Topstitch along both long edges of each strap, 1/8” from the edge.
- Placement Marking: On the exterior side of the bag, draw four additional vertical lines using a fabric pen to guide strap placement. Draw two lines 7” away from the raw outer edges, and draw two lines 6 1/2” from the center line.
- Pinning and Securing: Pin the straps to the sides of the bag so that the inside edge of each strap aligns against the marked vertical lines. The raw edges of the straps must line up with the bottom raw edges of the bag.
- Attach the long ends of each strap by sewing on top of the previous topstitching on the straps.
Sew from the bottom raw edges up to within 1/2” of the top, topstitch across the strap even with the bag’s topstitching, then pivot and sew down the other edge back to the bottom. Repeat this process four times to secure both straps.
Sew the Seams
- Side Seam (French Seam, Pass 1): Fold the bag in half with wrong sides together, aligning the short edges. The straps will be on the outside. Pin the side seam, focusing on lining up the top edges nicely. Sew the side seam using a 3/8” seam allowance.
- Trim the seam allowance to just 1/8”.
- Side Seam (French Seam, Pass 2): Turn the bag inside out. Sew across the side seam again with a 1/4” seam allowance to complete the French seam, which results in no visible raw edges.
- Bottom Seam (French Seam, Pass 1): Sew the second French seam along the bottom. Pin the raw edges together with the bag right side out. Stitch 1/8” to the right of the basting stitches on the bottom of the bag.
- Trim the seam allowance to 1/8” and turn the bag inside out.
- Bottom Seam (French Seam, Pass 2): Stitch along the bottom edge with a 1/4” seam allowance.
Box the Corners
- Flatten each corner of the bag by aligning the bottom seam with the side seam (remembering that one side ‘seam’ is the topstitching).
- Use a fabric pen to draw a 4” long line across the corner. Pin the corner flat.
- Sew across the drawn line, backstitching securely to finish the bag.