
Pattern Description:
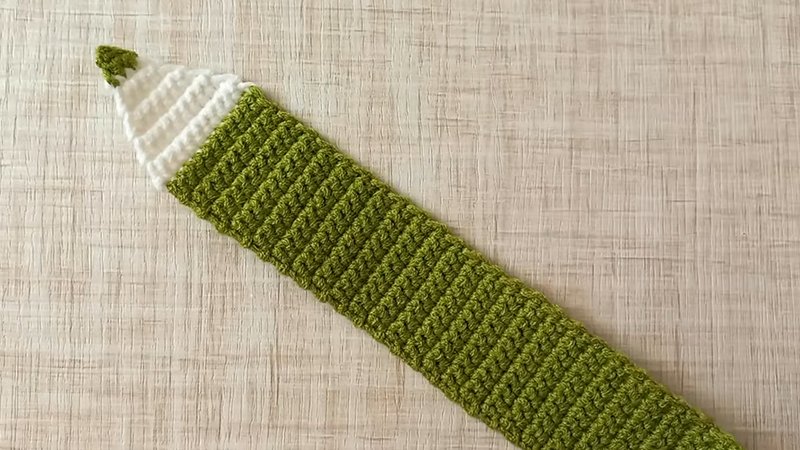
The Striped Pencil Bookmark is a crochet pattern primarily using Single Crochet (SC). It features a stripped design alternating a base color (BC) and a contrasting color (CC), often in sequences like CC-2BC-CC-2BC-CC-2BC-CC.
The pattern creates a rectangular length and finishes with a decreasing base cone and tip.
Materials Needed & Measurements:
| Item Category | Specific Item/Measurement | |
| Materials | Yarn: Stash Basket, scraps of yarn | |
| Crochet Hook: 5mm | ||
| Needles | ||
| Scissors | ||
| Measuring Tape | ||
| Stitch Marker (e.g., mini safety pins from clothing tags) | ||
| Defining Dimensions | Pencil Length: 9″ | |
| Width: 2″ |
Abbreviations
- BC: Base Colour.
- CC: Contrasting Colour.
- Ch: Chain.
- SC: Single Crochet.
- SCtog: Single Crochet Together (a decrease technique).
Instructions for Making the Crochet Striped Pencil Bookmark Pattern:
Striped Section
The overall process is stripped, alternating BC and CC. The specific example pattern detailed involves the sequence: CC-2BC-CC-2BC-CC-2BC-CC.
Pencil Length Construction
The length begins with a chain and then proceeds through rows of SC.
| Row | Instructions | Colour | Total Stitches |
| R1 | Starting with BC, Ch 30+1. SC from the 2\text{nd} hook. Ch 1 and turn. | BC | 30 SC |
| R2 | SC in every SC. Change to CC. Ch 1 and turn. | BC | 30 SC |
| R3 | SC in every SC. Change to BC. Ch 1 and turn. | CC | 30 SC |
Continuation: Continue placing SC in every subsequent row, Ch 1 and turn. Follow the sequence 2 BC-CC-2 BC- CC-2 BC.
Border and Edging
Once the rectangular length is completed, SC around the piece using the CC to form a defined border. To ensure a clear rectangular edge, place 3 SC in the corner SC.
Base Cone and Tip Construction
After the main length is completed, select one side of the piece to begin working the cone and tip. The pencil cone part utilizes BC (acting as the pencil’s “skin”), while the final tip uses CC.
Base Cone Instructions (Using BC)
The cone section involves a series of decreasing rows (SCtog).
| Row | Instructions | Colour | Total Stitches |
| R1 | Ch 1 and SC 10 times. Ch 1 and turn. | BC | 10 SC |
| R2 | SCtog, 6 SC, SCtog. Ch 1 and turn. | BC | 8 SC |
| R3 | SC in every SC. Ch 1 and turn. | BC | 8 SC |
| R4 | SCtog, 4 SC, SCtog. Ch 1 and turn. | BC | 6 SC |
| R5 | SC in every SC. Ch 1 and turn. | BC | 6 SC |
| R6 | SCtog, 2 SC, SCtog. Ch 1 and turn. | BC | 4 SC |
| R7 | SC in every SC. Change to CC. Ch 1 and turn. | BC | 4 SC |
Tip Instructions (Using CC)
The final section is crocheted with CC to form the point.
| Row | Instructions | Colour | Total Stitches |
| R8 | SCtog, SCtog. Ch 1 and turn. | CC | 2 SC |
| R9 | SC in every SC. Ch 1 and turn. | CC | 2 SC |
| R10 | SCtog and Slip Stitch. Sew the remaining strand. | CC |
Optional Finishing and Alterations
Once the bookmark is complete, optional alterations can enhance the design.
Finishing Touches
Optional additions include:
- Attaching a pom-pom that matches the base colour or the edging colour. Different techniques can be used to create the pom-pom.
- Attaching a tassel, beads, or flowers to the end of the bookmark.
- Removing the string and attaching a paper clip to use the item as a bookmark, or pasting it onto a wrapped gift for an interesting style.
- Adding a personal tag.
It is advised to maintain elegant simplicity and avoid over accessorizing the item, as too many additions may hide the inherent beauty of the pattern itself.


